菜鳥成長手冊—係統安裝全接觸
win98安裝
Windows Vista Beta1
紅旗Red Flag Linux 4.0
係統的安裝問題是非常多菜鳥朋友初次接觸電腦遇到的大問題,我找出了一些比較好的文章,希望能幫助大家解決日常安裝係統的一些問題。
Windows XP篇:
一、準備工作:
1.準備好Windows XP Professional簡體中文版安裝光盤,並檢查光驅是否支持自啟動。
2.可能的情況下,在運行安裝程序前用磁盤掃描程序掃描所有硬盤檢查硬盤錯誤並進行修複,否則安裝程序運行時如檢查到有硬盤錯誤即會很麻煩。
3.用紙張記錄安裝文件的產品密匙(安裝序列號)。
4.可能的情況下,用驅動程序備份工具(如:驅動精靈)將原Windows XP下的所有驅動程序備份到硬盤上(如∶F
rive)。最好能記蟲靼濉⑼?ā⑾鑰ǖ戎饕?布?男禿偶吧??Ъ遙?は認略厙??絛蟣贛謾?br /> 5.如果你想在安裝過程中格式化C盤或D盤(建議安裝過程中格式化C盤),請備份C盤或D盤有用的數據。
二、用光盤啟動係統:
(如果你已經知道方法請轉到下一步),重新啟動係統並把光驅設為第一啟動盤,保存設置並重啟。將XP安裝光盤放入光驅,重新啟動電腦。剛啟動時,當出現如下圖?臼笨燜侔聰祿爻導??裨蠆荒芷舳疿P係統光盤安裝。
 screen.width*0.7) {this.resized=true; this.width=screen.width*0.7; this.alt='Click here to open new window\nCTRL+Mouse wheel to zoom in/out';}
}" border="0" />
screen.width*0.7) {this.resized=true; this.width=screen.width*0.7; this.alt='Click here to open new window\nCTRL+Mouse wheel to zoom in/out';}
}" border="0" />
三、安裝Windows XP Professional
光盤自啟動後,如無意外即可見到安裝界麵,將出現如下圖所示。
 screen.width*0.7) {this.resized=true; this.width=screen.width*0.7; this.alt='Click here to open new window\nCTRL+Mouse wheel to zoom in/out';}
}" border="0" />
screen.width*0.7) {this.resized=true; this.width=screen.width*0.7; this.alt='Click here to open new window\nCTRL+Mouse wheel to zoom in/out';}
}" border="0" />
全中文提示,“要現在安裝WindowsXP,請按ENTER”,按回車鍵。
 screen.width*0.7) {this.resized=true; this.width=screen.width*0.7; this.alt='Click here to open new window\nCTRL+Mouse wheel to zoom in/out';}
}" border="0" />
screen.width*0.7) {this.resized=true; this.width=screen.width*0.7; this.alt='Click here to open new window\nCTRL+Mouse wheel to zoom in/out';}
}" border="0" />
許可協議,這裏沒有選擇的餘地,按“F8”鍵。
 screen.width*0.7) {this.resized=true; this.width=screen.width*0.7; this.alt='Click here to open new window\nCTRL+Mouse wheel to zoom in/out';}
}" border="0" />
screen.width*0.7) {this.resized=true; this.width=screen.width*0.7; this.alt='Click here to open new window\nCTRL+Mouse wheel to zoom in/out';}
}" border="0" />
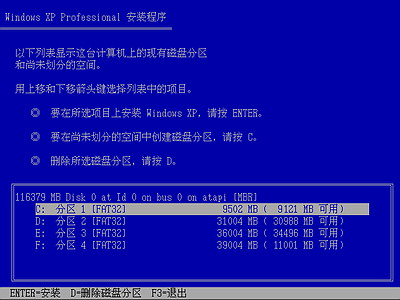
這裏用“向下或向上”方向鍵選擇安裝係統所用的分區,如果你已格式化C盤請選擇C分區,選擇好分區後按“Enter”鍵回車。
 screen.width*0.7) {this.resized=true; this.width=screen.width*0.7; this.alt='Click here to open new window\nCTRL+Mouse wheel to zoom in/out';}
}" border="0" />
screen.width*0.7) {this.resized=true; this.width=screen.width*0.7; this.alt='Click here to open new window\nCTRL+Mouse wheel to zoom in/out';}
}" border="0" />
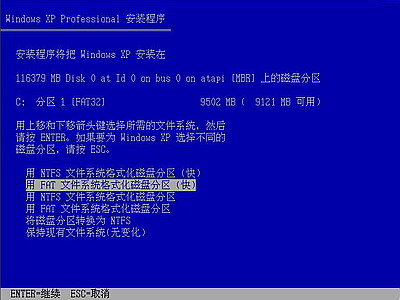
這裏對所選分區可以進行格式化,從而轉換文件係統格,或保存現有文件係統,有多種選擇的餘地,但要注意的是NTFS格式可節約磁盤空間提高安全xxx和減小磁盤碎片但同時存在很多問題OS和98/Me下看不到NTFS格式的分區,在這裏選“用FAT文件係統格式化磁盤分區(快),按“Enter”鍵回車。
 screen.width*0.7) {this.resized=true; this.width=screen.width*0.7; this.alt='Click here to open new window\nCTRL+Mouse wheel to zoom in/out';}
}" border="0" />
screen.width*0.7) {this.resized=true; this.width=screen.width*0.7; this.alt='Click here to open new window\nCTRL+Mouse wheel to zoom in/out';}
}" border="0" />
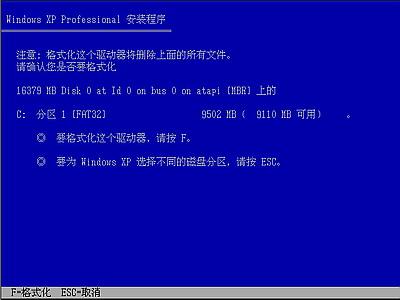
格式化C盤的警告,按F鍵將準備格式化c盤。
 screen.width*0.7) {this.resized=true; this.width=screen.width*0.7; this.alt='Click here to open new window\nCTRL+Mouse wheel to zoom in/out';}
}" border="0" />
screen.width*0.7) {this.resized=true; this.width=screen.width*0.7; this.alt='Click here to open new window\nCTRL+Mouse wheel to zoom in/out';}
}" border="0" />
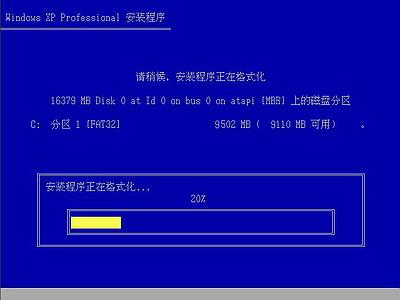
由於所選分區C的空間大於2048M(即2G),FAT文件係統不支持大於2048M的磁盤分區,所以安裝程序會用FAT32文件係統格式對C盤進行格式化,按“Enter”鍵回車。
 screen.width*0.7) {this.resized=true; this.width=screen.width*0.7; this.alt='Click here to open new window\nCTRL+Mouse wheel to zoom in/out';}
}" border="0" />
screen.width*0.7) {this.resized=true; this.width=screen.width*0.7; this.alt='Click here to open new window\nCTRL+Mouse wheel to zoom in/out';}
}" border="0" />
隻有用光盤啟動或安裝啟動軟盤啟動XP安裝程序,才能在安裝過程中提供格式化分區選項;如果用MS-DOS啟動盤啟動進入DOS下,運行i386winnt進行安裝XP時,安裝XP時沒有格式化分區選項。
 screen.width*0.7) {this.resized=true; this.width=screen.width*0.7; this.alt='Click here to open new window\nCTRL+Mouse wheel to zoom in/out';}
}" border="0" />
screen.width*0.7) {this.resized=true; this.width=screen.width*0.7; this.alt='Click here to open new window\nCTRL+Mouse wheel to zoom in/out';}
}" border="0" />
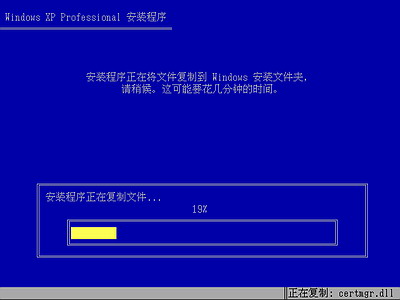
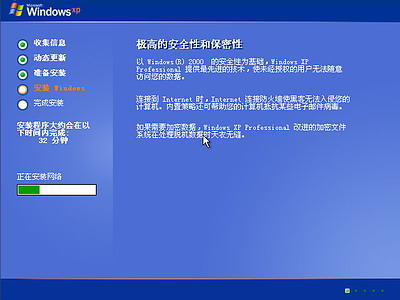
文件複製完後,安裝程序開始初始化Windows配置。然後係統將會自動在15秒後重新啟動。
 screen.width*0.7) {this.resized=true; this.width=screen.width*0.7; this.alt='Click here to open new window\nCTRL+Mouse wheel to zoom in/out';}
}" border="0" />
screen.width*0.7) {this.resized=true; this.width=screen.width*0.7; this.alt='Click here to open new window\nCTRL+Mouse wheel to zoom in/out';}
}" border="0" />
過5分鍾後,當提示還需33分鍾時將出現。
 screen.width*0.7) {this.resized=true; this.width=screen.width*0.7; this.alt='Click here to open new window\nCTRL+Mouse wheel to zoom in/out';}
}" border="0" />
screen.width*0.7) {this.resized=true; this.width=screen.width*0.7; this.alt='Click here to open new window\nCTRL+Mouse wheel to zoom in/out';}
}" border="0" />
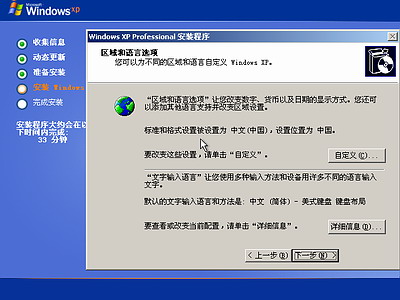
區域和語言設置選用默認值就可以了,直接點“下一步”按鈕。
 screen.width*0.7) {this.resized=true; this.width=screen.width*0.7; this.alt='Click here to open new window\nCTRL+Mouse wheel to zoom in/out';}
}" border="0" />
screen.width*0.7) {this.resized=true; this.width=screen.width*0.7; this.alt='Click here to open new window\nCTRL+Mouse wheel to zoom in/out';}
}" border="0" />
這裏輸入你想好的姓名和單位,這裏的姓名是你以後注冊的用戶名,點“下一步”按鈕。
 screen.width*0.7) {this.resized=true; this.width=screen.width*0.7; this.alt='Click here to open new window\nCTRL+Mouse wheel to zoom in/out';}
}" border="0" />
screen.width*0.7) {this.resized=true; this.width=screen.width*0.7; this.alt='Click here to open new window\nCTRL+Mouse wheel to zoom in/out';}
}" border="0" />
如果你沒觴xxは燃竅虜?訪茉浚ò滄靶蛄瀉牛┚痛蠹?呂玻≌飫鍤淙氚滄靶蛄瀉牛?恪跋亂徊健卑磁ァ?/font>
 screen.width*0.7) {this.resized=true; this.width=screen.width*0.7; this.alt='Click here to open new window\nCTRL+Mouse wheel to zoom in/out';}
}" border="0" />
screen.width*0.7) {this.resized=true; this.width=screen.width*0.7; this.alt='Click here to open new window\nCTRL+Mouse wheel to zoom in/out';}
}" border="0" />
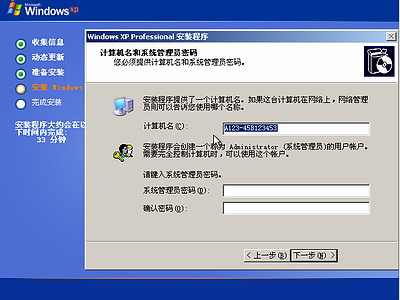
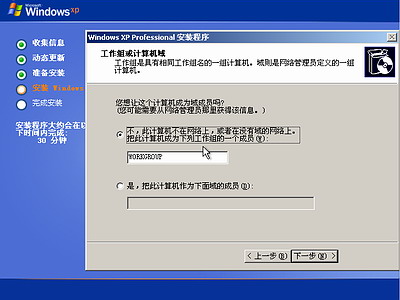
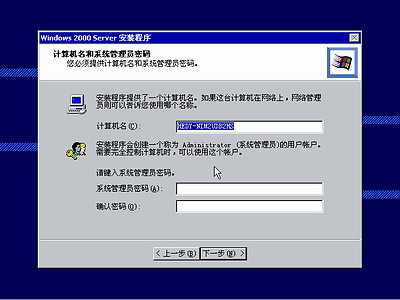
安裝程序自動為你創建又長又難看的計算機名稱,自己可任意更改,輸入兩次係統管理員密碼,請記住這個密碼,Administrator係統管理員在係統中具有最高權限,平時登陸係統不需要這個帳號。接著點“下一步”出現如下圖。
 screen.width*0.7) {this.resized=true; this.width=screen.width*0.7; this.alt='Click here to open new window\nCTRL+Mouse wheel to zoom in/out';}
}" border="0" />
screen.width*0.7) {this.resized=true; this.width=screen.width*0.7; this.alt='Click here to open new window\nCTRL+Mouse wheel to zoom in/out';}
}" border="0" />
日期和時間設置不用講,選北京時間,點“下一步”。
 screen.width*0.7) {this.resized=true; this.width=screen.width*0.7; this.alt='Click here to open new window\nCTRL+Mouse wheel to zoom in/out';}
}" border="0" />
screen.width*0.7) {this.resized=true; this.width=screen.width*0.7; this.alt='Click here to open new window\nCTRL+Mouse wheel to zoom in/out';}
}" border="0" />
開始安裝,複製係統文件、安裝網絡係統。
 screen.width*0.7) {this.resized=true; this.width=screen.width*0.7; this.alt='Click here to open new window\nCTRL+Mouse wheel to zoom in/out';}
}" border="0" />
screen.width*0.7) {this.resized=true; this.width=screen.width*0.7; this.alt='Click here to open new window\nCTRL+Mouse wheel to zoom in/out';}
}" border="0" />
讓你選擇網絡安裝所用的方式,選典型設置點“下一步”。
 screen.width*0.7) {this.resized=true; this.width=screen.width*0.7; this.alt='Click here to open new window\nCTRL+Mouse wheel to zoom in/out';}
}" border="0" />
screen.width*0.7) {this.resized=true; this.width=screen.width*0.7; this.alt='Click here to open new window\nCTRL+Mouse wheel to zoom in/out';}
}" border="0" />
點“下一步”出現如下圖。
 screen.width*0.7) {this.resized=true; this.width=screen.width*0.7; this.alt='Click here to open new window\nCTRL+Mouse wheel to zoom in/out';}
}" border="0" />
screen.width*0.7) {this.resized=true; this.width=screen.width*0.7; this.alt='Click here to open new window\nCTRL+Mouse wheel to zoom in/out';}
}" border="0" />
繼續安裝,到這裏後就不用你參與了,安裝程序會自動完成全過程。
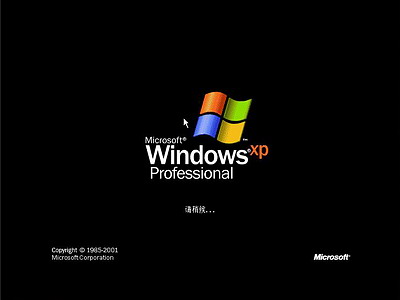
安裝完成後自動重新啟動,出現啟動畫麵。
 screen.width*0.7) {this.resized=true; this.width=screen.width*0.7; this.alt='Click here to open new window\nCTRL+Mouse wheel to zoom in/out';}
}" border="0" />
screen.width*0.7) {this.resized=true; this.width=screen.width*0.7; this.alt='Click here to open new window\nCTRL+Mouse wheel to zoom in/out';}
}" border="0" />
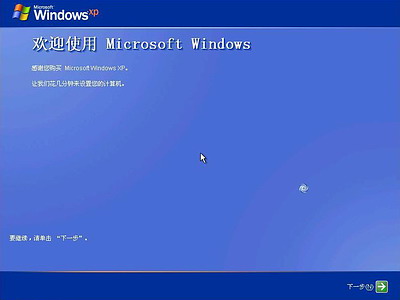
第一次啟動需要較長時間,請耐心等候,接下來是歡迎使用畫麵,提示設置係統。
 screen.width*0.7) {this.resized=true; this.width=screen.width*0.7; this.alt='Click here to open new window\nCTRL+Mouse wheel to zoom in/out';}
}" border="0" />
screen.width*0.7) {this.resized=true; this.width=screen.width*0.7; this.alt='Click here to open new window\nCTRL+Mouse wheel to zoom in/out';}
}" border="0" />
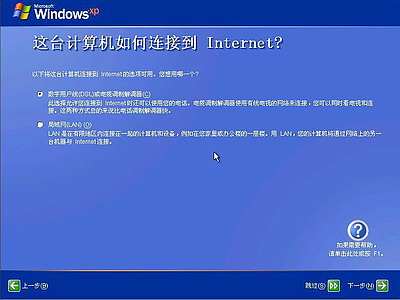
點擊右下角的“下一步”按鈕,出現設置上網連接畫麵。
 screen.width*0.7) {this.resized=true; this.width=screen.width*0.7; this.alt='Click here to open new window\nCTRL+Mouse wheel to zoom in/out';}
}" border="0" />
screen.width*0.7) {this.resized=true; this.width=screen.width*0.7; this.alt='Click here to open new window\nCTRL+Mouse wheel to zoom in/out';}
}" border="0" />
這裏建立的寬帶撥號連接,不會在桌麵上建立撥號連接快捷方式,且默認的撥號連接名稱為“我的ISP”(自定義除外);進入桌麵後通過連接向導建立的寬帶撥號連接,在桌麵上會建立撥號連接快捷方式,且默認的撥號連接名稱為“寬帶連接”(自定義除外)。如果你不想在這裏建立寬帶撥號連接,請點擊“跳過”按鈕。
在這裏我先創建一個寬帶連接,選第一項“數字用戶線(ADSL)或電纜調製解調器”,點擊“下一步”按鈕。
 screen.width*0.7) {this.resized=true; this.width=screen.width*0.7; this.alt='Click here to open new window\nCTRL+Mouse wheel to zoom in/out';}
}" border="0" />
screen.width*0.7) {this.resized=true; this.width=screen.width*0.7; this.alt='Click here to open new window\nCTRL+Mouse wheel to zoom in/out';}
}" border="0" />
目前使用的電信或聯通(ADSL)住宅用戶都有帳號和密碼的,所以我選“是,我使用用戶名和密碼連接”,點擊“下一步”按鈕。
 screen.width*0.7) {this.resized=true; this.width=screen.width*0.7; this.alt='Click here to open new window\nCTRL+Mouse wheel to zoom in/out';}
}" border="0" />
screen.width*0.7) {this.resized=true; this.width=screen.width*0.7; this.alt='Click here to open new window\nCTRL+Mouse wheel to zoom in/out';}
}" border="0" />
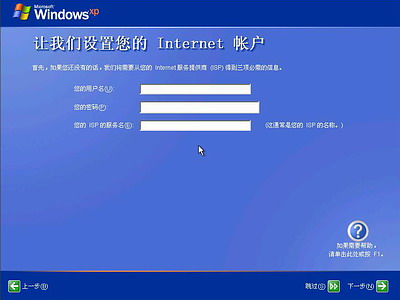
輸入電信或聯通提供的帳號和密碼,在“你的ISP的服務名”處輸入你喜歡的名稱,該名稱作為撥號連接快捷菜單的名稱,如果留空係統會自動創建名為“我的ISP”作為該連接的名稱,點擊“下一步”按鈕。
 screen.width*0.7) {this.resized=true; this.width=screen.width*0.7; this.alt='Click here to open new window\nCTRL+Mouse wheel to zoom in/out';}
}" border="0" />
screen.width*0.7) {this.resized=true; this.width=screen.width*0.7; this.alt='Click here to open new window\nCTRL+Mouse wheel to zoom in/out';}
}" border="0" />
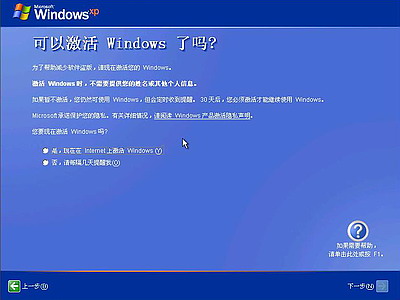
已經建立了撥號連接,微軟當然想你現在就激活XP啦,不過即使不激活也有30天的試用期,又何必急呢?選擇“否,請等候幾天提醒我”,點擊“下一步”按鈕。
 screen.width*0.7) {this.resized=true; this.width=screen.width*0.7; this.alt='Click here to open new window\nCTRL+Mouse wheel to zoom in/out';}
}" border="0" />
screen.width*0.7) {this.resized=true; this.width=screen.width*0.7; this.alt='Click here to open new window\nCTRL+Mouse wheel to zoom in/out';}
}" border="0" />
輸入一個你平時用來登陸計算機的用戶名,點下一步。
 screen.width*0.7) {this.resized=true; this.width=screen.width*0.7; this.alt='Click here to open new window\nCTRL+Mouse wheel to zoom in/out';}
}" border="0" />
screen.width*0.7) {this.resized=true; this.width=screen.width*0.7; this.alt='Click here to open new window\nCTRL+Mouse wheel to zoom in/out';}
}" border="0" />
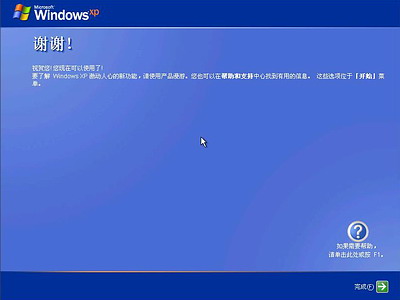
點擊完成,就結束安裝。係統將注銷並重新以新用戶身份登陸。登陸桌麵。
 screen.width*0.7) {this.resized=true; this.width=screen.width*0.7; this.alt='Click here to open new window\nCTRL+Mouse wheel to zoom in/out';}
}" border="0" />
screen.width*0.7) {this.resized=true; this.width=screen.width*0.7; this.alt='Click here to open new window\nCTRL+Mouse wheel to zoom in/out';}
}" border="0" />
看到了藍天白雲的畫麵,你就知道是什麽回事。可是桌麵上就隻有回收站一個圖標。想找回常見的圖標請看下麵。
六、找回常見的圖標
在桌麵上點開始-->連接到-->寬帶連接,如下圖。
 screen.width*0.7) {this.resized=true; this.width=screen.width*0.7; this.alt='Click here to open new window\nCTRL+Mouse wheel to zoom in/out';}
}" border="0" />
screen.width*0.7) {this.resized=true; this.width=screen.width*0.7; this.alt='Click here to open new window\nCTRL+Mouse wheel to zoom in/out';}
}" border="0" />
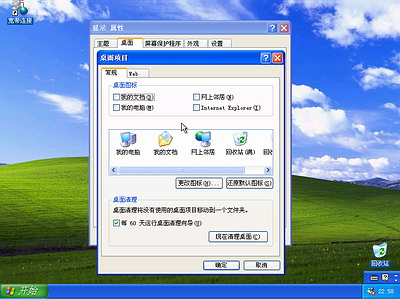
在圖中的左下部點擊“自定義桌麵”按鈕。
 screen.width*0.7) {this.resized=true; this.width=screen.width*0.7; this.alt='Click here to open new window\nCTRL+Mouse wheel to zoom in/out';}
}" border="0" />
screen.width*0.7) {this.resized=true; this.width=screen.width*0.7; this.alt='Click here to open new window\nCTRL+Mouse wheel to zoom in/out';}
}" border="0" />
在圖中的上部,將“我的文檔”、“我的電腦”、“網上鄰居”和“InternetExplorer”四個項目前麵的空格上打鉤,然後點“確定”,再“確定”,你將會看到桌麵上多了你想要的圖標。
 screen.width*0.7) {this.resized=true; this.width=screen.width*0.7; this.alt='Click here to open new window\nCTRL+Mouse wheel to zoom in/out';}
}" border="0" />
screen.width*0.7) {this.resized=true; this.width=screen.width*0.7; this.alt='Click here to open new window\nCTRL+Mouse wheel to zoom in/out';}
}" border="0" />
有關其它方麵的功能的設置方法請參考-->功能設置。
安裝Windows 2000
安裝Windows 2003Windows XP篇:
一、準備工作:
1.準備好Windows XP Professional簡體中文版安裝光盤,並檢查光驅是否支持自啟動。
2.可能的情況下,在運行安裝程序前用磁盤掃描程序掃描所有硬盤檢查硬盤錯誤並進行修複,否則安裝程序運行時如檢查到有硬盤錯誤即會很麻煩。
3.用紙張記錄安裝文件的產品密匙(安裝序列號)。
4.可能的情況下,用驅動程序備份工具(如:驅動精靈)將原Windows XP下的所有驅動程序備份到硬盤上(如∶F
rive)。最好能記蟲靼濉⑼?ā⑾鑰ǖ戎饕?布?男禿偶吧??Ъ遙?は認略厙??絛蟣贛謾?br /> 5.如果你想在安裝過程中格式化C盤或D盤(建議安裝過程中格式化C盤),請備份C盤或D盤有用的數據。
二、用光盤啟動係統:
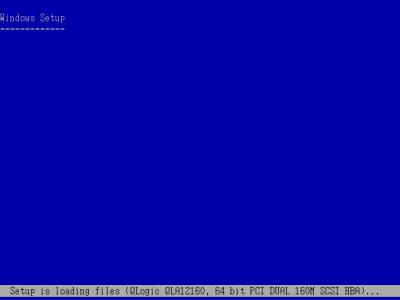
(如果你已經知道方法請轉到下一步),重新啟動係統並把光驅設為第一啟動盤,保存設置並重啟。將XP安裝光盤放入光驅,重新啟動電腦。剛啟動時,當出現如下圖?臼笨燜侔聰祿爻導??裨蠆荒芷舳疿P係統光盤安裝。
screen.width*0.7) {this.resized=true; this.width=screen.width*0.7; this.alt='Click here to open new window\nCTRL+Mouse wheel to zoom in/out';}
}" border="0" />三、安裝Windows XP Professional
光盤自啟動後,如無意外即可見到安裝界麵,將出現如下圖所示。
screen.width*0.7) {this.resized=true; this.width=screen.width*0.7; this.alt='Click here to open new window\nCTRL+Mouse wheel to zoom in/out';}
}" border="0" />全中文提示,“要現在安裝WindowsXP,請按ENTER”,按回車鍵。
screen.width*0.7) {this.resized=true; this.width=screen.width*0.7; this.alt='Click here to open new window\nCTRL+Mouse wheel to zoom in/out';}
}" border="0" />許可協議,這裏沒有選擇的餘地,按“F8”鍵。
screen.width*0.7) {this.resized=true; this.width=screen.width*0.7; this.alt='Click here to open new window\nCTRL+Mouse wheel to zoom in/out';}
}" border="0" />這裏用“向下或向上”方向鍵選擇安裝係統所用的分區,如果你已格式化C盤請選擇C分區,選擇好分區後按“Enter”鍵回車。
screen.width*0.7) {this.resized=true; this.width=screen.width*0.7; this.alt='Click here to open new window\nCTRL+Mouse wheel to zoom in/out';}
}" border="0" />這裏對所選分區可以進行格式化,從而轉換文件係統格,或保存現有文件係統,有多種選擇的餘地,但要注意的是NTFS格式可節約磁盤空間提高安全xxx和減小磁盤碎片但同時存在很多問題OS和98/Me下看不到NTFS格式的分區,在這裏選“用FAT文件係統格式化磁盤分區(快),按“Enter”鍵回車。
screen.width*0.7) {this.resized=true; this.width=screen.width*0.7; this.alt='Click here to open new window\nCTRL+Mouse wheel to zoom in/out';}
}" border="0" />格式化C盤的警告,按F鍵將準備格式化c盤。
screen.width*0.7) {this.resized=true; this.width=screen.width*0.7; this.alt='Click here to open new window\nCTRL+Mouse wheel to zoom in/out';}
}" border="0" />由於所選分區C的空間大於2048M(即2G),FAT文件係統不支持大於2048M的磁盤分區,所以安裝程序會用FAT32文件係統格式對C盤進行格式化,按“Enter”鍵回車。
screen.width*0.7) {this.resized=true; this.width=screen.width*0.7; this.alt='Click here to open new window\nCTRL+Mouse wheel to zoom in/out';}
}" border="0" />隻有用光盤啟動或安裝啟動軟盤啟動XP安裝程序,才能在安裝過程中提供格式化分區選項;如果用MS-DOS啟動盤啟動進入DOS下,運行i386winnt進行安裝XP時,安裝XP時沒有格式化分區選項。
screen.width*0.7) {this.resized=true; this.width=screen.width*0.7; this.alt='Click here to open new window\nCTRL+Mouse wheel to zoom in/out';}
}" border="0" />文件複製完後,安裝程序開始初始化Windows配置。然後係統將會自動在15秒後重新啟動。
screen.width*0.7) {this.resized=true; this.width=screen.width*0.7; this.alt='Click here to open new window\nCTRL+Mouse wheel to zoom in/out';}
}" border="0" />過5分鍾後,當提示還需33分鍾時將出現。
screen.width*0.7) {this.resized=true; this.width=screen.width*0.7; this.alt='Click here to open new window\nCTRL+Mouse wheel to zoom in/out';}
}" border="0" />區域和語言設置選用默認值就可以了,直接點“下一步”按鈕。
screen.width*0.7) {this.resized=true; this.width=screen.width*0.7; this.alt='Click here to open new window\nCTRL+Mouse wheel to zoom in/out';}
}" border="0" />這裏輸入你想好的姓名和單位,這裏的姓名是你以後注冊的用戶名,點“下一步”按鈕。
screen.width*0.7) {this.resized=true; this.width=screen.width*0.7; this.alt='Click here to open new window\nCTRL+Mouse wheel to zoom in/out';}
}" border="0" />如果你沒觴xxは燃竅虜?訪茉浚ò滄靶蛄瀉牛┚痛蠹?呂玻≌飫鍤淙氚滄靶蛄瀉牛?恪跋亂徊健卑磁ァ?/font>
screen.width*0.7) {this.resized=true; this.width=screen.width*0.7; this.alt='Click here to open new window\nCTRL+Mouse wheel to zoom in/out';}
}" border="0" />安裝程序自動為你創建又長又難看的計算機名稱,自己可任意更改,輸入兩次係統管理員密碼,請記住這個密碼,Administrator係統管理員在係統中具有最高權限,平時登陸係統不需要這個帳號。接著點“下一步”出現如下圖。
screen.width*0.7) {this.resized=true; this.width=screen.width*0.7; this.alt='Click here to open new window\nCTRL+Mouse wheel to zoom in/out';}
}" border="0" />日期和時間設置不用講,選北京時間,點“下一步”。
screen.width*0.7) {this.resized=true; this.width=screen.width*0.7; this.alt='Click here to open new window\nCTRL+Mouse wheel to zoom in/out';}
}" border="0" />開始安裝,複製係統文件、安裝網絡係統。
screen.width*0.7) {this.resized=true; this.width=screen.width*0.7; this.alt='Click here to open new window\nCTRL+Mouse wheel to zoom in/out';}
}" border="0" />讓你選擇網絡安裝所用的方式,選典型設置點“下一步”。
screen.width*0.7) {this.resized=true; this.width=screen.width*0.7; this.alt='Click here to open new window\nCTRL+Mouse wheel to zoom in/out';}
}" border="0" />點“下一步”出現如下圖。
screen.width*0.7) {this.resized=true; this.width=screen.width*0.7; this.alt='Click here to open new window\nCTRL+Mouse wheel to zoom in/out';}
}" border="0" />繼續安裝,到這裏後就不用你參與了,安裝程序會自動完成全過程。
安裝完成後自動重新啟動,出現啟動畫麵。
screen.width*0.7) {this.resized=true; this.width=screen.width*0.7; this.alt='Click here to open new window\nCTRL+Mouse wheel to zoom in/out';}
}" border="0" />第一次啟動需要較長時間,請耐心等候,接下來是歡迎使用畫麵,提示設置係統。
screen.width*0.7) {this.resized=true; this.width=screen.width*0.7; this.alt='Click here to open new window\nCTRL+Mouse wheel to zoom in/out';}
}" border="0" />點擊右下角的“下一步”按鈕,出現設置上網連接畫麵。
screen.width*0.7) {this.resized=true; this.width=screen.width*0.7; this.alt='Click here to open new window\nCTRL+Mouse wheel to zoom in/out';}
}" border="0" />這裏建立的寬帶撥號連接,不會在桌麵上建立撥號連接快捷方式,且默認的撥號連接名稱為“我的ISP”(自定義除外);進入桌麵後通過連接向導建立的寬帶撥號連接,在桌麵上會建立撥號連接快捷方式,且默認的撥號連接名稱為“寬帶連接”(自定義除外)。如果你不想在這裏建立寬帶撥號連接,請點擊“跳過”按鈕。
在這裏我先創建一個寬帶連接,選第一項“數字用戶線(ADSL)或電纜調製解調器”,點擊“下一步”按鈕。
screen.width*0.7) {this.resized=true; this.width=screen.width*0.7; this.alt='Click here to open new window\nCTRL+Mouse wheel to zoom in/out';}
}" border="0" />目前使用的電信或聯通(ADSL)住宅用戶都有帳號和密碼的,所以我選“是,我使用用戶名和密碼連接”,點擊“下一步”按鈕。
screen.width*0.7) {this.resized=true; this.width=screen.width*0.7; this.alt='Click here to open new window\nCTRL+Mouse wheel to zoom in/out';}
}" border="0" />輸入電信或聯通提供的帳號和密碼,在“你的ISP的服務名”處輸入你喜歡的名稱,該名稱作為撥號連接快捷菜單的名稱,如果留空係統會自動創建名為“我的ISP”作為該連接的名稱,點擊“下一步”按鈕。
screen.width*0.7) {this.resized=true; this.width=screen.width*0.7; this.alt='Click here to open new window\nCTRL+Mouse wheel to zoom in/out';}
}" border="0" />已經建立了撥號連接,微軟當然想你現在就激活XP啦,不過即使不激活也有30天的試用期,又何必急呢?選擇“否,請等候幾天提醒我”,點擊“下一步”按鈕。
screen.width*0.7) {this.resized=true; this.width=screen.width*0.7; this.alt='Click here to open new window\nCTRL+Mouse wheel to zoom in/out';}
}" border="0" />輸入一個你平時用來登陸計算機的用戶名,點下一步。
screen.width*0.7) {this.resized=true; this.width=screen.width*0.7; this.alt='Click here to open new window\nCTRL+Mouse wheel to zoom in/out';}
}" border="0" />點擊完成,就結束安裝。係統將注銷並重新以新用戶身份登陸。登陸桌麵。
screen.width*0.7) {this.resized=true; this.width=screen.width*0.7; this.alt='Click here to open new window\nCTRL+Mouse wheel to zoom in/out';}
}" border="0" />看到了藍天白雲的畫麵,你就知道是什麽回事。可是桌麵上就隻有回收站一個圖標。想找回常見的圖標請看下麵。
六、找回常見的圖標
在桌麵上點開始-->連接到-->寬帶連接,如下圖。
screen.width*0.7) {this.resized=true; this.width=screen.width*0.7; this.alt='Click here to open new window\nCTRL+Mouse wheel to zoom in/out';}
}" border="0" />在圖中的左下部點擊“自定義桌麵”按鈕。
screen.width*0.7) {this.resized=true; this.width=screen.width*0.7; this.alt='Click here to open new window\nCTRL+Mouse wheel to zoom in/out';}
}" border="0" />在圖中的上部,將“我的文檔”、“我的電腦”、“網上鄰居”和“InternetExplorer”四個項目前麵的空格上打鉤,然後點“確定”,再“確定”,你將會看到桌麵上多了你想要的圖標。
screen.width*0.7) {this.resized=true; this.width=screen.width*0.7; this.alt='Click here to open new window\nCTRL+Mouse wheel to zoom in/out';}
}" border="0" />有關其它方麵的功能的設置方法請參考-->功能設置。
安裝Windows 2000
windows 2000 server篇:
一、準備工作:
1.準備好Windows 2000 server簡體中文版安裝光盤,並檢查光驅是否支持自啟動。
2.可能的情況下,在運行安裝程序前用磁盤掃描程序掃描所有硬盤檢查硬盤錯誤並進行修複,否則安裝程序運行時如檢查到有硬盤錯誤即會很麻煩。
3.用紙張記錄安裝文件的產品密匙(安裝序列號)。
4.可能的情況下,用驅動程序備份工具(如:驅動精靈)將原Windows 2000下的所有驅動程序備份到硬盤上(如∶Frive)。最好能記蟲靼濉⑼?ā⑾鑰ǖ戎饕?布?男禿偶吧??Ъ遙?は認略厙??絛蟣贛謾?br /> 5.如果你想在安裝過程中格式化C盤或D盤(建議安裝過程中格式化C盤),請備份C盤或D盤有用的數據。
二、用光盤啟動係統:
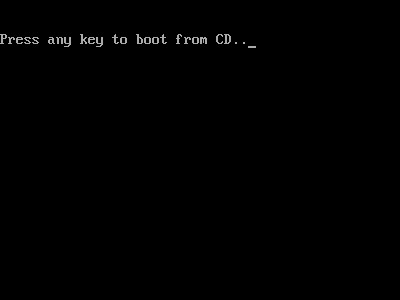
(如果你已經知道方法請轉到下一步),將2000安裝光盤放入光驅,重新啟動係統並把光驅設為第一啟動盤,保存設置並重啟,如無意外即可見到安裝界麵:
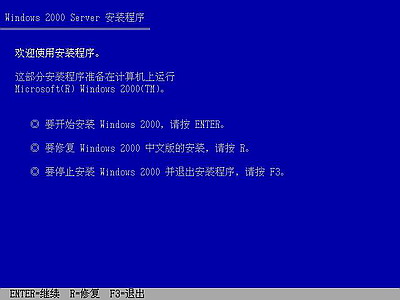
三、安裝Windows 2000 server
光盤自啟動後,如無意外即可見到安裝界麵,將出現如下圖所示。
 screen.width*0.7) {this.resized=true; this.width=screen.width*0.7; this.alt='Click here to open new window\nCTRL+Mouse wheel to zoom in/out';}
}" border="0" />
screen.width*0.7) {this.resized=true; this.width=screen.width*0.7; this.alt='Click here to open new window\nCTRL+Mouse wheel to zoom in/out';}
}" border="0" />
這一步有三個選項“1.要開始安裝Windows 2000,請按ENTER;2.要修複Windows 2000中文版的安裝,請按R3。要停止安裝Windows 2000並退出安裝程序,請按F3”在這裏我們選第一項按“Enter”鍵回車,出現下圖所示。
 screen.width*0.7) {this.resized=true; this.width=screen.width*0.7; this.alt='Click here to open new window\nCTRL+Mouse wheel to zoom in/out';}
}" border="0" />
screen.width*0.7) {this.resized=true; this.width=screen.width*0.7; this.alt='Click here to open new window\nCTRL+Mouse wheel to zoom in/out';}
}" border="0" />
許可協議,這裏沒有選擇的餘地,按“F8”。
 screen.width*0.7) {this.resized=true; this.width=screen.width*0.7; this.alt='Click here to open new window\nCTRL+Mouse wheel to zoom in/out';}
}" border="0" />
screen.width*0.7) {this.resized=true; this.width=screen.width*0.7; this.alt='Click here to open new window\nCTRL+Mouse wheel to zoom in/out';}
}" border="0" />
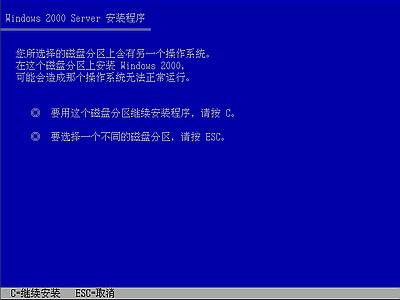
這裏用“向下或向上”箭頭鍵選擇安裝係統所用的分區,選擇好分區後按“Enter”鍵回車,安裝程序將檢查所選分區,如果這個分區己經安裝了另一個係統會出現下圖。
 screen.width*0.7) {this.resized=true; this.width=screen.width*0.7; this.alt='Click here to open new window\nCTRL+Mouse wheel to zoom in/out';}
}" border="0" />
screen.width*0.7) {this.resized=true; this.width=screen.width*0.7; this.alt='Click here to open new window\nCTRL+Mouse wheel to zoom in/out';}
}" border="0" />
要使用所選的分區安裝,按“C”鍵。
 screen.width*0.7) {this.resized=true; this.width=screen.width*0.7; this.alt='Click here to open new window\nCTRL+Mouse wheel to zoom in/out';}
}" border="0" />
screen.width*0.7) {this.resized=true; this.width=screen.width*0.7; this.alt='Click here to open new window\nCTRL+Mouse wheel to zoom in/out';}
}" border="0" />
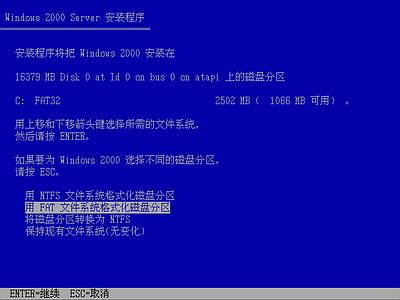
這裏對所選分區可以進行格式化,從而轉換文件係統格式,或保存現有文件係統,有多種選擇的餘地,但要注意的是NTFS格式可節約磁盤空間提高安全xxx和減小磁盤碎片但同時存在很多問題OS和98/Me下看不到NTFS格式的分區(這兒既然是Server,個人強烈推薦選擇NTFS),在這裏選“用FAT文件係統格式化磁盤分區”,按“Enter”鍵。
格式化所選分區C盤的警告,按F鍵將準備格式化c盤。
 screen.width*0.7) {this.resized=true; this.width=screen.width*0.7; this.alt='Click here to open new window\nCTRL+Mouse wheel to zoom in/out';}
}" border="0" />
screen.width*0.7) {this.resized=true; this.width=screen.width*0.7; this.alt='Click here to open new window\nCTRL+Mouse wheel to zoom in/out';}
}" border="0" />
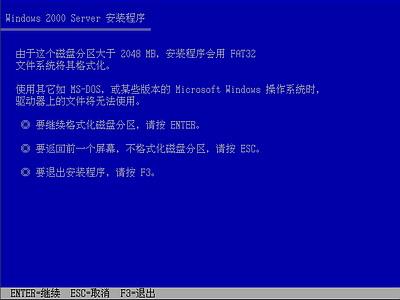
由於所選分區C的空間大於2048M(即2G),FAT文件係統不支持大於2048M的磁盤分區,所以安裝程序會用FAT32文件係統格式對C盤進行格式化,按“Enter”鍵回車。
 screen.width*0.7) {this.resized=true; this.width=screen.width*0.7; this.alt='Click here to open new window\nCTRL+Mouse wheel to zoom in/out';}
}" border="0" />
screen.width*0.7) {this.resized=true; this.width=screen.width*0.7; this.alt='Click here to open new window\nCTRL+Mouse wheel to zoom in/out';}
}" border="0" />
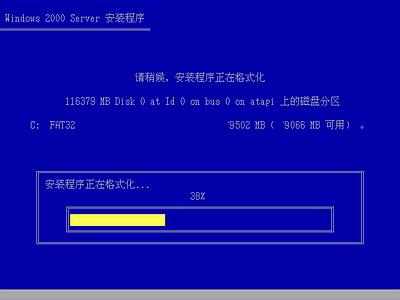
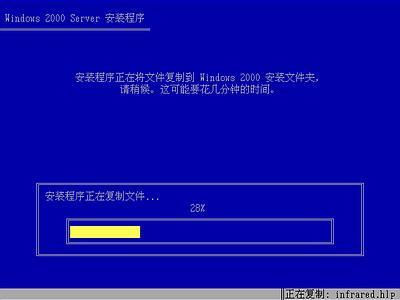
隻有用光盤啟動或安裝啟動軟盤啟動Windows 2000安裝程序,才能在安裝過程中提供格式化分區選項;如果用MS-DOS啟動盤啟動進入DOS下,運行i386winnt進行安裝Windows 2000時,安裝Windows 2000時沒有格式化分區選項。格式化C分區完成後,安裝程序開始從光盤中複製文件。
 screen.width*0.7) {this.resized=true; this.width=screen.width*0.7; this.alt='Click here to open new window\nCTRL+Mouse wheel to zoom in/out';}
}" border="0" />
screen.width*0.7) {this.resized=true; this.width=screen.width*0.7; this.alt='Click here to open new window\nCTRL+Mouse wheel to zoom in/out';}
}" border="0" />
複製完文件後,複製完文件後係統將會自動在15秒後重新啟動,這時要注意了,請在係統重啟時
將硬盤設為
第一啟動盤或者臨時取出安裝光盤啟動後再放入,使係統不至於進入死循環又重新啟動安裝程序。
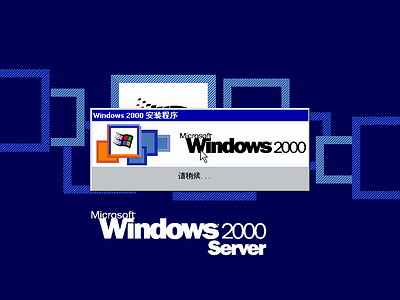
重新啟動後,首次出現2000啟動畫麵。
 screen.width*0.7) {this.resized=true; this.width=screen.width*0.7; this.alt='Click here to open new window\nCTRL+Mouse wheel to zoom in/out';}
}" border="0" />
screen.width*0.7) {this.resized=true; this.width=screen.width*0.7; this.alt='Click here to open new window\nCTRL+Mouse wheel to zoom in/out';}
}" border="0" />
啟動後開始檢測設備和安裝設備,其間會黑屏二次,這是正常的,完成後出現如下圖所示。
 screen.width*0.7) {this.resized=true; this.width=screen.width*0.7; this.alt='Click here to open new window\nCTRL+Mouse wheel to zoom in/out';}
}" border="0" />
screen.width*0.7) {this.resized=true; this.width=screen.width*0.7; this.alt='Click here to open new window\nCTRL+Mouse wheel to zoom in/out';}
}" border="0" />
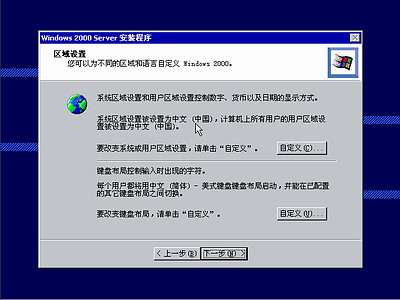
區域和語言設置選用默認值就可以了,直接點“下一步”按鈕。
 screen.width*0.7) {this.resized=true; this.width=screen.width*0.7; this.alt='Click here to open new window\nCTRL+Mouse wheel to zoom in/out';}
}" border="0" />
screen.width*0.7) {this.resized=true; this.width=screen.width*0.7; this.alt='Click here to open new window\nCTRL+Mouse wheel to zoom in/out';}
}" border="0" />
這裏任意輸入你想好的姓名和單位,點“下一步”按鈕。
 screen.width*0.7) {this.resized=true; this.width=screen.width*0.7; this.alt='Click here to open new window\nCTRL+Mouse wheel to zoom in/out';}
}" border="0" />
screen.width*0.7) {this.resized=true; this.width=screen.width*0.7; this.alt='Click here to open new window\nCTRL+Mouse wheel to zoom in/out';}
}" border="0" />
如果你沒觴xxは燃竅虜?訪茉浚ò滄靶蛄瀉牛┚痛蠹?呂玻≌飫鍤淙氚滄靶蛄瀉湃紜肏6TWQ-TQQM8-HXJYG-D69F7-R84VM,點“下一步”按鈕。
 screen.width*0.7) {this.resized=true; this.width=screen.width*0.7; this.alt='Click here to open new window\nCTRL+Mouse wheel to zoom in/out';}
}" border="0" />
screen.width*0.7) {this.resized=true; this.width=screen.width*0.7; this.alt='Click here to open new window\nCTRL+Mouse wheel to zoom in/out';}
}" border="0" />
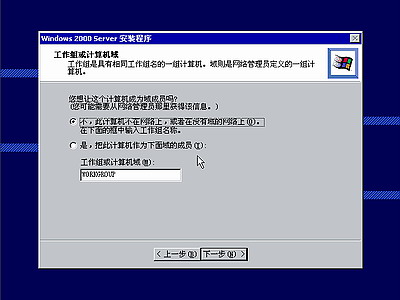
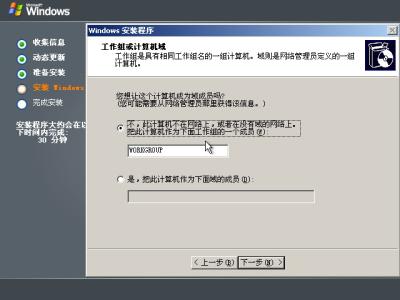
在這裏你可以根據需要任選一項,
想配置成服務器選第一
項,配置成工作站選第二項(同Windows 2003一樣),選擇後按“下一步”。
 screen.width*0.7) {this.resized=true; this.width=screen.width*0.7; this.alt='Click here to open new window\nCTRL+Mouse wheel to zoom in/out';}
}" border="0" />
screen.width*0.7) {this.resized=true; this.width=screen.width*0.7; this.alt='Click here to open new window\nCTRL+Mouse wheel to zoom in/out';}
}" border="0" />
計算機名稱自己任意輸入默認
作為服務器名,輸入兩
次係統管理員密碼,請記住這個密碼,登陸時用。
 screen.width*0.7) {this.resized=true; this.width=screen.width*0.7; this.alt='Click here to open new window\nCTRL+Mouse wheel to zoom in/out';}
}" border="0" />
screen.width*0.7) {this.resized=true; this.width=screen.width*0.7; this.alt='Click here to open new window\nCTRL+Mouse wheel to zoom in/out';}
}" border="0" />
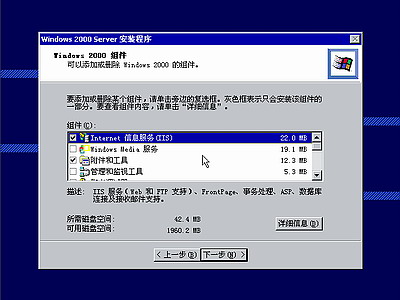
出現組件選項,根據需要選擇,亦可以在安裝完成後可在添加/刪除裏更改,點“下一步”繼續。
 screen.width*0.7) {this.resized=true; this.width=screen.width*0.7; this.alt='Click here to open new window\nCTRL+Mouse wheel to zoom in/out';}
}" border="0" />
screen.width*0.7) {this.resized=true; this.width=screen.width*0.7; this.alt='Click here to open new window\nCTRL+Mouse wheel to zoom in/out';}
}" border="0" />
日期和時間設置不用講了,點“下一步”,接著開始安裝網絡。
 screen.width*0.7) {this.resized=true; this.width=screen.width*0.7; this.alt='Click here to open new window\nCTRL+Mouse wheel to zoom in/out';}
}" border="0" />
screen.width*0.7) {this.resized=true; this.width=screen.width*0.7; this.alt='Click here to open new window\nCTRL+Mouse wheel to zoom in/out';}
}" border="0" />
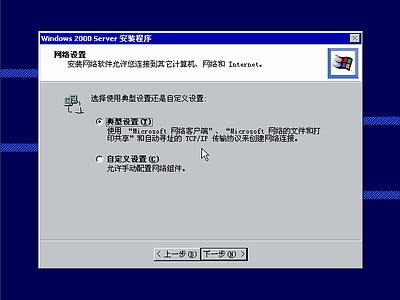
網絡設置選“典型”即可,點“下一步”。
 screen.width*0.7) {this.resized=true; this.width=screen.width*0.7; this.alt='Click here to open new window\nCTRL+Mouse wheel to zoom in/out';}
}" border="0" />
screen.width*0.7) {this.resized=true; this.width=screen.width*0.7; this.alt='Click here to open new window\nCTRL+Mouse wheel to zoom in/out';}
}" border="0" />
點“下一步”,開始安裝組件、保存設置、刪除用過的臨時文件。
 screen.width*0.7) {this.resized=true; this.width=screen.width*0.7; this.alt='Click here to open new window\nCTRL+Mouse wheel to zoom in/out';}
}" border="0" />
screen.width*0.7) {this.resized=true; this.width=screen.width*0.7; this.alt='Click here to open new window\nCTRL+Mouse wheel to zoom in/out';}
}" border="0" />
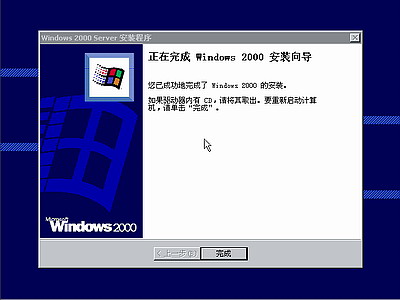
點擊“完成”按鈕完成全部安裝過程,係統重新啟動。
 screen.width*0.7) {this.resized=true; this.width=screen.width*0.7; this.alt='Click here to open new window\nCTRL+Mouse wheel to zoom in/out';}
}" border="0" />
screen.width*0.7) {this.resized=true; this.width=screen.width*0.7; this.alt='Click here to open new window\nCTRL+Mouse wheel to zoom in/out';}
}" border="0" />
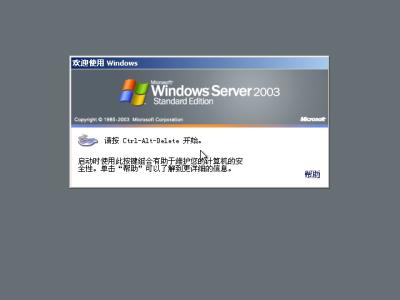
按Ctrl+Alt+Delete組合鍵啟動係統。
 screen.width*0.7) {this.resized=true; this.width=screen.width*0.7; this.alt='Click here to open new window\nCTRL+Mouse wheel to zoom in/out';}
}" border="0" />
screen.width*0.7) {this.resized=true; this.width=screen.width*0.7; this.alt='Click here to open new window\nCTRL+Mouse wheel to zoom in/out';}
}" border="0" />
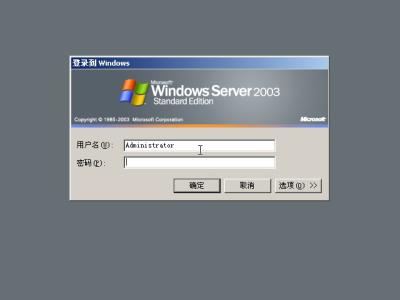
輸入你安裝時設置的密碼。
 screen.width*0.7) {this.resized=true; this.width=screen.width*0.7; this.alt='Click here to open new window\nCTRL+Mouse wheel to zoom in/out';}
}" border="0" />
screen.width*0.7) {this.resized=true; this.width=screen.width*0.7; this.alt='Click here to open new window\nCTRL+Mouse wheel to zoom in/out';}
}" border="0" />
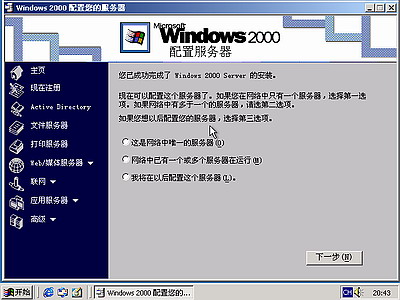
如果你不想配置
你的服務器,可以
以後再配置,直接點“下一步”,將出現桌麵。
 screen.width*0.7) {this.resized=true; this.width=screen.width*0.7; this.alt='Click here to open new window\nCTRL+Mouse wheel to zoom in/out';}
}" border="0" />
screen.width*0.7) {this.resized=true; this.width=screen.width*0.7; this.alt='Click here to open new window\nCTRL+Mouse wheel to zoom in/out';}
}" border="0" />
將“啟動時顯示該屏幕”前麵的勾取消,下次啟動就不會出現該窗口了,直接關閉窗口。
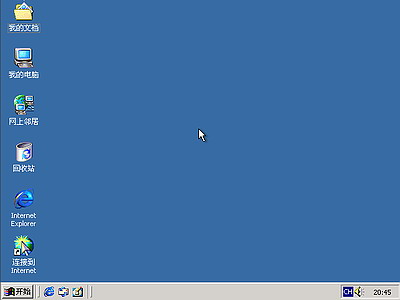 screen.width*0.7) {this.resized=true; this.width=screen.width*0.7; this.alt='Click here to open new window\nCTRL+Mouse wheel to zoom in/out';}
}" border="0" />
screen.width*0.7) {this.resized=true; this.width=screen.width*0.7; this.alt='Click here to open new window\nCTRL+Mouse wheel to zoom in/out';}
}" border="0" />
Windows sever 2000啟動成功。
四、基本設置
安裝完成後,後期工作比安裝所用的時間要長很多;
1.安裝完成後,接著要檢查設備驅動程序是否已經全部安裝;
2.設置上網連接,上網更新係統;
3.安裝軟件;
4.優化和用Ghost備份係統
一、準備工作:
1.準備好Windows 2000 server簡體中文版安裝光盤,並檢查光驅是否支持自啟動。
2.可能的情況下,在運行安裝程序前用磁盤掃描程序掃描所有硬盤檢查硬盤錯誤並進行修複,否則安裝程序運行時如檢查到有硬盤錯誤即會很麻煩。
3.用紙張記錄安裝文件的產品密匙(安裝序列號)。
4.可能的情況下,用驅動程序備份工具(如:驅動精靈)將原Windows 2000下的所有驅動程序備份到硬盤上(如∶Frive)。最好能記蟲靼濉⑼?ā⑾鑰ǖ戎饕?布?男禿偶吧??Ъ遙?は認略厙??絛蟣贛謾?br /> 5.如果你想在安裝過程中格式化C盤或D盤(建議安裝過程中格式化C盤),請備份C盤或D盤有用的數據。
二、用光盤啟動係統:
(如果你已經知道方法請轉到下一步),將2000安裝光盤放入光驅,重新啟動係統並把光驅設為第一啟動盤,保存設置並重啟,如無意外即可見到安裝界麵:
三、安裝Windows 2000 server
光盤自啟動後,如無意外即可見到安裝界麵,將出現如下圖所示。
screen.width*0.7) {this.resized=true; this.width=screen.width*0.7; this.alt='Click here to open new window\nCTRL+Mouse wheel to zoom in/out';}
}" border="0" />這一步有三個選項“1.要開始安裝Windows 2000,請按ENTER;2.要修複Windows 2000中文版的安裝,請按R3。要停止安裝Windows 2000並退出安裝程序,請按F3”在這裏我們選第一項按“Enter”鍵回車,出現下圖所示。
screen.width*0.7) {this.resized=true; this.width=screen.width*0.7; this.alt='Click here to open new window\nCTRL+Mouse wheel to zoom in/out';}
}" border="0" />許可協議,這裏沒有選擇的餘地,按“F8”。
screen.width*0.7) {this.resized=true; this.width=screen.width*0.7; this.alt='Click here to open new window\nCTRL+Mouse wheel to zoom in/out';}
}" border="0" />這裏用“向下或向上”箭頭鍵選擇安裝係統所用的分區,選擇好分區後按“Enter”鍵回車,安裝程序將檢查所選分區,如果這個分區己經安裝了另一個係統會出現下圖。
screen.width*0.7) {this.resized=true; this.width=screen.width*0.7; this.alt='Click here to open new window\nCTRL+Mouse wheel to zoom in/out';}
}" border="0" />要使用所選的分區安裝,按“C”鍵。
screen.width*0.7) {this.resized=true; this.width=screen.width*0.7; this.alt='Click here to open new window\nCTRL+Mouse wheel to zoom in/out';}
}" border="0" />這裏對所選分區可以進行格式化,從而轉換文件係統格式,或保存現有文件係統,有多種選擇的餘地,但要注意的是NTFS格式可節約磁盤空間提高安全xxx和減小磁盤碎片但同時存在很多問題OS和98/Me下看不到NTFS格式的分區(這兒既然是Server,個人強烈推薦選擇NTFS),在這裏選“用FAT文件係統格式化磁盤分區”,按“Enter”鍵。
格式化所選分區C盤的警告,按F鍵將準備格式化c盤。
screen.width*0.7) {this.resized=true; this.width=screen.width*0.7; this.alt='Click here to open new window\nCTRL+Mouse wheel to zoom in/out';}
}" border="0" />由於所選分區C的空間大於2048M(即2G),FAT文件係統不支持大於2048M的磁盤分區,所以安裝程序會用FAT32文件係統格式對C盤進行格式化,按“Enter”鍵回車。
screen.width*0.7) {this.resized=true; this.width=screen.width*0.7; this.alt='Click here to open new window\nCTRL+Mouse wheel to zoom in/out';}
}" border="0" />隻有用光盤啟動或安裝啟動軟盤啟動Windows 2000安裝程序,才能在安裝過程中提供格式化分區選項;如果用MS-DOS啟動盤啟動進入DOS下,運行i386winnt進行安裝Windows 2000時,安裝Windows 2000時沒有格式化分區選項。格式化C分區完成後,安裝程序開始從光盤中複製文件。
screen.width*0.7) {this.resized=true; this.width=screen.width*0.7; this.alt='Click here to open new window\nCTRL+Mouse wheel to zoom in/out';}
}" border="0" />複製完文件後,複製完文件後係統將會自動在15秒後重新啟動,這時要注意了,請在係統重啟時
將硬盤設為
第一啟動盤或者臨時取出安裝光盤啟動後再放入,使係統不至於進入死循環又重新啟動安裝程序。
重新啟動後,首次出現2000啟動畫麵。
screen.width*0.7) {this.resized=true; this.width=screen.width*0.7; this.alt='Click here to open new window\nCTRL+Mouse wheel to zoom in/out';}
}" border="0" />screen.width*0.7) {this.resized=true; this.width=screen.width*0.7; this.alt='Click here to open new window\nCTRL+Mouse wheel to zoom in/out';}
}" border="0" />啟動後開始檢測設備和安裝設備,其間會黑屏二次,這是正常的,完成後出現如下圖所示。
screen.width*0.7) {this.resized=true; this.width=screen.width*0.7; this.alt='Click here to open new window\nCTRL+Mouse wheel to zoom in/out';}
}" border="0" />區域和語言設置選用默認值就可以了,直接點“下一步”按鈕。
screen.width*0.7) {this.resized=true; this.width=screen.width*0.7; this.alt='Click here to open new window\nCTRL+Mouse wheel to zoom in/out';}
}" border="0" />這裏任意輸入你想好的姓名和單位,點“下一步”按鈕。
screen.width*0.7) {this.resized=true; this.width=screen.width*0.7; this.alt='Click here to open new window\nCTRL+Mouse wheel to zoom in/out';}
}" border="0" />如果你沒觴xxは燃竅虜?訪茉浚ò滄靶蛄瀉牛┚痛蠹?呂玻≌飫鍤淙氚滄靶蛄瀉湃紜肏6TWQ-TQQM8-HXJYG-D69F7-R84VM,點“下一步”按鈕。
screen.width*0.7) {this.resized=true; this.width=screen.width*0.7; this.alt='Click here to open new window\nCTRL+Mouse wheel to zoom in/out';}
}" border="0" />在這裏你可以根據需要任選一項,
想配置成服務器選第一
項,配置成工作站選第二項(同Windows 2003一樣),選擇後按“下一步”。
screen.width*0.7) {this.resized=true; this.width=screen.width*0.7; this.alt='Click here to open new window\nCTRL+Mouse wheel to zoom in/out';}
}" border="0" />計算機名稱自己任意輸入默認
作為服務器名,輸入兩
次係統管理員密碼,請記住這個密碼,登陸時用。
screen.width*0.7) {this.resized=true; this.width=screen.width*0.7; this.alt='Click here to open new window\nCTRL+Mouse wheel to zoom in/out';}
}" border="0" />出現組件選項,根據需要選擇,亦可以在安裝完成後可在添加/刪除裏更改,點“下一步”繼續。
screen.width*0.7) {this.resized=true; this.width=screen.width*0.7; this.alt='Click here to open new window\nCTRL+Mouse wheel to zoom in/out';}
}" border="0" />日期和時間設置不用講了,點“下一步”,接著開始安裝網絡。
screen.width*0.7) {this.resized=true; this.width=screen.width*0.7; this.alt='Click here to open new window\nCTRL+Mouse wheel to zoom in/out';}
}" border="0" />網絡設置選“典型”即可,點“下一步”。
screen.width*0.7) {this.resized=true; this.width=screen.width*0.7; this.alt='Click here to open new window\nCTRL+Mouse wheel to zoom in/out';}
}" border="0" />點“下一步”,開始安裝組件、保存設置、刪除用過的臨時文件。
screen.width*0.7) {this.resized=true; this.width=screen.width*0.7; this.alt='Click here to open new window\nCTRL+Mouse wheel to zoom in/out';}
}" border="0" />點擊“完成”按鈕完成全部安裝過程,係統重新啟動。
screen.width*0.7) {this.resized=true; this.width=screen.width*0.7; this.alt='Click here to open new window\nCTRL+Mouse wheel to zoom in/out';}
}" border="0" />按Ctrl+Alt+Delete組合鍵啟動係統。
screen.width*0.7) {this.resized=true; this.width=screen.width*0.7; this.alt='Click here to open new window\nCTRL+Mouse wheel to zoom in/out';}
}" border="0" />輸入你安裝時設置的密碼。
screen.width*0.7) {this.resized=true; this.width=screen.width*0.7; this.alt='Click here to open new window\nCTRL+Mouse wheel to zoom in/out';}
}" border="0" />如果你不想配置
你的服務器,可以
以後再配置,直接點“下一步”,將出現桌麵。
screen.width*0.7) {this.resized=true; this.width=screen.width*0.7; this.alt='Click here to open new window\nCTRL+Mouse wheel to zoom in/out';}
}" border="0" />將“啟動時顯示該屏幕”前麵的勾取消,下次啟動就不會出現該窗口了,直接關閉窗口。
screen.width*0.7) {this.resized=true; this.width=screen.width*0.7; this.alt='Click here to open new window\nCTRL+Mouse wheel to zoom in/out';}
}" border="0" />Windows sever 2000啟動成功。
四、基本設置
安裝完成後,後期工作比安裝所用的時間要長很多;
1.安裝完成後,接著要檢查設備驅動程序是否已經全部安裝;
2.設置上網連接,上網更新係統;
3.安裝軟件;
4.優化和用Ghost備份係統
Windows 2003篇:
一、準備工作:
1.準備好Windows Server 2003 Standard Edition簡體中文標準版版安裝光盤。
2.可能的情況下,在運行安裝程序前用磁盤掃描程序掃描所有硬盤檢查硬盤錯誤並進行修複,否則安裝程序運行時如檢查到有硬盤錯誤即會很麻煩。
3.用紙張記錄安裝文件的產品密匙(安裝序列號)。
4.如果你未安裝過Windows 2003係統,而現在正使用XP/2000係統,建議用驅動程序備份工具(如:驅動精靈)將WindowsXP/2000係統下的所有驅動程序備份到硬盤上(如∶Frive)。備份的WindowsXP/2000係統驅動程序可以在Windows2003係統下使用。
5.如果你想在安裝過程中格式化C盤或D盤(建議安裝過程中格式化用於安裝2003係統的分區),請備份C盤或D盤有用的數據。
6.導出電子郵件帳戶和通信簿;
將“CocumentsandSettingsAdministrator(或你的用戶名)”中的“收藏夾”目錄複製到其它盤,以備份收藏夾;可能的情況下將其它應用程序的設置導出。
7.係統要求-----對基於x86的計算機:建議使用一個或多個主頻不低於550MHz(支持的最低主頻為133MHz)的處理器。每台計算機最多支持8個處理器,建議使用Intel Pentium/Celeron係列、AMD K6/Athlon/Duron係列或兼容的處理器。建議最少使用128MB的RAM,最大支持32GB。對基於Itanium體係結構的計算機:使用一個或多個主頻不低於733MHz的處理器。每台計算機最多支持8個處理器。RAM最小為1GB,最大為64GB。硬盤可用空間,在基於x86的計算機上,該空間大約為1.25GB到2GB,在基於Itanium體係結構的計算機上,該空間大約為3GB到4GB,如果您通過網絡而不是CD-ROM運行安裝程序,或者從FAT或FAT32分區執行升級(推薦使用NTFS文件係統),那麽將需要更大的磁盤空間。
二、用光盤啟動係統:
(如果你已經知道方法請轉到下一步),重新啟動係統並把光驅設為第一啟動盤,保存設置並重啟。將2003安裝光盤放入光驅,重新啟動電腦。剛啟動時,當出現如下圖1所示時快速按下回車鍵,否則不能啟動2003係統安裝。
 screen.width*0.7) {this.resized=true; this.width=screen.width*0.7; this.alt='Click here to open new window\nCTRL+Mouse wheel to zoom in/out';}
}" border="0" />
screen.width*0.7) {this.resized=true; this.width=screen.width*0.7; this.alt='Click here to open new window\nCTRL+Mouse wheel to zoom in/out';}
}" border="0" />
三、安裝Windows Server 2003
光盤自啟動後,如無意外即可見到安裝界麵。
 screen.width*0.7) {this.resized=true; this.width=screen.width*0.7; this.alt='Click here to open new window\nCTRL+Mouse wheel to zoom in/out';}
}" border="0" />
screen.width*0.7) {this.resized=true; this.width=screen.width*0.7; this.alt='Click here to open new window\nCTRL+Mouse wheel to zoom in/out';}
}" border="0" />
從光盤讀取啟動信息,很快出現如下圖所示。
 screen.width*0.7) {this.resized=true; this.width=screen.width*0.7; this.alt='Click here to open new window\nCTRL+Mouse wheel to zoom in/out';}
}" border="0" />
screen.width*0.7) {this.resized=true; this.width=screen.width*0.7; this.alt='Click here to open new window\nCTRL+Mouse wheel to zoom in/out';}
}" border="0" />
全中文提示,“要現在安裝Windows,請按ENTER”,按回車鍵。
 screen.width*0.7) {this.resized=true; this.width=screen.width*0.7; this.alt='Click here to open new window\nCTRL+Mouse wheel to zoom in/out';}
}" border="0" />
screen.width*0.7) {this.resized=true; this.width=screen.width*0.7; this.alt='Click here to open new window\nCTRL+Mouse wheel to zoom in/out';}
}" border="0" />
許可協議,這裏沒有選擇的餘地,按“F8”。
 screen.width*0.7) {this.resized=true; this.width=screen.width*0.7; this.alt='Click here to open new window\nCTRL+Mouse wheel to zoom in/out';}
}" border="0" />
screen.width*0.7) {this.resized=true; this.width=screen.width*0.7; this.alt='Click here to open new window\nCTRL+Mouse wheel to zoom in/out';}
}" border="0" />
這裏用“向下或向上”方向鍵選擇安裝係統所用的分區,我這裏準備用C盤安裝2003,並準備在下麵的過程中格式化C盤。選擇好分區後按“Enter”鍵回車,安裝程序將檢查C盤的空間和C盤現有的操作係統。
 screen.width*0.7) {this.resized=true; this.width=screen.width*0.7; this.alt='Click here to open new window\nCTRL+Mouse wheel to zoom in/out';}
}" border="0" />
screen.width*0.7) {this.resized=true; this.width=screen.width*0.7; this.alt='Click here to open new window\nCTRL+Mouse wheel to zoom in/out';}
}" border="0" />
上圖表示安裝程序檢測到C盤已經有操作係統存在,提出警告信息。如果你選擇安裝係統的分區是空的。在這裏我堅持用C盤安裝係統,根據提示,
按下鍵盤上的“C
”鍵後出現如下圖所示。
 screen.width*0.7) {this.resized=true; this.width=screen.width*0.7; this.alt='Click here to open new window\nCTRL+Mouse wheel to zoom in/out';}
}" border="0" />
screen.width*0.7) {this.resized=true; this.width=screen.width*0.7; this.alt='Click here to open new window\nCTRL+Mouse wheel to zoom in/out';}
}" border="0" />
上圖最下方提供了5個對所選分區進行操作的選項,其中“保存現有文件係統(無變化)”的選項不含格式化分區操作,其它都會有對分區進行格式化的操作。這裏,我用“上移”箭頭鍵選擇“用NTFS文件係統格式化磁盤分區”。
 screen.width*0.7) {this.resized=true; this.width=screen.width*0.7; this.alt='Click here to open new window\nCTRL+Mouse wheel to zoom in/out';}
}" border="0" />
screen.width*0.7) {this.resized=true; this.width=screen.width*0.7; this.alt='Click here to open new window\nCTRL+Mouse wheel to zoom in/out';}
}" border="0" />
回車後出現格式化C盤的警告。
 screen.width*0.7) {this.resized=true; this.width=screen.width*0.7; this.alt='Click here to open new window\nCTRL+Mouse wheel to zoom in/out';}
}" border="0" />
screen.width*0.7) {this.resized=true; this.width=screen.width*0.7; this.alt='Click here to open new window\nCTRL+Mouse wheel to zoom in/out';}
}" border="0" />
確定要格式化C盤後,按“F”鍵,安裝程序將開始格式化C盤,格式化過程如下圖所示。
 screen.width*0.7) {this.resized=true; this.width=screen.width*0.7; this.alt='Click here to open new window\nCTRL+Mouse wheel to zoom in/out';}
}" border="0" />
screen.width*0.7) {this.resized=true; this.width=screen.width*0.7; this.alt='Click here to open new window\nCTRL+Mouse wheel to zoom in/out';}
}" border="0" />
隻有用光盤啟動安裝程序,才能在安裝過程中提供格式化分區選項;如果用MS-DOS啟動盤啟動進入DOS下,運行i386winnt.exe進行安裝時,安裝Windows 2003過程沒有格式化分區選項。
格式化C分區完成後,創建要複製的文件列表,跟接著開始複製係統文件。
 screen.width*0.7) {this.resized=true; this.width=screen.width*0.7; this.alt='Click here to open new window\nCTRL+Mouse wheel to zoom in/out';}
}" border="0" />
screen.width*0.7) {this.resized=true; this.width=screen.width*0.7; this.alt='Click here to open new window\nCTRL+Mouse wheel to zoom in/out';}
}" border="0" />
文件複製完後,安裝程序開始初始化Windows配置。
 screen.width*0.7) {this.resized=true; this.width=screen.width*0.7; this.alt='Click here to open new window\nCTRL+Mouse wheel to zoom in/out';}
}" border="0" />
screen.width*0.7) {this.resized=true; this.width=screen.width*0.7; this.alt='Click here to open new window\nCTRL+Mouse wheel to zoom in/out';}
}" border="0" />
初始化Windows配置完成後,係統將在15秒後重新啟動。
 screen.width*0.7) {this.resized=true; this.width=screen.width*0.7; this.alt='Click here to open new window\nCTRL+Mouse wheel to zoom in/out';}
}" border="0" />
screen.width*0.7) {this.resized=true; this.width=screen.width*0.7; this.alt='Click here to open new window\nCTRL+Mouse wheel to zoom in/out';}
}" border="0" />
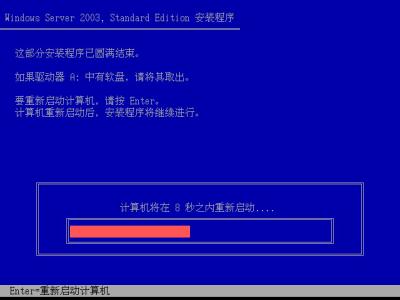
這部分安裝程序已經完成,係統將會自動在15秒後重新啟動,將控製權從安裝程序轉移給係統。這時要注意了,建議在係統重
啟時將硬盤設為第一啟動盤(不改變也可以)。
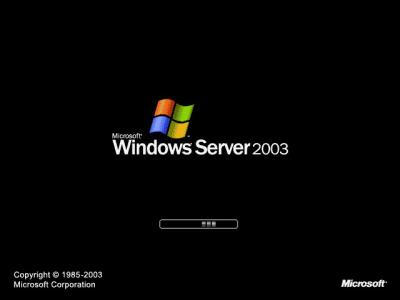
重新啟動後,首次出現Windows Server 2003啟動畫麵。
 screen.width*0.7) {this.resized=true; this.width=screen.width*0.7; this.alt='Click here to open new window\nCTRL+Mouse wheel to zoom in/out';}
}" border="0" />
screen.width*0.7) {this.resized=true; this.width=screen.width*0.7; this.alt='Click here to open new window\nCTRL+Mouse wheel to zoom in/out';}
}" border="0" />
啟動後,出現下圖所示。
 screen.width*0.7) {this.resized=true; this.width=screen.width*0.7; this.alt='Click here to open new window\nCTRL+Mouse wheel to zoom in/out';}
}" border="0" />
screen.width*0.7) {this.resized=true; this.width=screen.width*0.7; this.alt='Click here to open new window\nCTRL+Mouse wheel to zoom in/out';}
}" border="0" />
過5分鍾後,當提示還需33分鍾。
 screen.width*0.7) {this.resized=true; this.width=screen.width*0.7; this.alt='Click here to open new window\nCTRL+Mouse wheel to zoom in/out';}
}" border="0" />
screen.width*0.7) {this.resized=true; this.width=screen.width*0.7; this.alt='Click here to open new window\nCTRL+Mouse wheel to zoom in/out';}
}" border="0" />
區域和語言設置選用默認值就可以了,直接點“下一步”按鈕。
 screen.width*0.7) {this.resized=true; this.width=screen.width*0.7; this.alt='Click here to open new window\nCTRL+Mouse wheel to zoom in/out';}
}" border="0" />
screen.width*0.7) {this.resized=true; this.width=screen.width*0.7; this.alt='Click here to open new window\nCTRL+Mouse wheel to zoom in/out';}
}" border="0" />
這裏輸入你想好的姓名(用戶名)和單位,點“下一步”按鈕。
 screen.width*0.7) {this.resized=true; this.width=screen.width*0.7; this.alt='Click here to open new window\nCTRL+Mouse wheel to zoom in/out';}
}" border="0" />
screen.width*0.7) {this.resized=true; this.width=screen.width*0.7; this.alt='Click here to open new window\nCTRL+Mouse wheel to zoom in/out';}
}" border="0" />
如果你沒觴xxは燃竅虜?訪茉浚ò滄靶蛄瀉牛┚吐櫸沉耍≌飫鍤淙氚滄靶蛄瀉牛?恪跋亂徊健卑磁ァ?br /> screen.width*0.7) {this.resized=true; this.width=screen.width*0.7; this.alt='Click here to open new window\nCTRL+Mouse wheel to zoom in/out';}
}" border="0" />
screen.width*0.7) {this.resized=true; this.width=screen.width*0.7; this.alt='Click here to open new window\nCTRL+Mouse wheel to zoom in/out';}
}" border="0" />
(同Windows2000一樣),如果你想將係統
做成服務器就選“每服務器。同時連
接數”並更改數值(10人內免費)。否則你隨便選啦,反正差別不大,點“下一步”按鈕。
 screen.width*0.7) {this.resized=true; this.width=screen.width*0.7; this.alt='Click here to open new window\nCTRL+Mouse wheel to zoom in/out';}
}" border="0" />
screen.width*0.7) {this.resized=true; this.width=screen.width*0.7; this.alt='Click here to open new window\nCTRL+Mouse wheel to zoom in/out';}
}" border="0" />
安裝程序自動為你創建又長又難看的計算機名稱,自己可任意更改,輸入兩次係統管理員密碼,請記住這個密碼,Administrator係統管理員在係統中具有最高權限。密碼長度少於6個字符時會出現如下圖所示的提示信息。
 screen.width*0.7) {this.resized=true; this.width=screen.width*0.7; this.alt='Click here to open new window\nCTRL+Mouse wheel to zoom in/out';}
}" border="0" />
screen.width*0.7) {this.resized=true; this.width=screen.width*0.7; this.alt='Click here to open new window\nCTRL+Mouse wheel to zoom in/out';}
}" border="0" />
點擊“是”繼續安裝。
 screen.width*0.7) {this.resized=true; this.width=screen.width*0.7; this.alt='Click here to open new window\nCTRL+Mouse wheel to zoom in/out';}
}" border="0" />
screen.width*0.7) {this.resized=true; this.width=screen.width*0.7; this.alt='Click here to open new window\nCTRL+Mouse wheel to zoom in/out';}
}" border="0" />
日期和時間設置不用講,選北京時間,點“下一步”繼續安裝,複製文件、安裝網絡係統。
 screen.width*0.7) {this.resized=true; this.width=screen.width*0.7; this.alt='Click here to open new window\nCTRL+Mouse wheel to zoom in/out';}
}" border="0" />
screen.width*0.7) {this.resized=true; this.width=screen.width*0.7; this.alt='Click here to open new window\nCTRL+Mouse wheel to zoom in/out';}
}" border="0" />
上圖中安裝網絡係統。
 screen.width*0.7) {this.resized=true; this.width=screen.width*0.7; this.alt='Click here to open new window\nCTRL+Mouse wheel to zoom in/out';}
}" border="0" />
screen.width*0.7) {this.resized=true; this.width=screen.width*0.7; this.alt='Click here to open new window\nCTRL+Mouse wheel to zoom in/out';}
}" border="0" />
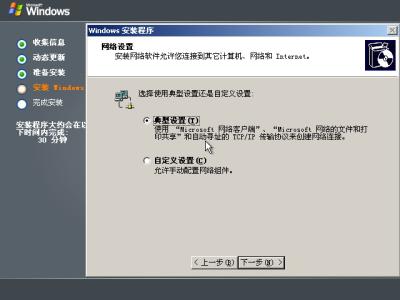
讓你選擇網絡安裝所用的方式,選“典型設置”就行,然後點“下一步”出現如下圖。
 screen.width*0.7) {this.resized=true; this.width=screen.width*0.7; this.alt='Click here to open new window\nCTRL+Mouse wheel to zoom in/out';}
}" border="0" />
screen.width*0.7) {this.resized=true; this.width=screen.width*0.7; this.alt='Click here to open new window\nCTRL+Mouse wheel to zoom in/out';}
}" border="0" />
點“下一步”繼續安裝,到這裏後就不用你參與了,係統會自動完成全過程。
安裝完成後自動重新啟動,出現啟動畫麵,然後出現歡迎畫麵。
 screen.width*0.7) {this.resized=true; this.width=screen.width*0.7; this.alt='Click here to open new window\nCTRL+Mouse wheel to zoom in/out';}
}" border="0" />
screen.width*0.7) {this.resized=true; this.width=screen.width*0.7; this.alt='Click here to open new window\nCTRL+Mouse wheel to zoom in/out';}
}" border="0" />
上圖中,需要按組合鍵“Ctrl+Alt+Delete”才能繼續啟動,在XP中此功能默認是關閉的。按組合鍵“Ctrl+Alt+Delete”後繼續啟動,出現登陸畫麵。
 screen.width*0.7) {this.resized=true; this.width=screen.width*0.7; this.alt='Click here to open new window\nCTRL+Mouse wheel to zoom in/out';}
}" border="0" />
screen.width*0.7) {this.resized=true; this.width=screen.width*0.7; this.alt='Click here to open new window\nCTRL+Mouse wheel to zoom in/out';}
}" border="0" />
輸入密碼後回車,繼續啟動進入桌麵。第一次啟動後自動運行“管理
您的服務器”向導
。
 screen.width*0.7) {this.resized=true; this.width=screen.width*0.7; this.alt='Click here to open new window\nCTRL+Mouse wheel to zoom in/out';}
}" border="0" />
screen.width*0.7) {this.resized=true; this.width=screen.width*0.7; this.alt='Click here to open new window\nCTRL+Mouse wheel to zoom in/out';}
}" border="0" />
如果你不想每次啟動都出現這個窗口,可在該窗口左下角的“在登錄時不要顯示此項”前麵打勾然後關閉窗口。關閉該窗口後即見到Windows
2003的桌麵。
 screen.width*0.7) {this.resized=true; this.width=screen.width*0.7; this.alt='Click here to open new window\nCTRL+Mouse wheel to zoom in/out';}
}" border="0" />
screen.width*0.7) {this.resized=true; this.width=screen.width*0.7; this.alt='Click here to open new window\nCTRL+Mouse wheel to zoom in/out';}
}" border="0" />
桌麵上除了回收站和語言欄外,空白一片。空白一片好做文章啊!
四、安裝係統後
Windows Server 2003簡體中文版安裝時,默認安裝了Internet Explorer增強的安全設置,默認關閉了聲音,默認沒有開啟顯示和聲音的硬件加速。這樣你上網時大部分網站不能打開,係統無聲,播放電影和音樂遲鈍。同時默認要按Ctrl+Alt+Delete組合鍵登錄,默認開啟了關機事件跟蹤。
一、準備工作:
1.準備好Windows Server 2003 Standard Edition簡體中文標準版版安裝光盤。
2.可能的情況下,在運行安裝程序前用磁盤掃描程序掃描所有硬盤檢查硬盤錯誤並進行修複,否則安裝程序運行時如檢查到有硬盤錯誤即會很麻煩。
3.用紙張記錄安裝文件的產品密匙(安裝序列號)。
4.如果你未安裝過Windows 2003係統,而現在正使用XP/2000係統,建議用驅動程序備份工具(如:驅動精靈)將WindowsXP/2000係統下的所有驅動程序備份到硬盤上(如∶Frive)。備份的WindowsXP/2000係統驅動程序可以在Windows2003係統下使用。
5.如果你想在安裝過程中格式化C盤或D盤(建議安裝過程中格式化用於安裝2003係統的分區),請備份C盤或D盤有用的數據。
6.導出電子郵件帳戶和通信簿;
將“CocumentsandSettingsAdministrator(或你的用戶名)”中的“收藏夾”目錄複製到其它盤,以備份收藏夾;可能的情況下將其它應用程序的設置導出。
7.係統要求-----對基於x86的計算機:建議使用一個或多個主頻不低於550MHz(支持的最低主頻為133MHz)的處理器。每台計算機最多支持8個處理器,建議使用Intel Pentium/Celeron係列、AMD K6/Athlon/Duron係列或兼容的處理器。建議最少使用128MB的RAM,最大支持32GB。對基於Itanium體係結構的計算機:使用一個或多個主頻不低於733MHz的處理器。每台計算機最多支持8個處理器。RAM最小為1GB,最大為64GB。硬盤可用空間,在基於x86的計算機上,該空間大約為1.25GB到2GB,在基於Itanium體係結構的計算機上,該空間大約為3GB到4GB,如果您通過網絡而不是CD-ROM運行安裝程序,或者從FAT或FAT32分區執行升級(推薦使用NTFS文件係統),那麽將需要更大的磁盤空間。
二、用光盤啟動係統:
(如果你已經知道方法請轉到下一步),重新啟動係統並把光驅設為第一啟動盤,保存設置並重啟。將2003安裝光盤放入光驅,重新啟動電腦。剛啟動時,當出現如下圖1所示時快速按下回車鍵,否則不能啟動2003係統安裝。
screen.width*0.7) {this.resized=true; this.width=screen.width*0.7; this.alt='Click here to open new window\nCTRL+Mouse wheel to zoom in/out';}
}" border="0" />三、安裝Windows Server 2003
光盤自啟動後,如無意外即可見到安裝界麵。
screen.width*0.7) {this.resized=true; this.width=screen.width*0.7; this.alt='Click here to open new window\nCTRL+Mouse wheel to zoom in/out';}
}" border="0" />從光盤讀取啟動信息,很快出現如下圖所示。
screen.width*0.7) {this.resized=true; this.width=screen.width*0.7; this.alt='Click here to open new window\nCTRL+Mouse wheel to zoom in/out';}
}" border="0" />全中文提示,“要現在安裝Windows,請按ENTER”,按回車鍵。
screen.width*0.7) {this.resized=true; this.width=screen.width*0.7; this.alt='Click here to open new window\nCTRL+Mouse wheel to zoom in/out';}
}" border="0" />許可協議,這裏沒有選擇的餘地,按“F8”。
screen.width*0.7) {this.resized=true; this.width=screen.width*0.7; this.alt='Click here to open new window\nCTRL+Mouse wheel to zoom in/out';}
}" border="0" />這裏用“向下或向上”方向鍵選擇安裝係統所用的分區,我這裏準備用C盤安裝2003,並準備在下麵的過程中格式化C盤。選擇好分區後按“Enter”鍵回車,安裝程序將檢查C盤的空間和C盤現有的操作係統。
screen.width*0.7) {this.resized=true; this.width=screen.width*0.7; this.alt='Click here to open new window\nCTRL+Mouse wheel to zoom in/out';}
}" border="0" />上圖表示安裝程序檢測到C盤已經有操作係統存在,提出警告信息。如果你選擇安裝係統的分區是空的。在這裏我堅持用C盤安裝係統,根據提示,
按下鍵盤上的“C
”鍵後出現如下圖所示。
screen.width*0.7) {this.resized=true; this.width=screen.width*0.7; this.alt='Click here to open new window\nCTRL+Mouse wheel to zoom in/out';}
}" border="0" />上圖最下方提供了5個對所選分區進行操作的選項,其中“保存現有文件係統(無變化)”的選項不含格式化分區操作,其它都會有對分區進行格式化的操作。這裏,我用“上移”箭頭鍵選擇“用NTFS文件係統格式化磁盤分區”。
screen.width*0.7) {this.resized=true; this.width=screen.width*0.7; this.alt='Click here to open new window\nCTRL+Mouse wheel to zoom in/out';}
}" border="0" />回車後出現格式化C盤的警告。
screen.width*0.7) {this.resized=true; this.width=screen.width*0.7; this.alt='Click here to open new window\nCTRL+Mouse wheel to zoom in/out';}
}" border="0" />確定要格式化C盤後,按“F”鍵,安裝程序將開始格式化C盤,格式化過程如下圖所示。
screen.width*0.7) {this.resized=true; this.width=screen.width*0.7; this.alt='Click here to open new window\nCTRL+Mouse wheel to zoom in/out';}
}" border="0" />隻有用光盤啟動安裝程序,才能在安裝過程中提供格式化分區選項;如果用MS-DOS啟動盤啟動進入DOS下,運行i386winnt.exe進行安裝時,安裝Windows 2003過程沒有格式化分區選項。
格式化C分區完成後,創建要複製的文件列表,跟接著開始複製係統文件。
screen.width*0.7) {this.resized=true; this.width=screen.width*0.7; this.alt='Click here to open new window\nCTRL+Mouse wheel to zoom in/out';}
}" border="0" />文件複製完後,安裝程序開始初始化Windows配置。
screen.width*0.7) {this.resized=true; this.width=screen.width*0.7; this.alt='Click here to open new window\nCTRL+Mouse wheel to zoom in/out';}
}" border="0" />初始化Windows配置完成後,係統將在15秒後重新啟動。
screen.width*0.7) {this.resized=true; this.width=screen.width*0.7; this.alt='Click here to open new window\nCTRL+Mouse wheel to zoom in/out';}
}" border="0" />這部分安裝程序已經完成,係統將會自動在15秒後重新啟動,將控製權從安裝程序轉移給係統。這時要注意了,建議在係統重
啟時將硬盤設為第一啟動盤(不改變也可以)。
重新啟動後,首次出現Windows Server 2003啟動畫麵。
screen.width*0.7) {this.resized=true; this.width=screen.width*0.7; this.alt='Click here to open new window\nCTRL+Mouse wheel to zoom in/out';}
}" border="0" />啟動後,出現下圖所示。
screen.width*0.7) {this.resized=true; this.width=screen.width*0.7; this.alt='Click here to open new window\nCTRL+Mouse wheel to zoom in/out';}
}" border="0" />過5分鍾後,當提示還需33分鍾。
screen.width*0.7) {this.resized=true; this.width=screen.width*0.7; this.alt='Click here to open new window\nCTRL+Mouse wheel to zoom in/out';}
}" border="0" />區域和語言設置選用默認值就可以了,直接點“下一步”按鈕。
screen.width*0.7) {this.resized=true; this.width=screen.width*0.7; this.alt='Click here to open new window\nCTRL+Mouse wheel to zoom in/out';}
}" border="0" />這裏輸入你想好的姓名(用戶名)和單位,點“下一步”按鈕。
screen.width*0.7) {this.resized=true; this.width=screen.width*0.7; this.alt='Click here to open new window\nCTRL+Mouse wheel to zoom in/out';}
}" border="0" />如果你沒觴xxは燃竅虜?訪茉浚ò滄靶蛄瀉牛┚吐櫸沉耍≌飫鍤淙氚滄靶蛄瀉牛?恪跋亂徊健卑磁ァ?br />
screen.width*0.7) {this.resized=true; this.width=screen.width*0.7; this.alt='Click here to open new window\nCTRL+Mouse wheel to zoom in/out';}
}" border="0" />(同Windows2000一樣),如果你想將係統
做成服務器就選“每服務器。同時連
接數”並更改數值(10人內免費)。否則你隨便選啦,反正差別不大,點“下一步”按鈕。
screen.width*0.7) {this.resized=true; this.width=screen.width*0.7; this.alt='Click here to open new window\nCTRL+Mouse wheel to zoom in/out';}
}" border="0" />安裝程序自動為你創建又長又難看的計算機名稱,自己可任意更改,輸入兩次係統管理員密碼,請記住這個密碼,Administrator係統管理員在係統中具有最高權限。密碼長度少於6個字符時會出現如下圖所示的提示信息。
screen.width*0.7) {this.resized=true; this.width=screen.width*0.7; this.alt='Click here to open new window\nCTRL+Mouse wheel to zoom in/out';}
}" border="0" />點擊“是”繼續安裝。
screen.width*0.7) {this.resized=true; this.width=screen.width*0.7; this.alt='Click here to open new window\nCTRL+Mouse wheel to zoom in/out';}
}" border="0" />日期和時間設置不用講,選北京時間,點“下一步”繼續安裝,複製文件、安裝網絡係統。
screen.width*0.7) {this.resized=true; this.width=screen.width*0.7; this.alt='Click here to open new window\nCTRL+Mouse wheel to zoom in/out';}
}" border="0" />上圖中安裝網絡係統。
screen.width*0.7) {this.resized=true; this.width=screen.width*0.7; this.alt='Click here to open new window\nCTRL+Mouse wheel to zoom in/out';}
}" border="0" />讓你選擇網絡安裝所用的方式,選“典型設置”就行,然後點“下一步”出現如下圖。
screen.width*0.7) {this.resized=true; this.width=screen.width*0.7; this.alt='Click here to open new window\nCTRL+Mouse wheel to zoom in/out';}
}" border="0" />點“下一步”繼續安裝,到這裏後就不用你參與了,係統會自動完成全過程。
安裝完成後自動重新啟動,出現啟動畫麵,然後出現歡迎畫麵。
screen.width*0.7) {this.resized=true; this.width=screen.width*0.7; this.alt='Click here to open new window\nCTRL+Mouse wheel to zoom in/out';}
}" border="0" />上圖中,需要按組合鍵“Ctrl+Alt+Delete”才能繼續啟動,在XP中此功能默認是關閉的。按組合鍵“Ctrl+Alt+Delete”後繼續啟動,出現登陸畫麵。
screen.width*0.7) {this.resized=true; this.width=screen.width*0.7; this.alt='Click here to open new window\nCTRL+Mouse wheel to zoom in/out';}
}" border="0" />輸入密碼後回車,繼續啟動進入桌麵。第一次啟動後自動運行“管理
您的服務器”向導
。
screen.width*0.7) {this.resized=true; this.width=screen.width*0.7; this.alt='Click here to open new window\nCTRL+Mouse wheel to zoom in/out';}
}" border="0" />如果你不想每次啟動都出現這個窗口,可在該窗口左下角的“在登錄時不要顯示此項”前麵打勾然後關閉窗口。關閉該窗口後即見到Windows
2003的桌麵。
screen.width*0.7) {this.resized=true; this.width=screen.width*0.7; this.alt='Click here to open new window\nCTRL+Mouse wheel to zoom in/out';}
}" border="0" />桌麵上除了回收站和語言欄外,空白一片。空白一片好做文章啊!
四、安裝係統後
Windows Server 2003簡體中文版安裝時,默認安裝了Internet Explorer增強的安全設置,默認關閉了聲音,默認沒有開啟顯示和聲音的硬件加速。這樣你上網時大部分網站不能打開,係統無聲,播放電影和音樂遲鈍。同時默認要按Ctrl+Alt+Delete組合鍵登錄,默認開啟了關機事件跟蹤。
win98安裝
Windows 98篇:
一、準備工作:
1.首先當然是要準備好Windows 98的係統安裝光盤。
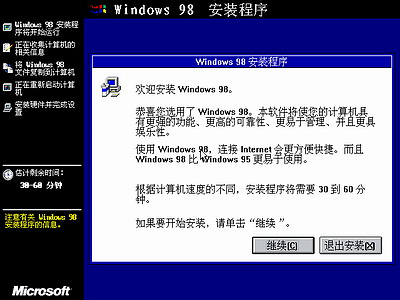
2.在可能的情況下,可以在運行安裝程序之前用磁盤掃描程序將所有硬盤掃描一遍,檢查硬盤錯誤並進行修複,否則安裝程序運行時如果檢查到有硬盤錯誤就會很麻煩。 3.如果安裝過程中需要用產品密匙(安裝序列號)的,用紙張記錄安裝文件的產品密匙(安裝序列號)。
4.安裝之前可以用驅動程序備份工具(如:驅動精靈)將Windows 98下的所有驅動程序備份到硬盤上(如∶Frive)。最好能上網下載本機的網卡驅動和調製解調器等的驅動程序,如果你用寬帶連接請下載並保存寬帶撥號軟件Enternet300,能上網就能找到大部分所要的軟件。
5.如果你想在安裝過程中格式化C盤(建議安裝過程中格式化C盤),請備份C盤有用的數據。
6.必須有FAT或FAT32文件係統格式的分區,因為Windows 98隻能安裝在FAT或FAT32文件係統格式的分區,推薦分區空間大於2G。
二、用光盤啟動係統:
(如果你已經知道方法請轉到下一步),將98安裝光盤放入光驅,重新啟動係統並把光驅設為第一啟動盤,保存設置並重啟,如無意外即可見到安裝界麵。
三、安裝Windows 98
光盤自啟動後,如無意外即可見到啟動界麵,將出現如下圖所示,如光盤不能自啟動,可用98啟動軟盤啟動(設軟驅為第一啟動盤)。
 screen.width*0.7) {this.resized=true; this.width=screen.width*0.7; this.alt='Click here to open new window\nCTRL+Mouse wheel to zoom in/out';}
}" border="0" />
screen.width*0.7) {this.resized=true; this.width=screen.width*0.7; this.alt='Click here to open new window\nCTRL+Mouse wheel to zoom in/out';}
}" border="0" />
如果你想格式化C盤,即選第二項進入DOS下,在提示符“A:>_”下輸入“format
c:”後回車,再輸入“y”後回車即開如格式化C盤!
在這裏我已經格式化C盤了,所以選第一項(從光盤安裝98)後直接回車,很快出現如下圖所示,(如果不選擇在30秒後會自動啟動第一項)。
 screen.width*0.7) {this.resized=true; this.width=screen.width*0.7; this.alt='Click here to open new window\nCTRL+Mouse wheel to zoom in/out';}
}" border="0" />
screen.width*0.7) {this.resized=true; this.width=screen.width*0.7; this.alt='Click here to open new window\nCTRL+Mouse wheel to zoom in/out';}
}" border="0" />
一啟動就
可以用鼠標了,中文界麵,
點擊“繼續”按鈕,出現如下圖。
 screen.width*0.7) {this.resized=true; this.width=screen.width*0.7; this.alt='Click here to open new window\nCTRL+Mouse wheel to zoom in/out';}
}" border="0" />
screen.width*0.7) {this.resized=true; this.width=screen.width*0.7; this.alt='Click here to open new window\nCTRL+Mouse wheel to zoom in/out';}
}" border="0" />
正在準備Windows 98安裝向導,很快結束,出現如下圖所示。
 screen.width*0.7) {this.resized=true; this.width=screen.width*0.7; this.alt='Click here to open new window\nCTRL+Mouse wheel to zoom in/out';}
}" border="0" />
screen.width*0.7) {this.resized=true; this.width=screen.width*0.7; this.alt='Click here to open new window\nCTRL+Mouse wheel to zoom in/out';}
}" border="0" />
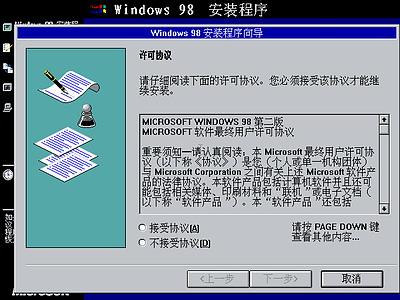
許可協議當然是要接受啦!否則無法
安裝。用鼠標移動光標到“接
受協議”前麵的圓圈裏點擊一下使圓圈內多了一個黑點,然後點“下一步”出現如下圖。
 screen.width*0.7) {this.resized=true; this.width=screen.width*0.7; this.alt='Click here to open new window\nCTRL+Mouse wheel to zoom in/out';}
}" border="0" />
screen.width*0.7) {this.resized=true; this.width=screen.width*0.7; this.alt='Click here to open new window\nCTRL+Mouse wheel to zoom in/out';}
}" border="0" />
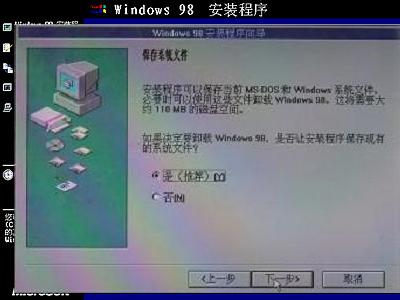
這裏選擇安裝係統文件所用的目錄,默認是安裝在C:WINDOWS,點“下一步”出現如下圖。
 screen.width*0.7) {this.resized=true; this.width=screen.width*0.7; this.alt='Click here to open new window\nCTRL+Mouse wheel to zoom in/out';}
}" border="0" />
screen.width*0.7) {this.resized=true; this.width=screen.width*0.7; this.alt='Click here to open new window\nCTRL+Mouse wheel to zoom in/out';}
}" border="0" />
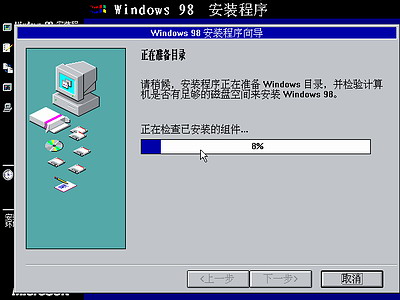
安裝程序開始檢查
所有硬盤,完成後
出現如下圖所示。
 screen.width*0.7) {this.resized=true; this.width=screen.width*0.7; this.alt='Click here to open new window\nCTRL+Mouse wheel to zoom in/out';}
}" border="0" />
screen.width*0.7) {this.resized=true; this.width=screen.width*0.7; this.alt='Click here to open new window\nCTRL+Mouse wheel to zoom in/out';}
}" border="0" />
開始檢查磁盤中己安裝的組件和準備安裝係統所用目錄,很快完成後出現如下圖所示。
 screen.width*0.7) {this.resized=true; this.width=screen.width*0.7; this.alt='Click here to open new window\nCTRL+Mouse wheel to zoom in/out';}
}" border="0" />
screen.width*0.7) {this.resized=true; this.width=screen.width*0.7; this.alt='Click here to open new window\nCTRL+Mouse wheel to zoom in/out';}
}" border="0" />
檢查可用磁盤空間,檢查磁盤錯誤。
完成後出現如下圖所示
 screen.width*0.7) {this.resized=true; this.width=screen.width*0.7; this.alt='Click here to open new window\nCTRL+Mouse wheel to zoom in/out';}
}" border="0" />
screen.width*0.7) {this.resized=true; this.width=screen.width*0.7; this.alt='Click here to open new window\nCTRL+Mouse wheel to zoom in/out';}
}" border="0" />
如果你沒有格式化C盤將會出現這幅圖像。
 screen.width*0.7) {this.resized=true; this.width=screen.width*0.7; this.alt='Click here to open new window\nCTRL+Mouse wheel to zoom in/out';}
}" border="0" />
screen.width*0.7) {this.resized=true; this.width=screen.width*0.7; this.alt='Click here to open new window\nCTRL+Mouse wheel to zoom in/out';}
}" border="0" />
選擇地理位置,默認選中國,點“下一步”出現如下圖。
 screen.width*0.7) {this.resized=true; this.width=screen.width*0.7; this.alt='Click here to open new window\nCTRL+Mouse wheel to zoom in/out';}
}" border="0" />
screen.width*0.7) {this.resized=true; this.width=screen.width*0.7; this.alt='Click here to open new window\nCTRL+Mouse wheel to zoom in/out';}
}" border="0" />
不論你是否想製作Windows 98啟動盤,都要點“下一步”。
 screen.width*0.7) {this.resized=true; this.width=screen.width*0.7; this.alt='Click here to open new window\nCTRL+Mouse wheel to zoom in/out';}
}" border="0" />
screen.width*0.7) {this.resized=true; this.width=screen.width*0.7; this.alt='Click here to open new window\nCTRL+Mouse wheel to zoom in/out';}
}" border="0" />
如果你不想製作Windows 98啟動盤請點擊“取消”跳過這一步。建議你製作啟動盤,請將取消了寫保護的空白軟盤放進軟驅中,點擊“確定”開始製作啟動盤。
 screen.width*0.7) {this.resized=true; this.width=screen.width*0.7; this.alt='Click here to open new window\nCTRL+Mouse wheel to zoom in/out';}
}" border="0" />
screen.width*0.7) {this.resized=true; this.width=screen.width*0.7; this.alt='Click here to open new window\nCTRL+Mouse wheel to zoom in/out';}
}" border="0" />
正在製作98啟動盤,完成後顯示如下圖(因軟盤比較容易損壞,建議多製作一張啟動盤備用)。
 screen.width*0.7) {this.resized=true; this.width=screen.width*0.7; this.alt='Click here to open new window\nCTRL+Mouse wheel to zoom in/out';}
}" border="0" />
screen.width*0.7) {this.resized=true; this.width=screen.width*0.7; this.alt='Click here to open new window\nCTRL+Mouse wheel to zoom in/out';}
}" border="0" />
取出剛製作的98啟動軟盤,然後單擊“確定”。
 screen.width*0.7) {this.resized=true; this.width=screen.width*0.7; this.alt='Click here to open new window\nCTRL+Mouse wheel to zoom in/out';}
}" border="0" />
screen.width*0.7) {this.resized=true; this.width=screen.width*0.7; this.alt='Click here to open new window\nCTRL+Mouse wheel to zoom in/out';}
}" border="0" />
這裏點擊“下一步”之後就沒有上一步了,程序不可逆,沒有回頭的餘地,點“下一步”沒什麽大不了的。
 screen.width*0.7) {this.resized=true; this.width=screen.width*0.7; this.alt='Click here to open new window\nCTRL+Mouse wheel to zoom in/out';}
}" border="0" />
screen.width*0.7) {this.resized=true; this.width=screen.width*0.7; this.alt='Click here to open new window\nCTRL+Mouse wheel to zoom in/out';}
}" border="0" />
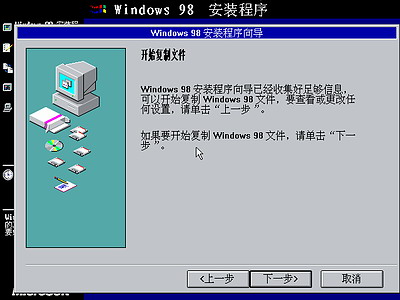
開始複製所有文件?你可以去休息了,複製完成後如下圖。
 screen.width*0.7) {this.resized=true; this.width=screen.width*0.7; this.alt='Click here to open new window\nCTRL+Mouse wheel to zoom in/out';}
}" border="0" />
screen.width*0.7) {this.resized=true; this.width=screen.width*0.7; this.alt='Click here to open new window\nCTRL+Mouse wheel to zoom in/out';}
}" border="0" />
如果你還沒有取出軟盤,請取出軟盤後點“確定”。
 screen.width*0.7) {this.resized=true; this.width=screen.width*0.7; this.alt='Click here to open new window\nCTRL+Mouse wheel to zoom in/out';}
}" border="0" />
screen.width*0.7) {this.resized=true; this.width=screen.width*0.7; this.alt='Click here to open new window\nCTRL+Mouse wheel to zoom in/out';}
}" border="0" />
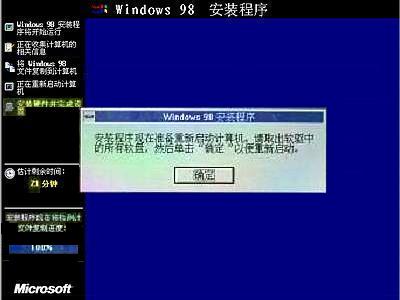
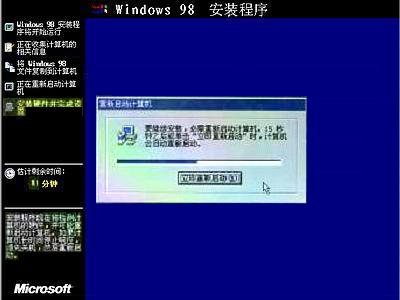
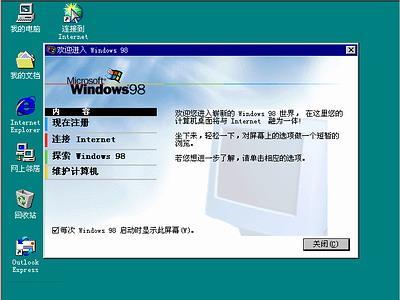
係統將重新啟動,啟動時第一次出現Windows 98啟動畫麵,啟動完成後開始安裝硬件,開始菜單,係統設置等等。其間會重新啟動幾次,你可以休息一下了,安裝程序會自動完成餘下的全部過程。見到如下圖所示時即大功告成。
 screen.width*0.7) {this.resized=true; this.width=screen.width*0.7; this.alt='Click here to open new window\nCTRL+Mouse wheel to zoom in/out';}
}" border="0" />
screen.width*0.7) {this.resized=true; this.width=screen.width*0.7; this.alt='Click here to open new window\nCTRL+Mouse wheel to zoom in/out';}
}" border="0" />
四、結尾工作:
1.安裝驅動程序,請參考--->驅動安裝
2.設置上網連接,上網升級係統,進行係統設置
3.安裝殺毒軟件,升級殺毒軟件,裝程序等。
概括起來,結尾工作所用的時間比安裝所用的時間長很多。建議大多數用戶,裝完係統及程序後優化一下係統,然後用係統備份工具(如Ghost中文伴侶等)將整個C盤備份為一個鏡像文件(鏡像文件大小約為整個C盤文件大小的1/3至1/4左右),以後如果係統損壞就可以用不到10分鍾時間來恢複一個同備份時一模一樣的全新係統。
一、準備工作:
1.首先當然是要準備好Windows 98的係統安裝光盤。
2.在可能的情況下,可以在運行安裝程序之前用磁盤掃描程序將所有硬盤掃描一遍,檢查硬盤錯誤並進行修複,否則安裝程序運行時如果檢查到有硬盤錯誤就會很麻煩。 3.如果安裝過程中需要用產品密匙(安裝序列號)的,用紙張記錄安裝文件的產品密匙(安裝序列號)。
4.安裝之前可以用驅動程序備份工具(如:驅動精靈)將Windows 98下的所有驅動程序備份到硬盤上(如∶Frive)。最好能上網下載本機的網卡驅動和調製解調器等的驅動程序,如果你用寬帶連接請下載並保存寬帶撥號軟件Enternet300,能上網就能找到大部分所要的軟件。
5.如果你想在安裝過程中格式化C盤(建議安裝過程中格式化C盤),請備份C盤有用的數據。
6.必須有FAT或FAT32文件係統格式的分區,因為Windows 98隻能安裝在FAT或FAT32文件係統格式的分區,推薦分區空間大於2G。
二、用光盤啟動係統:
(如果你已經知道方法請轉到下一步),將98安裝光盤放入光驅,重新啟動係統並把光驅設為第一啟動盤,保存設置並重啟,如無意外即可見到安裝界麵。
三、安裝Windows 98
光盤自啟動後,如無意外即可見到啟動界麵,將出現如下圖所示,如光盤不能自啟動,可用98啟動軟盤啟動(設軟驅為第一啟動盤)。
screen.width*0.7) {this.resized=true; this.width=screen.width*0.7; this.alt='Click here to open new window\nCTRL+Mouse wheel to zoom in/out';}
}" border="0" />如果你想格式化C盤,即選第二項進入DOS下,在提示符“A:>_”下輸入“format
c:”後回車,再輸入“y”後回車即開如格式化C盤!
在這裏我已經格式化C盤了,所以選第一項(從光盤安裝98)後直接回車,很快出現如下圖所示,(如果不選擇在30秒後會自動啟動第一項)。
screen.width*0.7) {this.resized=true; this.width=screen.width*0.7; this.alt='Click here to open new window\nCTRL+Mouse wheel to zoom in/out';}
}" border="0" />一啟動就
可以用鼠標了,中文界麵,
點擊“繼續”按鈕,出現如下圖。
screen.width*0.7) {this.resized=true; this.width=screen.width*0.7; this.alt='Click here to open new window\nCTRL+Mouse wheel to zoom in/out';}
}" border="0" />正在準備Windows 98安裝向導,很快結束,出現如下圖所示。
screen.width*0.7) {this.resized=true; this.width=screen.width*0.7; this.alt='Click here to open new window\nCTRL+Mouse wheel to zoom in/out';}
}" border="0" />許可協議當然是要接受啦!否則無法
安裝。用鼠標移動光標到“接
受協議”前麵的圓圈裏點擊一下使圓圈內多了一個黑點,然後點“下一步”出現如下圖。
screen.width*0.7) {this.resized=true; this.width=screen.width*0.7; this.alt='Click here to open new window\nCTRL+Mouse wheel to zoom in/out';}
}" border="0" />這裏選擇安裝係統文件所用的目錄,默認是安裝在C:WINDOWS,點“下一步”出現如下圖。
screen.width*0.7) {this.resized=true; this.width=screen.width*0.7; this.alt='Click here to open new window\nCTRL+Mouse wheel to zoom in/out';}
}" border="0" />安裝程序開始檢查
所有硬盤,完成後
出現如下圖所示。
screen.width*0.7) {this.resized=true; this.width=screen.width*0.7; this.alt='Click here to open new window\nCTRL+Mouse wheel to zoom in/out';}
}" border="0" />開始檢查磁盤中己安裝的組件和準備安裝係統所用目錄,很快完成後出現如下圖所示。
screen.width*0.7) {this.resized=true; this.width=screen.width*0.7; this.alt='Click here to open new window\nCTRL+Mouse wheel to zoom in/out';}
}" border="0" />檢查可用磁盤空間,檢查磁盤錯誤。
完成後出現如下圖所示
screen.width*0.7) {this.resized=true; this.width=screen.width*0.7; this.alt='Click here to open new window\nCTRL+Mouse wheel to zoom in/out';}
}" border="0" />如果你沒有格式化C盤將會出現這幅圖像。
screen.width*0.7) {this.resized=true; this.width=screen.width*0.7; this.alt='Click here to open new window\nCTRL+Mouse wheel to zoom in/out';}
}" border="0" />選擇地理位置,默認選中國,點“下一步”出現如下圖。
screen.width*0.7) {this.resized=true; this.width=screen.width*0.7; this.alt='Click here to open new window\nCTRL+Mouse wheel to zoom in/out';}
}" border="0" />不論你是否想製作Windows 98啟動盤,都要點“下一步”。
screen.width*0.7) {this.resized=true; this.width=screen.width*0.7; this.alt='Click here to open new window\nCTRL+Mouse wheel to zoom in/out';}
}" border="0" />如果你不想製作Windows 98啟動盤請點擊“取消”跳過這一步。建議你製作啟動盤,請將取消了寫保護的空白軟盤放進軟驅中,點擊“確定”開始製作啟動盤。
screen.width*0.7) {this.resized=true; this.width=screen.width*0.7; this.alt='Click here to open new window\nCTRL+Mouse wheel to zoom in/out';}
}" border="0" />正在製作98啟動盤,完成後顯示如下圖(因軟盤比較容易損壞,建議多製作一張啟動盤備用)。
screen.width*0.7) {this.resized=true; this.width=screen.width*0.7; this.alt='Click here to open new window\nCTRL+Mouse wheel to zoom in/out';}
}" border="0" />取出剛製作的98啟動軟盤,然後單擊“確定”。
screen.width*0.7) {this.resized=true; this.width=screen.width*0.7; this.alt='Click here to open new window\nCTRL+Mouse wheel to zoom in/out';}
}" border="0" />這裏點擊“下一步”之後就沒有上一步了,程序不可逆,沒有回頭的餘地,點“下一步”沒什麽大不了的。
screen.width*0.7) {this.resized=true; this.width=screen.width*0.7; this.alt='Click here to open new window\nCTRL+Mouse wheel to zoom in/out';}
}" border="0" />開始複製所有文件?你可以去休息了,複製完成後如下圖。
screen.width*0.7) {this.resized=true; this.width=screen.width*0.7; this.alt='Click here to open new window\nCTRL+Mouse wheel to zoom in/out';}
}" border="0" />如果你還沒有取出軟盤,請取出軟盤後點“確定”。
screen.width*0.7) {this.resized=true; this.width=screen.width*0.7; this.alt='Click here to open new window\nCTRL+Mouse wheel to zoom in/out';}
}" border="0" />係統將重新啟動,啟動時第一次出現Windows 98啟動畫麵,啟動完成後開始安裝硬件,開始菜單,係統設置等等。其間會重新啟動幾次,你可以休息一下了,安裝程序會自動完成餘下的全部過程。見到如下圖所示時即大功告成。
screen.width*0.7) {this.resized=true; this.width=screen.width*0.7; this.alt='Click here to open new window\nCTRL+Mouse wheel to zoom in/out';}
}" border="0" />四、結尾工作:
1.安裝驅動程序,請參考--->驅動安裝
2.設置上網連接,上網升級係統,進行係統設置
3.安裝殺毒軟件,升級殺毒軟件,裝程序等。
概括起來,結尾工作所用的時間比安裝所用的時間長很多。建議大多數用戶,裝完係統及程序後優化一下係統,然後用係統備份工具(如Ghost中文伴侶等)將整個C盤備份為一個鏡像文件(鏡像文件大小約為整個C盤文件大小的1/3至1/4左右),以後如果係統損壞就可以用不到10分鍾時間來恢複一個同備份時一模一樣的全新係統。
Windows Me篇:
一、準備工作:
1.準備好Windows Me簡體中文版安裝光盤,並檢查光驅是否支持自啟動。
2.可能的情況下,在運行安裝程序前用磁盤掃描程序掃描所有硬盤檢查硬盤錯誤並進行修複,否則安裝程序運行時如檢查到有硬盤錯誤即會很麻煩。
3.用紙張記錄安裝文件的產品密匙(安裝序列號)。
4.可能的情況下,用驅動程序備份工具(如:驅動精靈)將原Windows Me下的所有驅動程序備份到硬盤上(如∶Frive)。最好能記蟲靼濉⑼?ā⑾鑰ǖ戎饕?布?男禿偶吧??Ъ遙?は認略厙??絛蟣贛謾?br /> 5.如果你想在安裝過程中格式化C盤或D盤(建議安裝過程中格式化C盤),請備份C盤或D盤有用的數據。
6.必須有FAT或FAT32文件係統格式的活動分區,Windows Me亦隻能安裝在FAT或FAT32文件係統格式的分區,推薦分區空間大於2G。
二、用光盤啟動係統:
(如果你已經知道方法請轉到下一步),將Me安裝光盤放入光驅,重新啟動係統並把光驅設為第一啟動盤,保存設置並重啟,如無意外即可見到安裝界麵:
三、安裝Windows ME
光盤自啟動後,如無意外即可見到啟動界麵,如光盤不能自啟動,可用Me或98啟動軟盤啟動(設軟驅為第一啟動盤)。
 screen.width*0.7) {this.resized=true; this.width=screen.width*0.7; this.alt='Click here to open new window\nCTRL+Mouse wheel to zoom in/out';}
}" border="0" />
screen.width*0.7) {this.resized=true; this.width=screen.width*0.7; this.alt='Click here to open new window\nCTRL+Mouse wheel to zoom in/out';}
}" border="0" />
第一項是從光盤啟動Me安裝程序;如果你想格式化C盤可選第三項或第二項進入DOS下運行“format c:”,格式化C盤後再重新啟動安裝程序;如果用Me啟動軟盤啟動,將沒有圖1中的第一個選項。默認情況下30秒後自動啟動第一項。
 screen.width*0.7) {this.resized=true; this.width=screen.width*0.7; this.alt='Click here to open new window\nCTRL+Mouse wheel to zoom in/out';}
}" border="0" />
screen.width*0.7) {this.resized=true; this.width=screen.width*0.7; this.alt='Click here to open new window\nCTRL+Mouse wheel to zoom in/out';}
}" border="0" />
安裝程序正準備安裝向導,接著,出現如下圖所示。
 screen.width*0.7) {this.resized=true; this.width=screen.width*0.7; this.alt='Click here to open new window\nCTRL+Mouse wheel to zoom in/out';}
}" border="0" />
screen.width*0.7) {this.resized=true; this.width=screen.width*0.7; this.alt='Click here to open new window\nCTRL+Mouse wheel to zoom in/out';}
}" border="0" />
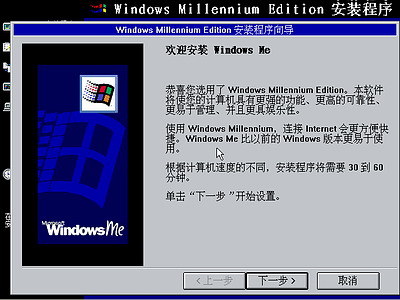
出現歡迎畫麵,點“下一步”。
 screen.width*0.7) {this.resized=true; this.width=screen.width*0.7; this.alt='Click here to open new window\nCTRL+Mouse wheel to zoom in/out';}
}" border="0" />
screen.width*0.7) {this.resized=true; this.width=screen.width*0.7; this.alt='Click here to open new window\nCTRL+Mouse wheel to zoom in/out';}
}" border="0" />
許可協議,這裏沒有選擇的餘地,選中“接受協議”後,“下一步”按鈕由灰色變為可操作,點“下一步”。
 screen.width*0.7) {this.resized=true; this.width=screen.width*0.7; this.alt='Click here to open new window\nCTRL+Mouse wheel to zoom in/out';}
}" border="0" />
screen.width*0.7) {this.resized=true; this.width=screen.width*0.7; this.alt='Click here to open new window\nCTRL+Mouse wheel to zoom in/out';}
}" border="0" />
如果你沒觴xxは燃竅虜?訪茉浚ò滄靶蛄瀉牛┚痛蠹?呂玻≌飫鍤淙氚滄靶蛄瀉牛?恪跋亂徊健卑磁ァ?/font>
 screen.width*0.7) {this.resized=true; this.width=screen.width*0.7; this.alt='Click here to open new window\nCTRL+Mouse wheel to zoom in/out';}
}" border="0" />
screen.width*0.7) {this.resized=true; this.width=screen.width*0.7; this.alt='Click here to open new window\nCTRL+Mouse wheel to zoom in/out';}
}" border="0" />
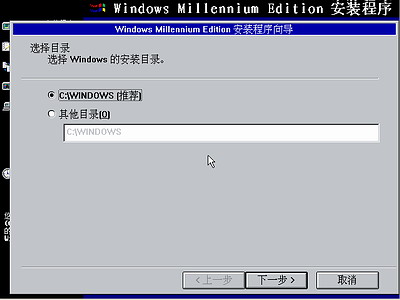
選擇安裝所用的分區和目錄,默認為C:WINDOWS,點“下一步”按鈕,出現下圖。
 screen.width*0.7) {this.resized=true; this.width=screen.width*0.7; this.alt='Click here to open new window\nCTRL+Mouse wheel to zoom in/out';}
}" border="0" />
screen.width*0.7) {this.resized=true; this.width=screen.width*0.7; this.alt='Click here to open new window\nCTRL+Mouse wheel to zoom in/out';}
}" border="0" />
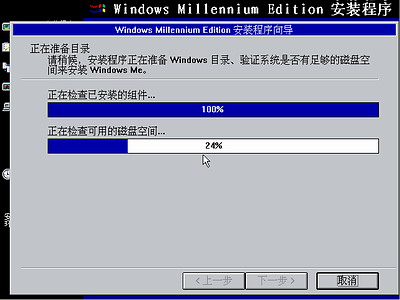
接著出現如下圖所示。
 screen.width*0.7) {this.resized=true; this.width=screen.width*0.7; this.alt='Click here to open new window\nCTRL+Mouse wheel to zoom in/out';}
}" border="0" />
screen.width*0.7) {this.resized=true; this.width=screen.width*0.7; this.alt='Click here to open new window\nCTRL+Mouse wheel to zoom in/out';}
}" border="0" />
等待驗證工序通過。
 screen.width*0.7) {this.resized=true; this.width=screen.width*0.7; this.alt='Click here to open new window\nCTRL+Mouse wheel to zoom in/out';}
}" border="0" />
screen.width*0.7) {this.resized=true; this.width=screen.width*0.7; this.alt='Click here to open new window\nCTRL+Mouse wheel to zoom in/out';}
}" border="0" />
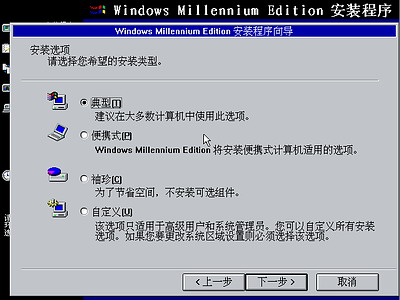
選擇安裝類型,一般選“典型”即可,點“下一步”按鈕。
 screen.width*0.7) {this.resized=true; this.width=screen.width*0.7; this.alt='Click here to open new window\nCTRL+Mouse wheel to zoom in/out';}
}" border="0" />
screen.width*0.7) {this.resized=true; this.width=screen.width*0.7; this.alt='Click here to open new window\nCTRL+Mouse wheel to zoom in/out';}
}" border="0" />
姓名欄輸入平時登陸係統所用的用戶名,公司自定,點“下一步”按鈕。
 screen.width*0.7) {this.resized=true; this.width=screen.width*0.7; this.alt='Click here to open new window\nCTRL+Mouse wheel to zoom in/out';}
}" border="0" />
screen.width*0.7) {this.resized=true; this.width=screen.width*0.7; this.alt='Click here to open new window\nCTRL+Mouse wheel to zoom in/out';}
}" border="0" />
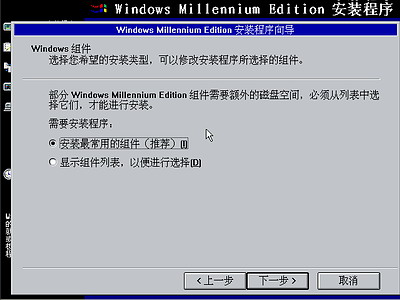
點“下一步”按鈕,出現如下圖。
 screen.width*0.7) {this.resized=true; this.width=screen.width*0.7; this.alt='Click here to open new window\nCTRL+Mouse wheel to zoom in/out';}
}" border="0" />
screen.width*0.7) {this.resized=true; this.width=screen.width*0.7; this.alt='Click here to open new window\nCTRL+Mouse wheel to zoom in/out';}
}" border="0" />
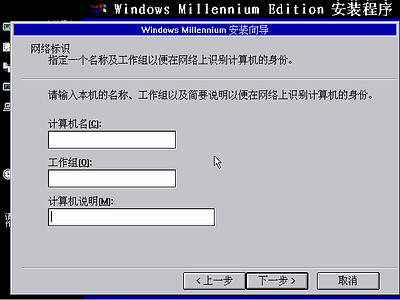
默認情況下以上各選項都已自動輸入,有必要時自已更改,點“下一步”按鈕。
 screen.width*0.7) {this.resized=true; this.width=screen.width*0.7; this.alt='Click here to open new window\nCTRL+Mouse wheel to zoom in/out';}
}" border="0" />
screen.width*0.7) {this.resized=true; this.width=screen.width*0.7; this.alt='Click here to open new window\nCTRL+Mouse wheel to zoom in/out';}
}" border="0" />
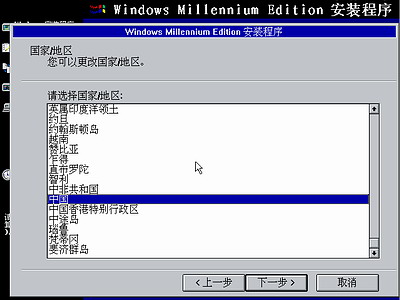
默認情況下選“中國”即可,點“下一步”按鈕。
 screen.width*0.7) {this.resized=true; this.width=screen.width*0.7; this.alt='Click here to open new window\nCTRL+Mouse wheel to zoom in/out';}
}" border="0" />
screen.width*0.7) {this.resized=true; this.width=screen.width*0.7; this.alt='Click here to open new window\nCTRL+Mouse wheel to zoom in/out';}
}" border="0" />
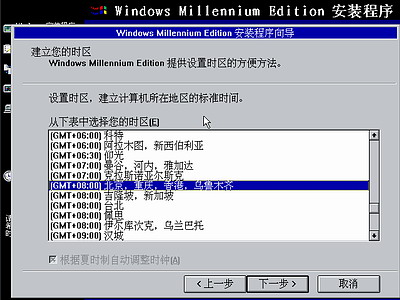
默認情況下選“北京時間”即可,點“下一步”按鈕。
 screen.width*0.7) {this.resized=true; this.width=screen.width*0.7; this.alt='Click here to open new window\nCTRL+Mouse wheel to zoom in/out';}
}" border="0" />
screen.width*0.7) {this.resized=true; this.width=screen.width*0.7; this.alt='Click here to open new window\nCTRL+Mouse wheel to zoom in/out';}
}" border="0" />
如果你是第一次安裝Me或沒有啟動軟盤,建議你在這裏創建“Me啟動盤”便於日後維護係統,將去除寫保護的空白軟盤放入軟驅中,點擊“確定”開始製作。你不想製作Windows Me啟動盤,都要點“確定”,然後在彈出的窗口中點“取消”按鈕。
 screen.width*0.7) {this.resized=true; this.width=screen.width*0.7; this.alt='Click here to open new window\nCTRL+Mouse wheel to zoom in/out';}
}" border="0" />
screen.width*0.7) {this.resized=true; this.width=screen.width*0.7; this.alt='Click here to open new window\nCTRL+Mouse wheel to zoom in/out';}
}" border="0" />
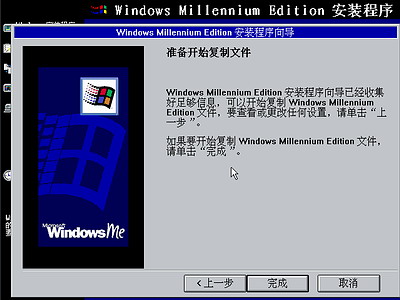
安裝向導至此結束了,點“完成”將開始正式安裝係統,出現如下圖。
 screen.width*0.7) {this.resized=true; this.width=screen.width*0.7; this.alt='Click here to open new window\nCTRL+Mouse wheel to zoom in/out';}
}" border="0" />
screen.width*0.7) {this.resized=true; this.width=screen.width*0.7; this.alt='Click here to open new window\nCTRL+Mouse wheel to zoom in/out';}
}" border="0" />
安裝過程所用時間較長,但不再需要你參與,請在複製文件結束,係統自動重新啟動
時,將硬盤設
為第一啟動盤或第一次重啟時臨時取出光盤(或啟動軟盤),等第一次重啟後再放入,使係統不至於又再重新啟動安裝程序。
重新啟動將首次出現Me啟動畫麵。
 screen.width*0.7) {this.resized=true; this.width=screen.width*0.7; this.alt='Click here to open new window\nCTRL+Mouse wheel to zoom in/out';}
}" border="0" />
screen.width*0.7) {this.resized=true; this.width=screen.width*0.7; this.alt='Click here to open new window\nCTRL+Mouse wheel to zoom in/out';}
}" border="0" />
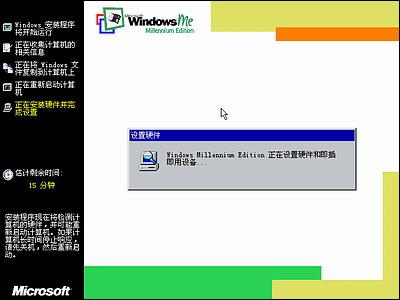
開始安裝硬件並完成設置,接著出現如下圖。
 screen.width*0.7) {this.resized=true; this.width=screen.width*0.7; this.alt='Click here to open new window\nCTRL+Mouse wheel to zoom in/out';}
}" border="0" />
screen.width*0.7) {this.resized=true; this.width=screen.width*0.7; this.alt='Click here to open new window\nCTRL+Mouse wheel to zoom in/out';}
}" border="0" />
出現用戶登陸界麵,如果你不設置密碼,直接點確定進入。第一次進係統所用時間較長。
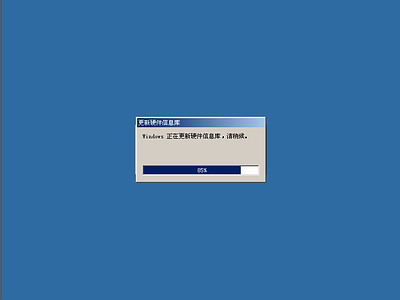 screen.width*0.7) {this.resized=true; this.width=screen.width*0.7; this.alt='Click here to open new window\nCTRL+Mouse wheel to zoom in/out';}
}" border="0" />
screen.width*0.7) {this.resized=true; this.width=screen.width*0.7; this.alt='Click here to open new window\nCTRL+Mouse wheel to zoom in/out';}
}" border="0" />
很多複雜過程後,接著出現如下圖。
 screen.width*0.7) {this.resized=true; this.width=screen.width*0.7; this.alt='Click here to open new window\nCTRL+Mouse wheel to zoom in/out';}
}" border="0" />
screen.width*0.7) {this.resized=true; this.width=screen.width*0.7; this.alt='Click here to open new window\nCTRL+Mouse wheel to zoom in/out';}
}" border="0" />
這是Windows Me的介紹視頻,隻在第一次進入係統時運行。如果這時你能聽到聲音即
表明你的聲卡驅動已安裝,介紹畫麵結束後,接著出現如下圖。
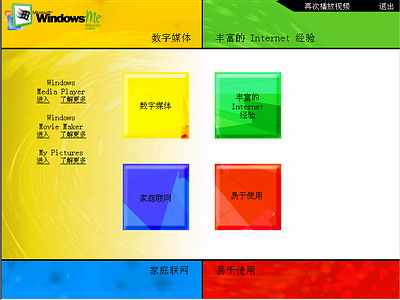 screen.width*0.7) {this.resized=true; this.width=screen.width*0.7; this.alt='Click here to open new window\nCTRL+Mouse wheel to zoom in/out';}
}" border="0" />
screen.width*0.7) {this.resized=true; this.width=screen.width*0.7; this.alt='Click here to open new window\nCTRL+Mouse wheel to zoom in/out';}
}" border="0" />
在這裏可了解Windows Me的很多新特xxx,看完後,點擊右上角的“退出”按鈕關閉窗口。
 screen.width*0.7) {this.resized=true; this.width=screen.width*0.7; this.alt='Click here to open new window\nCTRL+Mouse wheel to zoom in/out';}
}" border="0" />
screen.width*0.7) {this.resized=true; this.width=screen.width*0.7; this.alt='Click here to open new window\nCTRL+Mouse wheel to zoom in/out';}
}" border="0" />
嗬!係統啟動成功。
四、安裝係統後應做的事情∶
檢
查硬盤驅動安裝是否完成,裝主板驅動....;
升級係統;裝殺毒軟件;裝應用程序;建立上網連接;優化係統......等。
一、準備工作:
1.準備好Windows Me簡體中文版安裝光盤,並檢查光驅是否支持自啟動。
2.可能的情況下,在運行安裝程序前用磁盤掃描程序掃描所有硬盤檢查硬盤錯誤並進行修複,否則安裝程序運行時如檢查到有硬盤錯誤即會很麻煩。
3.用紙張記錄安裝文件的產品密匙(安裝序列號)。
4.可能的情況下,用驅動程序備份工具(如:驅動精靈)將原Windows Me下的所有驅動程序備份到硬盤上(如∶Frive)。最好能記蟲靼濉⑼?ā⑾鑰ǖ戎饕?布?男禿偶吧??Ъ遙?は認略厙??絛蟣贛謾?br /> 5.如果你想在安裝過程中格式化C盤或D盤(建議安裝過程中格式化C盤),請備份C盤或D盤有用的數據。
6.必須有FAT或FAT32文件係統格式的活動分區,Windows Me亦隻能安裝在FAT或FAT32文件係統格式的分區,推薦分區空間大於2G。
二、用光盤啟動係統:
(如果你已經知道方法請轉到下一步),將Me安裝光盤放入光驅,重新啟動係統並把光驅設為第一啟動盤,保存設置並重啟,如無意外即可見到安裝界麵:
三、安裝Windows ME
光盤自啟動後,如無意外即可見到啟動界麵,如光盤不能自啟動,可用Me或98啟動軟盤啟動(設軟驅為第一啟動盤)。
screen.width*0.7) {this.resized=true; this.width=screen.width*0.7; this.alt='Click here to open new window\nCTRL+Mouse wheel to zoom in/out';}
}" border="0" />第一項是從光盤啟動Me安裝程序;如果你想格式化C盤可選第三項或第二項進入DOS下運行“format c:”,格式化C盤後再重新啟動安裝程序;如果用Me啟動軟盤啟動,將沒有圖1中的第一個選項。默認情況下30秒後自動啟動第一項。
screen.width*0.7) {this.resized=true; this.width=screen.width*0.7; this.alt='Click here to open new window\nCTRL+Mouse wheel to zoom in/out';}
}" border="0" />安裝程序正準備安裝向導,接著,出現如下圖所示。
screen.width*0.7) {this.resized=true; this.width=screen.width*0.7; this.alt='Click here to open new window\nCTRL+Mouse wheel to zoom in/out';}
}" border="0" />出現歡迎畫麵,點“下一步”。
screen.width*0.7) {this.resized=true; this.width=screen.width*0.7; this.alt='Click here to open new window\nCTRL+Mouse wheel to zoom in/out';}
}" border="0" />許可協議,這裏沒有選擇的餘地,選中“接受協議”後,“下一步”按鈕由灰色變為可操作,點“下一步”。
screen.width*0.7) {this.resized=true; this.width=screen.width*0.7; this.alt='Click here to open new window\nCTRL+Mouse wheel to zoom in/out';}
}" border="0" />如果你沒觴xxは燃竅虜?訪茉浚ò滄靶蛄瀉牛┚痛蠹?呂玻≌飫鍤淙氚滄靶蛄瀉牛?恪跋亂徊健卑磁ァ?/font>
screen.width*0.7) {this.resized=true; this.width=screen.width*0.7; this.alt='Click here to open new window\nCTRL+Mouse wheel to zoom in/out';}
}" border="0" />選擇安裝所用的分區和目錄,默認為C:WINDOWS,點“下一步”按鈕,出現下圖。
screen.width*0.7) {this.resized=true; this.width=screen.width*0.7; this.alt='Click here to open new window\nCTRL+Mouse wheel to zoom in/out';}
}" border="0" />接著出現如下圖所示。
screen.width*0.7) {this.resized=true; this.width=screen.width*0.7; this.alt='Click here to open new window\nCTRL+Mouse wheel to zoom in/out';}
}" border="0" />等待驗證工序通過。
screen.width*0.7) {this.resized=true; this.width=screen.width*0.7; this.alt='Click here to open new window\nCTRL+Mouse wheel to zoom in/out';}
}" border="0" />選擇安裝類型,一般選“典型”即可,點“下一步”按鈕。
screen.width*0.7) {this.resized=true; this.width=screen.width*0.7; this.alt='Click here to open new window\nCTRL+Mouse wheel to zoom in/out';}
}" border="0" />姓名欄輸入平時登陸係統所用的用戶名,公司自定,點“下一步”按鈕。
screen.width*0.7) {this.resized=true; this.width=screen.width*0.7; this.alt='Click here to open new window\nCTRL+Mouse wheel to zoom in/out';}
}" border="0" />點“下一步”按鈕,出現如下圖。
screen.width*0.7) {this.resized=true; this.width=screen.width*0.7; this.alt='Click here to open new window\nCTRL+Mouse wheel to zoom in/out';}
}" border="0" />默認情況下以上各選項都已自動輸入,有必要時自已更改,點“下一步”按鈕。
screen.width*0.7) {this.resized=true; this.width=screen.width*0.7; this.alt='Click here to open new window\nCTRL+Mouse wheel to zoom in/out';}
}" border="0" />默認情況下選“中國”即可,點“下一步”按鈕。
screen.width*0.7) {this.resized=true; this.width=screen.width*0.7; this.alt='Click here to open new window\nCTRL+Mouse wheel to zoom in/out';}
}" border="0" />默認情況下選“北京時間”即可,點“下一步”按鈕。
screen.width*0.7) {this.resized=true; this.width=screen.width*0.7; this.alt='Click here to open new window\nCTRL+Mouse wheel to zoom in/out';}
}" border="0" />如果你是第一次安裝Me或沒有啟動軟盤,建議你在這裏創建“Me啟動盤”便於日後維護係統,將去除寫保護的空白軟盤放入軟驅中,點擊“確定”開始製作。你不想製作Windows Me啟動盤,都要點“確定”,然後在彈出的窗口中點“取消”按鈕。
screen.width*0.7) {this.resized=true; this.width=screen.width*0.7; this.alt='Click here to open new window\nCTRL+Mouse wheel to zoom in/out';}
}" border="0" />安裝向導至此結束了,點“完成”將開始正式安裝係統,出現如下圖。
screen.width*0.7) {this.resized=true; this.width=screen.width*0.7; this.alt='Click here to open new window\nCTRL+Mouse wheel to zoom in/out';}
}" border="0" />安裝過程所用時間較長,但不再需要你參與,請在複製文件結束,係統自動重新啟動
時,將硬盤設
為第一啟動盤或第一次重啟時臨時取出光盤(或啟動軟盤),等第一次重啟後再放入,使係統不至於又再重新啟動安裝程序。
重新啟動將首次出現Me啟動畫麵。
screen.width*0.7) {this.resized=true; this.width=screen.width*0.7; this.alt='Click here to open new window\nCTRL+Mouse wheel to zoom in/out';}
}" border="0" />開始安裝硬件並完成設置,接著出現如下圖。
screen.width*0.7) {this.resized=true; this.width=screen.width*0.7; this.alt='Click here to open new window\nCTRL+Mouse wheel to zoom in/out';}
}" border="0" />出現用戶登陸界麵,如果你不設置密碼,直接點確定進入。第一次進係統所用時間較長。
screen.width*0.7) {this.resized=true; this.width=screen.width*0.7; this.alt='Click here to open new window\nCTRL+Mouse wheel to zoom in/out';}
}" border="0" />很多複雜過程後,接著出現如下圖。
screen.width*0.7) {this.resized=true; this.width=screen.width*0.7; this.alt='Click here to open new window\nCTRL+Mouse wheel to zoom in/out';}
}" border="0" />這是Windows Me的介紹視頻,隻在第一次進入係統時運行。如果這時你能聽到聲音即
表明你的聲卡驅動已安裝,介紹畫麵結束後,接著出現如下圖。
screen.width*0.7) {this.resized=true; this.width=screen.width*0.7; this.alt='Click here to open new window\nCTRL+Mouse wheel to zoom in/out';}
}" border="0" />在這裏可了解Windows Me的很多新特xxx,看完後,點擊右上角的“退出”按鈕關閉窗口。
screen.width*0.7) {this.resized=true; this.width=screen.width*0.7; this.alt='Click here to open new window\nCTRL+Mouse wheel to zoom in/out';}
}" border="0" />嗬!係統啟動成功。
四、安裝係統後應做的事情∶
檢
查硬盤驅動安裝是否完成,裝主板驅動....;
升級係統;裝殺毒軟件;裝應用程序;建立上網連接;優化係統......等。
Windows Vista Beta1
Windows Vista Beta1
Windows Vista Beta1英文測試版是微軟在2005年7月22日發布的。剛剛網上公布的Vista硬件要求可以參見
《
Windows
Vista所需硬件要求詳細曝光!
》
Vista Beta1英文測試版沒有提供在DOS下安裝程序。Windows Vista Beta1英文測試版大小為2.46G因此用CD是無法刻的因為容量不夠,所以必須要用DVD刻錄機才行這點要注意。
參考文章:
《Windows Vista所需硬件要求詳細曝光!》
安裝前請務必用紙筆記下安裝序列號。將光驅設為第一啟動盤,放入Windows Vista Beta1英文測試版安裝光盤到光驅,重新啟動電腦,當出現如下畫麵時快速按回車鍵。
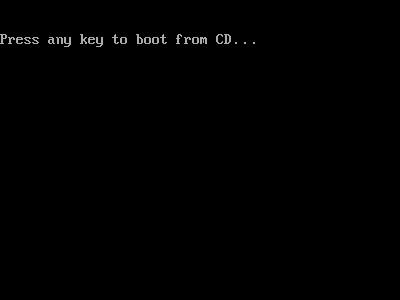 screen.width*0.7) {this.resized=true; this.width=screen.width*0.7; this.alt='Click here to open new window\nCTRL+Mouse wheel to zoom in/out';}
}" border="0" />
screen.width*0.7) {this.resized=true; this.width=screen.width*0.7; this.alt='Click here to open new window\nCTRL+Mouse wheel to zoom in/out';}
}" border="0" />
出現上畫麵時,在3秒內要按回車鍵,才能啟動光盤安裝,否則會啟動失敗。安裝啟動後首先出現如下。
 screen.width*0.7) {this.resized=true; this.width=screen.width*0.7; this.alt='Click here to open new window\nCTRL+Mouse wheel to zoom in/out';}
}" border="0" />
screen.width*0.7) {this.resized=true; this.width=screen.width*0.7; this.alt='Click here to open new window\nCTRL+Mouse wheel to zoom in/out';}
}" border="0" />
選擇“Install now”進行安裝。
 screen.width*0.7) {this.resized=true; this.width=screen.width*0.7; this.alt='Click here to open new window\nCTRL+Mouse wheel to zoom in/out';}
}" border="0" />
screen.width*0.7) {this.resized=true; this.width=screen.width*0.7; this.alt='Click here to open new window\nCTRL+Mouse wheel to zoom in/out';}
}" border="0" />
隨即出現如上圖所示的等待畫麵,畫麵提示正在啟動安裝程序。
 screen.width*0.7) {this.resized=true; this.width=screen.width*0.7; this.alt='Click here to open new window\nCTRL+Mouse wheel to zoom in/out';}
}" border="0" />
screen.width*0.7) {this.resized=true; this.width=screen.width*0.7; this.alt='Click here to open new window\nCTRL+Mouse wheel to zoom in/out';}
}" border="0" />
在“Product key”中輸入序列號。從上圖可知,安裝過程分三步∶第一步收集數據、第二步安裝過程、第三步啟動係統。
第一步完成後會重新啟動,以後就自動安裝了,不再需要你參與,與安裝XP對比要簡單很多。
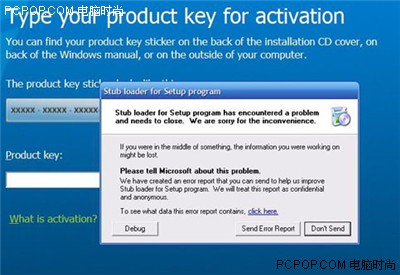 screen.width*0.7) {this.resized=true; this.width=screen.width*0.7; this.alt='Click here to open new window\nCTRL+Mouse wheel to zoom in/out';}
}" border="0" />
screen.width*0.7) {this.resized=true; this.width=screen.width*0.7; this.alt='Click here to open new window\nCTRL+Mouse wheel to zoom in/out';}
}" border="0" />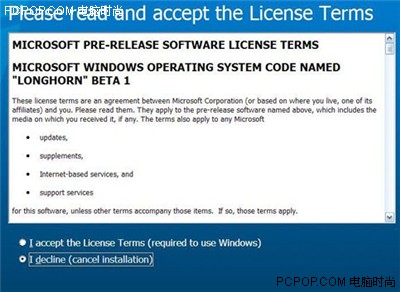
許可協議,不用多說,隻有同意了。按“Tab”選擇鍵,選擇“I accept the terms(required to use Windows)”後按回車鍵。
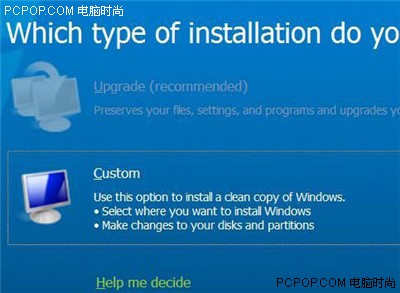 screen.width*0.7) {this.resized=true; this.width=screen.width*0.7; this.alt='Click here to open new window\nCTRL+Mouse wheel to zoom in/out';}
}" border="0" />
screen.width*0.7) {this.resized=true; this.width=screen.width*0.7; this.alt='Click here to open new window\nCTRL+Mouse wheel to zoom in/out';}
}" border="0" />
這裏是設置安裝選項∶安裝路徑、計算機名。而在XP中常見的用戶名、安裝語
言、鍵盤種
類、時區則因為是測試版本,所以這些選項不能更改。
 screen.width*0.7) {this.resized=true; this.width=screen.width*0.7; this.alt='Click here to open new window\nCTRL+Mouse wheel to zoom in/out';}
}" border="0" />
screen.width*0.7) {this.resized=true; this.width=screen.width*0.7; this.alt='Click here to open new window\nCTRL+Mouse wheel to zoom in/out';}
}" border="0" />
上圖為選擇安裝係統所用的分區,並同時可對分區進行∶使用(按R鍵)、刪除(按D鍵)、格式化(按F鍵)、新建(按N鍵)、擴充(按E鍵)、加載(按L鍵)等操作。上圖列出了各分區的大小和可用空間。我要用C盤來安裝係統,但C盤可用空間隻有2,490M(剛安裝完成時已用空間為2,540M),是不夠空間的,所以要格式化C盤。現在默認選中了C盤(橙色標示部分)按“F”鍵準備格式化C盤。
 screen.width*0.7) {this.resized=true; this.width=screen.width*0.7; this.alt='Click here to open new window\nCTRL+Mouse wheel to zoom in/out';}
}" border="0" />
screen.width*0.7) {this.resized=true; this.width=screen.width*0.7; this.alt='Click here to open new window\nCTRL+Mouse wheel to zoom in/out';}
}" border="0" />
已經成功啟動了。新的各項功能有待大家發掘。
Windows Vista Beta1英文測試版是微軟在2005年7月22日發布的。剛剛網上公布的Vista硬件要求可以參見
《
Windows
Vista所需硬件要求詳細曝光!
》
Vista Beta1英文測試版沒有提供在DOS下安裝程序。Windows Vista Beta1英文測試版大小為2.46G因此用CD是無法刻的因為容量不夠,所以必須要用DVD刻錄機才行這點要注意。
參考文章:
《Windows Vista所需硬件要求詳細曝光!》
安裝前請務必用紙筆記下安裝序列號。將光驅設為第一啟動盤,放入Windows Vista Beta1英文測試版安裝光盤到光驅,重新啟動電腦,當出現如下畫麵時快速按回車鍵。
screen.width*0.7) {this.resized=true; this.width=screen.width*0.7; this.alt='Click here to open new window\nCTRL+Mouse wheel to zoom in/out';}
}" border="0" />出現上畫麵時,在3秒內要按回車鍵,才能啟動光盤安裝,否則會啟動失敗。安裝啟動後首先出現如下。
screen.width*0.7) {this.resized=true; this.width=screen.width*0.7; this.alt='Click here to open new window\nCTRL+Mouse wheel to zoom in/out';}
}" border="0" />選擇“Install now”進行安裝。
screen.width*0.7) {this.resized=true; this.width=screen.width*0.7; this.alt='Click here to open new window\nCTRL+Mouse wheel to zoom in/out';}
}" border="0" />隨即出現如上圖所示的等待畫麵,畫麵提示正在啟動安裝程序。
screen.width*0.7) {this.resized=true; this.width=screen.width*0.7; this.alt='Click here to open new window\nCTRL+Mouse wheel to zoom in/out';}
}" border="0" />在“Product key”中輸入序列號。從上圖可知,安裝過程分三步∶第一步收集數據、第二步安裝過程、第三步啟動係統。
第一步完成後會重新啟動,以後就自動安裝了,不再需要你參與,與安裝XP對比要簡單很多。
screen.width*0.7) {this.resized=true; this.width=screen.width*0.7; this.alt='Click here to open new window\nCTRL+Mouse wheel to zoom in/out';}
}" border="0" />screen.width*0.7) {this.resized=true; this.width=screen.width*0.7; this.alt='Click here to open new window\nCTRL+Mouse wheel to zoom in/out';}
}" border="0" />許可協議,不用多說,隻有同意了。按“Tab”選擇鍵,選擇“I accept the terms(required to use Windows)”後按回車鍵。
screen.width*0.7) {this.resized=true; this.width=screen.width*0.7; this.alt='Click here to open new window\nCTRL+Mouse wheel to zoom in/out';}
}" border="0" />screen.width*0.7) {this.resized=true; this.width=screen.width*0.7; this.alt='Click here to open new window\nCTRL+Mouse wheel to zoom in/out';}
}" border="0" />這裏是設置安裝選項∶安裝路徑、計算機名。而在XP中常見的用戶名、安裝語
言、鍵盤種
類、時區則因為是測試版本,所以這些選項不能更改。
screen.width*0.7) {this.resized=true; this.width=screen.width*0.7; this.alt='Click here to open new window\nCTRL+Mouse wheel to zoom in/out';}
}" border="0" />上圖為選擇安裝係統所用的分區,並同時可對分區進行∶使用(按R鍵)、刪除(按D鍵)、格式化(按F鍵)、新建(按N鍵)、擴充(按E鍵)、加載(按L鍵)等操作。上圖列出了各分區的大小和可用空間。我要用C盤來安裝係統,但C盤可用空間隻有2,490M(剛安裝完成時已用空間為2,540M),是不夠空間的,所以要格式化C盤。現在默認選中了C盤(橙色標示部分)按“F”鍵準備格式化C盤。
screen.width*0.7) {this.resized=true; this.width=screen.width*0.7; this.alt='Click here to open new window\nCTRL+Mouse wheel to zoom in/out';}
}" border="0" />已經成功啟動了。新的各項功能有待大家發掘。
紅旗Red Flag Linux 4.0
紅旗Red Flag Linux 4.0
準備工作:安裝光盤或鏡像文件.
2
.在硬盤中至少留2個分區給安裝係統用,掛載點所用分區推薦4G以上,交換區不用太大在200M-600M左右比較適合,文件係統格式不論,反正安裝過程會重新格式化。
3.記錄下你電腦中下列設備型號∶鼠標、鍵盤、顯卡、網卡、顯示器。及網絡設置用到的IP地址、子網掩碼、默認網關和DNS名稱服務器地址
等信息。
二、安裝紅旗Linux桌麵版 4.0
將光驅設為第一啟動盤,放入第一張安裝光盤後重新啟動電腦,如果你的光驅支持自啟動,
如無意外將出現如下圖。
 screen.width*0.7) {this.resized=true; this.width=screen.width*0.7; this.alt='Click here to open new window\nCTRL+Mouse wheel to zoom in/out';}
}" border="0" />
screen.width*0.7) {this.resized=true; this.width=screen.width*0.7; this.alt='Click here to open new window\nCTRL+Mouse wheel to zoom in/out';}
}" border="0" />
如果不進行操作,在10秒後自動進入下一畫麵。
 screen.width*0.7) {this.resized=true; this.width=screen.width*0.7; this.alt='Click here to open new window\nCTRL+Mouse wheel to zoom in/out';}
}" border="0" />
screen.width*0.7) {this.resized=true; this.width=screen.width*0.7; this.alt='Click here to open new window\nCTRL+Mouse wheel to zoom in/out';}
}" border="0" />
一啟動就
能使用鼠標了,比效
方便;軟件協議,隻能選同意,除非你不想安裝,點擊“下一步”。
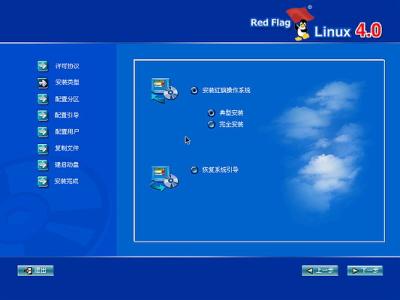 screen.width*0.7) {this.resized=true; this.width=screen.width*0.7; this.alt='Click here to open new window\nCTRL+Mouse wheel to zoom in/out';}
}" border="0" />
screen.width*0.7) {this.resized=true; this.width=screen.width*0.7; this.alt='Click here to open new window\nCTRL+Mouse wheel to zoom in/out';}
}" border="0" />
選擇安裝類型,一般選“典型安裝”即可,這裏還有一個選擇:“恢複係統引導”,它的作用是在以後係統使用中,係統引導出問題時用它進行恢複的.這裏先不管它,點下一步。
 screen.width*0.7) {this.resized=true; this.width=screen.width*0.7; this.alt='Click here to open new window\nCTRL+Mouse wheel to zoom in/out';}
}" border="0" />
screen.width*0.7) {this.resized=true; this.width=screen.width*0.7; this.alt='Click here to open new window\nCTRL+Mouse wheel to zoom in/out';}
}" border="0" />
配置分區是關鍵的一步,搞不
好會丟失硬盤有用數據,請小心,有些長期使用Windows的人裝不了Linux的主要原因也是因為這一步不懂。如果選
“用fdisk程序手工分區(隻限專家)”後,點擊“下一步”會顯示下圖。
 screen.width*0.7) {this.resized=true; this.width=screen.width*0.7; this.alt='Click here to open new window\nCTRL+Mouse wheel to zoom in/out';}
}" border="0" />
screen.width*0.7) {this.resized=true; this.width=screen.width*0.7; this.alt='Click here to open new window\nCTRL+Mouse wheel to zoom in/out';}
}" border="0" />
用這種方法分區,不直接不適合一般人使用,也不適合我用!於是點擊“上一步”按鈕,返回到上圖後,再選擇用“用Disk Druid手工分區”,然後點擊“下一步”。
 screen.width*0.7) {this.resized=true; this.width=screen.width*0.7; this.alt='Click here to open new window\nCTRL+Mouse wheel to zoom in/out';}
}" border="0" />
screen.width*0.7) {this.resized=true; this.width=screen.width*0.7; this.alt='Click here to open new window\nCTRL+Mouse wheel to zoom in/out';}
}" border="0" />
選擇用“用Disk Druid手工分區”即列出各分區的詳細信息,一目了然較直觀,適合我。我的硬盤有4個分區,而第一個分區已安裝了Windows
98,我想保留它裝雙係統。表中列出了硬盤的所有分區,我準備用原係統的D盤和E盤。即用/dev/hda5(4.8G)作掛載點安裝係統,用/dev/hda6(252M)做交換分區。
在這裏我先創建掛載點,掛載點放在/dev/hda5分區即原(D盤),掛載點創建步驟如下∶點擊“/dev/hda5”將其選中。
 screen.width*0.7) {this.resized=true; this.width=screen.width*0.7; this.alt='Click here to open new window\nCTRL+Mouse wheel to zoom in/out';}
}" border="0" />
screen.width*0.7) {this.resized=true; this.width=screen.width*0.7; this.alt='Click here to open new window\nCTRL+Mouse wheel to zoom in/out';}
}" border="0" />
然後點擊“編緝”按鈕,彈出如下圖所示的對話框。
 screen.width*0.7) {this.resized=true; this.width=screen.width*0.7; this.alt='Click here to open new window\nCTRL+Mouse wheel to zoom in/out';}
}" border="0" />
screen.width*0.7) {this.resized=true; this.width=screen.width*0.7; this.alt='Click here to open new window\nCTRL+Mouse wheel to zoom in/out';}
}" border="0" />
“掛載點”一欄選擇“/”,即使用選定分區的根目錄,最初文件係統類型為vfat(即現時的文件係統是FAT32)這種格式是Windows係統專用的,Linux的掛載點隻能使用ext2或ext3,所以必需改變文件係統格式,選中“將分區格式化成∶”並在其右側的選擇條中選“ext3”。
 screen.width*0.7) {this.resized=true; this.width=screen.width*0.7; this.alt='Click here to open new window\nCTRL+Mouse wheel to zoom in/out';}
}" border="0" />
screen.width*0.7) {this.resized=true; this.width=screen.width*0.7; this.alt='Click here to open new window\nCTRL+Mouse wheel to zoom in/out';}
}" border="0" />
如果你對
自已的硬盤質量信心不
足,應同時選擇“要檢查磁盤壞塊嗎?”在其前麵打勾,然後點擊“確定”即可。
在分區表中可見到已創建了掛載點。
 screen.width*0.7) {this.resized=true; this.width=screen.width*0.7; this.alt='Click here to open new window\nCTRL+Mouse wheel to zoom in/out';}
}" border="0" />
screen.width*0.7) {this.resized=true; this.width=screen.width*0.7; this.alt='Click here to open new window\nCTRL+Mouse wheel to zoom in/out';}
}" border="0" />
圖中可見掛載點已定位到/dev/hda5分區,該分區文件係統格式也被標注為ext3,可見掛載點已成功創建。
還要創建交換分區才能進行下一步安裝,交換分區我選擇在/dev/hda6分區(即原E盤)。創建交換分區步驟如下∶在圖所示分區表中點擊“/dev/hda6”把它選中。
 screen.width*0.7) {this.resized=true; this.width=screen.width*0.7; this.alt='Click here to open new window\nCTRL+Mouse wheel to zoom in/out';}
}" border="0" />
screen.width*0.7) {this.resized=true; this.width=screen.width*0.7; this.alt='Click here to open new window\nCTRL+Mouse wheel to zoom in/out';}
}" border="0" />
然後點擊“編緝”按鈕,彈出如下圖示的對話框。
 screen.width*0.7) {this.resized=true; this.width=screen.width*0.7; this.alt='Click here to open new window\nCTRL+Mouse wheel to zoom in/out';}
}" border="0" />
screen.width*0.7) {this.resized=true; this.width=screen.width*0.7; this.alt='Click here to open new window\nCTRL+Mouse wheel to zoom in/out';}
}" border="0" />
因/dev/hda6是用來做交換分區,所以掛載點一欄不用選,隻選“將分區格式化成swap”。
 screen.width*0.7) {this.resized=true; this.width=screen.width*0.7; this.alt='Click here to open new window\nCTRL+Mouse wheel to zoom in/out';}
}" border="0" />
screen.width*0.7) {this.resized=true; this.width=screen.width*0.7; this.alt='Click here to open new window\nCTRL+Mouse wheel to zoom in/out';}
}" border="0" />
選中“將分區格式化成swap”後,掛載點一欄隨即標示為不適用。然後點擊“確定”即可。
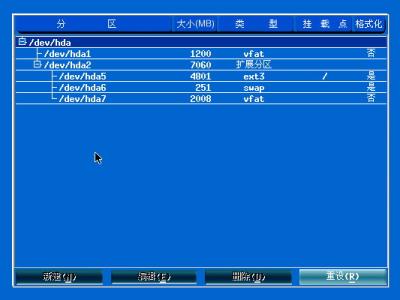 screen.width*0.7) {this.resized=true; this.width=screen.width*0.7; this.alt='Click here to open new window\nCTRL+Mouse wheel to zoom in/out';}
}" border="0" />
screen.width*0.7) {this.resized=true; this.width=screen.width*0.7; this.alt='Click here to open new window\nCTRL+Mouse wheel to zoom in/out';}
}" border="0" />
圖中可見/dev/hda5分區被標注為swap文件係統格式,可見交換分區已成功創建。可進行下一步安裝了,在屏幕右下角點擊“下一步”按鈕。
 screen.width*0.7) {this.resized=true; this.width=screen.width*0.7; this.alt='Click here to open new window\nCTRL+Mouse wheel to zoom in/out';}
}" border="0" />
screen.width*0.7) {this.resized=true; this.width=screen.width*0.7; this.alt='Click here to open new window\nCTRL+Mouse wheel to zoom in/out';}
}" border="0" />
提示格式化兩個分區,點“是”按鈕後,顯示如下圖,當時並不會對這兩個分區進行格式化,在安裝向導結束後,準備開始複製文件前才真正開始格式化這兩個分區。
 screen.width*0.7) {this.resized=true; this.width=screen.width*0.7; this.alt='Click here to open new window\nCTRL+Mouse wheel to zoom in/out';}
}" border="0" />
screen.width*0.7) {this.resized=true; this.width=screen.width*0.7; this.alt='Click here to open new window\nCTRL+Mouse wheel to zoom in/out';}
}" border="0" />
這一步配置引導程序,選擇引導記錄安裝位置,一般選用默
認放在硬盤(/dev/hda)主引導記錄(MBR)即可。圖中列表位置列出的兩項為啟動菜單顯示的啟動選項,引導卷標為啟
動時顯示的內容;上圖顯示分別為Windows和Red Flag Linux兩項 。
將“Windows”改為“Windows 98”;同樣將“Red Hat Linux”改為“Red Hat Linux 9”;
步驟如下∶點擊“/dev/hda1 DOS/Windows Windows”一行把它選中,使其顯示為深藍色,並在“引導卷標”右側框內將“Windows”改為“Windows 98”。
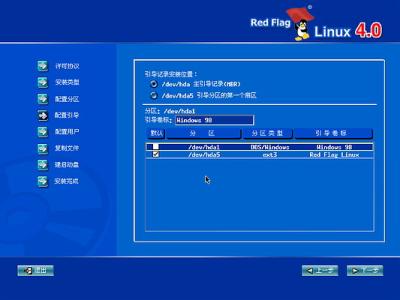 screen.width*0.7) {this.resized=true; this.width=screen.width*0.7; this.alt='Click here to open new window\nCTRL+Mouse wheel to zoom in/out';}
}" border="0" />
screen.width*0.7) {this.resized=true; this.width=screen.width*0.7; this.alt='Click here to open new window\nCTRL+Mouse wheel to zoom in/out';}
}" border="0" />
然後點擊“/dev/hda5 ext3 Red Hat Linux”一行把它選中,使其顯示為深藍色,用同樣的方法,將Red Hat Linux改為Red Hat Linux 4.0。
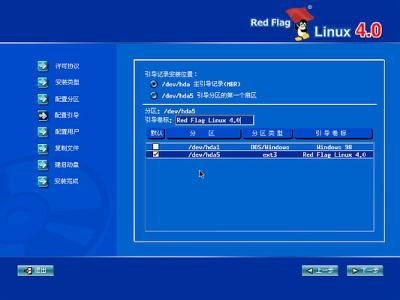 screen.width*0.7) {this.resized=true; this.width=screen.width*0.7; this.alt='Click here to open new window\nCTRL+Mouse wheel to zoom in/out';}
}" border="0" />
screen.width*0.7) {this.resized=true; this.width=screen.width*0.7; this.alt='Click here to open new window\nCTRL+Mouse wheel to zoom in/out';}
}" border="0" />
最後選擇啟動菜單的默認啟動的係統,在啟動時要默認進入的係統前麵的白色方框內點擊一下使其內變成“v”即可,我選擇“Red Hat Linux
4.0”,然後點擊“下一步”。
 screen.width*0.7) {this.resized=true; this.width=screen.width*0.7; this.alt='Click here to open new window\nCTRL+Mouse wheel to zoom in/out';}
}" border="0" />
screen.width*0.7) {this.resized=true; this.width=screen.width*0.7; this.alt='Click here to open new window\nCTRL+Mouse wheel to zoom in/out';}
}" border="0" />
設置係統管理員口令即root用戶密碼,在確認框謝xx俅問淙肟諏钜勻啡?以確定密碼的正確xxx。root帳號在係統中具有最高權根,平時登陸係統一般不用該帳號。設置完根口令後,應同時創建一個平時登陸係統用的普通帳號,點擊“添加”按鈕,彈出如下圖所示的對話框。
 screen.width*0.7) {this.resized=true; this.width=screen.width*0.7; this.alt='Click here to open new window\nCTRL+Mouse wheel to zoom in/out';}
}" border="0" />
screen.width*0.7) {this.resized=true; this.width=screen.width*0.7; this.alt='Click here to open new window\nCTRL+Mouse wheel to zoom in/out';}
}" border="0" />
在添加新用戶對話框中,輸入普通帳號的用戶名(如abc),後輸入該帳號所用的口令,在確認框謝xx俅問淙肟諏钜勻啡稀?br />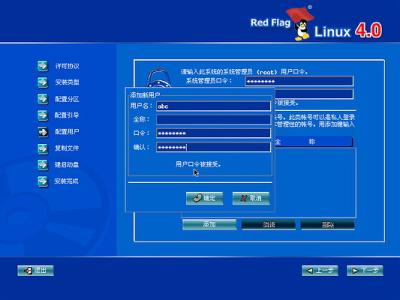 screen.width*0.7) {this.resized=true; this.width=screen.width*0.7; this.alt='Click here to open new window\nCTRL+Mouse wheel to zoom in/out';}
}" border="0" />
screen.width*0.7) {this.resized=true; this.width=screen.width*0.7; this.alt='Click here to open new window\nCTRL+Mouse wheel to zoom in/out';}
}" border="0" />
點擊“確認”按鈕。
 screen.width*0.7) {this.resized=true; this.width=screen.width*0.7; this.alt='Click here to open new window\nCTRL+Mouse wheel to zoom in/out';}
}" border="0" />
screen.width*0.7) {this.resized=true; this.width=screen.width*0.7; this.alt='Click here to open new window\nCTRL+Mouse wheel to zoom in/out';}
}" border="0" />
這時在圖中可見到多了一個名為abc的普通帳號,點擊“下一步”。
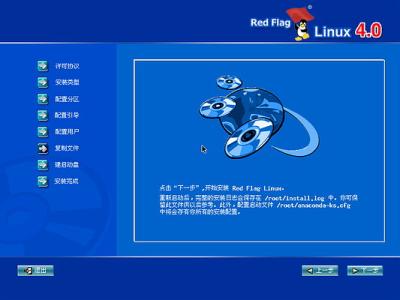 screen.width*0.7) {this.resized=true; this.width=screen.width*0.7; this.alt='Click here to open new window\nCTRL+Mouse wheel to zoom in/out';}
}" border="0" />
screen.width*0.7) {this.resized=true; this.width=screen.width*0.7; this.alt='Click here to open new window\nCTRL+Mouse wheel to zoom in/out';}
}" border="0" />
安裝向導到此結束,如果你對上麵各個步驟還有異議可直點“上一步”返回後重新設置,
否則點“下一步”後再無“上一步”選擇。要開始安裝請點擊“下一步”。
 screen.width*0.7) {this.resized=true; this.width=screen.width*0.7; this.alt='Click here to open new window\nCTRL+Mouse wheel to zoom in/out';}
}" border="0" />
screen.width*0.7) {this.resized=true; this.width=screen.width*0.7; this.alt='Click here to open new window\nCTRL+Mouse wheel to zoom in/out';}
}" border="0" />
複製文件前第一步是格式化選定的兩個分區,接著出現如下圖所示畫麵。
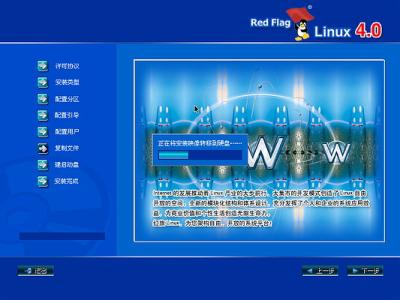 screen.width*0.7) {this.resized=true; this.width=screen.width*0.7; this.alt='Click here to open new window\nCTRL+Mouse wheel to zoom in/out';}
}" border="0" />
screen.width*0.7) {this.resized=true; this.width=screen.width*0.7; this.alt='Click here to open new window\nCTRL+Mouse wheel to zoom in/out';}
}" border="0" />
開始複製文
件到硬盤,所用
時間不長。
 screen.width*0.7) {this.resized=true; this.width=screen.width*0.7; this.alt='Click here to open new window\nCTRL+Mouse wheel to zoom in/out';}
}" border="0" />
screen.width*0.7) {this.resized=true; this.width=screen.width*0.7; this.alt='Click here to open new window\nCTRL+Mouse wheel to zoom in/out';}
}" border="0" />
正在進行安裝準備,真廣泛,很快出現如下圖所示畫麵。
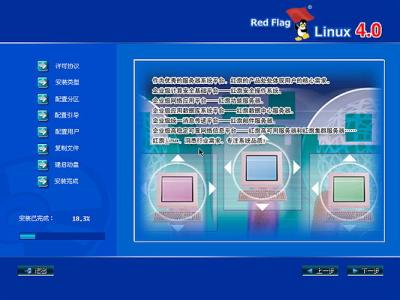 screen.width*0.7) {this.resized=true; this.width=screen.width*0.7; this.alt='Click here to open new window\nCTRL+Mouse wheel to zoom in/out';}
}" border="0" />
screen.width*0.7) {this.resized=true; this.width=screen.width*0.7; this.alt='Click here to open new window\nCTRL+Mouse wheel to zoom in/out';}
}" border="0" />
一個慢長的安裝過程已經開始,你可休息約30分鍾了。
 screen.width*0.7) {this.resized=true; this.width=screen.width*0.7; this.alt='Click here to open new window\nCTRL+Mouse wheel to zoom in/out';}
}" border="0" />
screen.width*0.7) {this.resized=true; this.width=screen.width*0.7; this.alt='Click here to open new window\nCTRL+Mouse wheel to zoom in/out';}
}" border="0" />
這一步是創建引導盤,建議創建!將去除寫保護的空白軟盤放入軟驅中,點擊“下一步”。
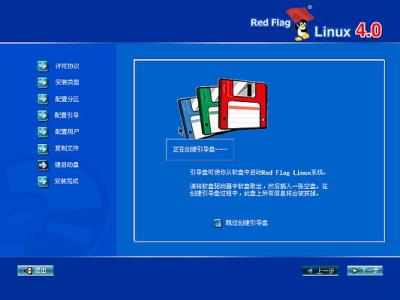 screen.width*0.7) {this.resized=true; this.width=screen.width*0.7; this.alt='Click here to open new window\nCTRL+Mouse wheel to zoom in/out';}
}" border="0" />
screen.width*0.7) {this.resized=true; this.width=screen.width*0.7; this.alt='Click here to open new window\nCTRL+Mouse wheel to zoom in/out';}
}" border="0" />
正在創建引導盤,完成後,顯示如下圖所示。
 screen.width*0.7) {this.resized=true; this.width=screen.width*0.7; this.alt='Click here to open new window\nCTRL+Mouse wheel to zoom in/out';}
}" border="0" />
screen.width*0.7) {this.resized=true; this.width=screen.width*0.7; this.alt='Click here to open new window\nCTRL+Mouse wheel to zoom in/out';}
}" border="0" />
提示全部安裝已經完成,取出軟盤後,點擊“下一步”按鈕。
係統重新啟動後,首次出現啟動選擇菜單。
 screen.width*0.7) {this.resized=true; this.width=screen.width*0.7; this.alt='Click here to open new window\nCTRL+Mouse wheel to zoom in/out';}
}" border="0" />
screen.width*0.7) {this.resized=true; this.width=screen.width*0.7; this.alt='Click here to open new window\nCTRL+Mouse wheel to zoom in/out';}
}" border="0" />
啟動選項第一是正常啟動圖形界麵,第二項是進安全模式,第三項是進命令提示模式,第四項是進Windows 98。如果選第二項進入安全模式,首先
出現的是X設置(顯卡和顯示
器設置),然後是係統設置,適合那些不能正常啟動係統的用戶。如果選第三項進入命令提示模式,適合那些不想浪費係統資源的高手。這裏先選擇正常啟動,10秒後自動進入。
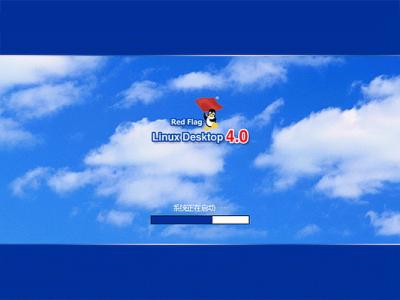 screen.width*0.7) {this.resized=true; this.width=screen.width*0.7; this.alt='Click here to open new window\nCTRL+Mouse wheel to zoom in/out';}
}" border="0" />
screen.width*0.7) {this.resized=true; this.width=screen.width*0.7; this.alt='Click here to open new window\nCTRL+Mouse wheel to zoom in/out';}
}" border="0" />
出現登陸窗口,可更改用戶名以用戶abc登陸。首次登陸我用管理員root的身份登陸係統,輸入密碼後回車。
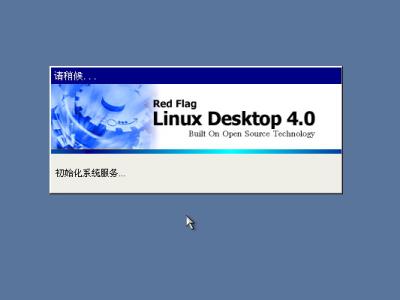 screen.width*0.7) {this.resized=true; this.width=screen.width*0.7; this.alt='Click here to open new window\nCTRL+Mouse wheel to zoom in/out';}
}" border="0" />
screen.width*0.7) {this.resized=true; this.width=screen.width*0.7; this.alt='Click here to open new window\nCTRL+Mouse wheel to zoom in/out';}
}" border="0" />
首次登陸所用時間會長一點,請耐心等候。
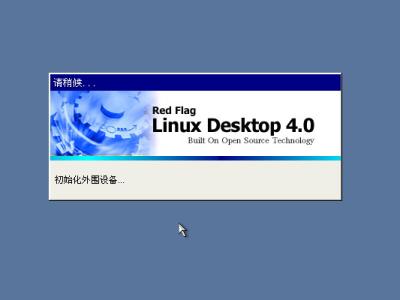 screen.width*0.7) {this.resized=true; this.width=screen.width*0.7; this.alt='Click here to open new window\nCTRL+Mouse wheel to zoom in/out';}
}" border="0" />
screen.width*0.7) {this.resized=true; this.width=screen.width*0.7; this.alt='Click here to open new window\nCTRL+Mouse wheel to zoom in/out';}
}" border="0" />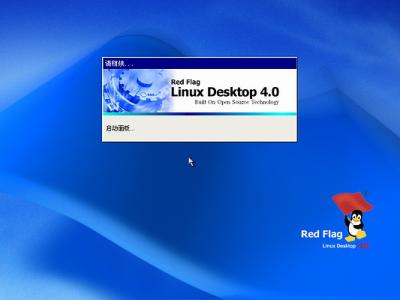
安裝全部完成,現在以root用戶的身份進入了係統。以後進入係統都是圖形界麵了。首次進入有小提示,可幫助你更好地了解紅旗桌麵版4.0的一些基本功能,對初裝者很有用。
想要開機後不再顯示該提示窗口,隻要取消“在啟動時顯示提示”前麵的勾後關閉提示窗口即可。
 screen.width*0.7) {this.resized=true; this.width=screen.width*0.7; this.alt='Click here to open new window\nCTRL+Mouse wheel to zoom in/out';}
}" border="0" />
screen.width*0.7) {this.resized=true; this.width=screen.width*0.7; this.alt='Click here to open new window\nCTRL+Mouse wheel to zoom in/out';}
}" border="0" />
這是紅旗桌麵版4.0的登陸桌麵,桌麵很似Windows的風格,很好!科技以人為本,最方便用的東西會是最多人用的,
因為普通用戶絕對會多於研究人員,這是絕對的。下麵打開“我的電腦”和輸入法看一看。
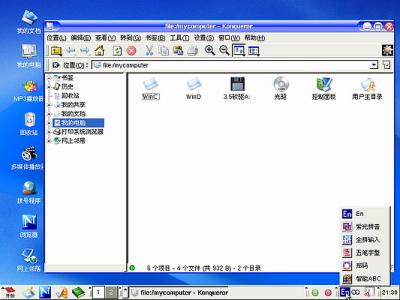 screen.width*0.7) {this.resized=true; this.width=screen.width*0.7; this.alt='Click here to open new window\nCTRL+Mouse wheel to zoom in/out';}
}" border="0" />
screen.width*0.7) {this.resized=true; this.width=screen.width*0.7; this.alt='Click here to open new window\nCTRL+Mouse wheel to zoom in/out';}
}" border="0" />
在眾多Linux版本中,我認為當前的紅旗桌麵版4.0最接近Windows使用者的習慣了,開機能自動掛載(顯示)基它分區的內容,還自帶五種中文輸入法。全部工作完成。慢慢分享一下啦!
三、卸載紅旗Linux桌麵版 4.0係統的方法:
進入DOS下在提示符“A:>_”下輸入“
fdisk/mbr”回車,重寫硬盤主引
導扇區即可,重啟後就沒有了紅旗Linux桌麵版
4.0的啟動菜單了,再格式化紅旗Linux桌麵版 4.0所在的分區就完事!
共創Linux co-create 1.0.3
共創Linux co-create 2005
準備工作:安裝光盤或鏡像文件.
2
.在硬盤中至少留2個分區給安裝係統用,掛載點所用分區推薦4G以上,交換區不用太大在200M-600M左右比較適合,文件係統格式不論,反正安裝過程會重新格式化。
3.記錄下你電腦中下列設備型號∶鼠標、鍵盤、顯卡、網卡、顯示器。及網絡設置用到的IP地址、子網掩碼、默認網關和DNS名稱服務器地址
等信息。
二、安裝紅旗Linux桌麵版 4.0
將光驅設為第一啟動盤,放入第一張安裝光盤後重新啟動電腦,如果你的光驅支持自啟動,
如無意外將出現如下圖。
screen.width*0.7) {this.resized=true; this.width=screen.width*0.7; this.alt='Click here to open new window\nCTRL+Mouse wheel to zoom in/out';}
}" border="0" />如果不進行操作,在10秒後自動進入下一畫麵。
screen.width*0.7) {this.resized=true; this.width=screen.width*0.7; this.alt='Click here to open new window\nCTRL+Mouse wheel to zoom in/out';}
}" border="0" />一啟動就
能使用鼠標了,比效
方便;軟件協議,隻能選同意,除非你不想安裝,點擊“下一步”。
screen.width*0.7) {this.resized=true; this.width=screen.width*0.7; this.alt='Click here to open new window\nCTRL+Mouse wheel to zoom in/out';}
}" border="0" />選擇安裝類型,一般選“典型安裝”即可,這裏還有一個選擇:“恢複係統引導”,它的作用是在以後係統使用中,係統引導出問題時用它進行恢複的.這裏先不管它,點下一步。
screen.width*0.7) {this.resized=true; this.width=screen.width*0.7; this.alt='Click here to open new window\nCTRL+Mouse wheel to zoom in/out';}
}" border="0" />配置分區是關鍵的一步,搞不
好會丟失硬盤有用數據,請小心,有些長期使用Windows的人裝不了Linux的主要原因也是因為這一步不懂。如果選
“用fdisk程序手工分區(隻限專家)”後,點擊“下一步”會顯示下圖。
screen.width*0.7) {this.resized=true; this.width=screen.width*0.7; this.alt='Click here to open new window\nCTRL+Mouse wheel to zoom in/out';}
}" border="0" />用這種方法分區,不直接不適合一般人使用,也不適合我用!於是點擊“上一步”按鈕,返回到上圖後,再選擇用“用Disk Druid手工分區”,然後點擊“下一步”。
screen.width*0.7) {this.resized=true; this.width=screen.width*0.7; this.alt='Click here to open new window\nCTRL+Mouse wheel to zoom in/out';}
}" border="0" />選擇用“用Disk Druid手工分區”即列出各分區的詳細信息,一目了然較直觀,適合我。我的硬盤有4個分區,而第一個分區已安裝了Windows
98,我想保留它裝雙係統。表中列出了硬盤的所有分區,我準備用原係統的D盤和E盤。即用/dev/hda5(4.8G)作掛載點安裝係統,用/dev/hda6(252M)做交換分區。
在這裏我先創建掛載點,掛載點放在/dev/hda5分區即原(D盤),掛載點創建步驟如下∶點擊“/dev/hda5”將其選中。
screen.width*0.7) {this.resized=true; this.width=screen.width*0.7; this.alt='Click here to open new window\nCTRL+Mouse wheel to zoom in/out';}
}" border="0" />然後點擊“編緝”按鈕,彈出如下圖所示的對話框。
screen.width*0.7) {this.resized=true; this.width=screen.width*0.7; this.alt='Click here to open new window\nCTRL+Mouse wheel to zoom in/out';}
}" border="0" />“掛載點”一欄選擇“/”,即使用選定分區的根目錄,最初文件係統類型為vfat(即現時的文件係統是FAT32)這種格式是Windows係統專用的,Linux的掛載點隻能使用ext2或ext3,所以必需改變文件係統格式,選中“將分區格式化成∶”並在其右側的選擇條中選“ext3”。
screen.width*0.7) {this.resized=true; this.width=screen.width*0.7; this.alt='Click here to open new window\nCTRL+Mouse wheel to zoom in/out';}
}" border="0" />如果你對
自已的硬盤質量信心不
足,應同時選擇“要檢查磁盤壞塊嗎?”在其前麵打勾,然後點擊“確定”即可。
在分區表中可見到已創建了掛載點。
screen.width*0.7) {this.resized=true; this.width=screen.width*0.7; this.alt='Click here to open new window\nCTRL+Mouse wheel to zoom in/out';}
}" border="0" />圖中可見掛載點已定位到/dev/hda5分區,該分區文件係統格式也被標注為ext3,可見掛載點已成功創建。
還要創建交換分區才能進行下一步安裝,交換分區我選擇在/dev/hda6分區(即原E盤)。創建交換分區步驟如下∶在圖所示分區表中點擊“/dev/hda6”把它選中。
screen.width*0.7) {this.resized=true; this.width=screen.width*0.7; this.alt='Click here to open new window\nCTRL+Mouse wheel to zoom in/out';}
}" border="0" />然後點擊“編緝”按鈕,彈出如下圖示的對話框。
screen.width*0.7) {this.resized=true; this.width=screen.width*0.7; this.alt='Click here to open new window\nCTRL+Mouse wheel to zoom in/out';}
}" border="0" />因/dev/hda6是用來做交換分區,所以掛載點一欄不用選,隻選“將分區格式化成swap”。
screen.width*0.7) {this.resized=true; this.width=screen.width*0.7; this.alt='Click here to open new window\nCTRL+Mouse wheel to zoom in/out';}
}" border="0" />選中“將分區格式化成swap”後,掛載點一欄隨即標示為不適用。然後點擊“確定”即可。
screen.width*0.7) {this.resized=true; this.width=screen.width*0.7; this.alt='Click here to open new window\nCTRL+Mouse wheel to zoom in/out';}
}" border="0" />圖中可見/dev/hda5分區被標注為swap文件係統格式,可見交換分區已成功創建。可進行下一步安裝了,在屏幕右下角點擊“下一步”按鈕。
screen.width*0.7) {this.resized=true; this.width=screen.width*0.7; this.alt='Click here to open new window\nCTRL+Mouse wheel to zoom in/out';}
}" border="0" />提示格式化兩個分區,點“是”按鈕後,顯示如下圖,當時並不會對這兩個分區進行格式化,在安裝向導結束後,準備開始複製文件前才真正開始格式化這兩個分區。
screen.width*0.7) {this.resized=true; this.width=screen.width*0.7; this.alt='Click here to open new window\nCTRL+Mouse wheel to zoom in/out';}
}" border="0" />這一步配置引導程序,選擇引導記錄安裝位置,一般選用默
認放在硬盤(/dev/hda)主引導記錄(MBR)即可。圖中列表位置列出的兩項為啟動菜單顯示的啟動選項,引導卷標為啟
動時顯示的內容;上圖顯示分別為Windows和Red Flag Linux兩項 。
將“Windows”改為“Windows 98”;同樣將“Red Hat Linux”改為“Red Hat Linux 9”;
步驟如下∶點擊“/dev/hda1 DOS/Windows Windows”一行把它選中,使其顯示為深藍色,並在“引導卷標”右側框內將“Windows”改為“Windows 98”。
screen.width*0.7) {this.resized=true; this.width=screen.width*0.7; this.alt='Click here to open new window\nCTRL+Mouse wheel to zoom in/out';}
}" border="0" />然後點擊“/dev/hda5 ext3 Red Hat Linux”一行把它選中,使其顯示為深藍色,用同樣的方法,將Red Hat Linux改為Red Hat Linux 4.0。
screen.width*0.7) {this.resized=true; this.width=screen.width*0.7; this.alt='Click here to open new window\nCTRL+Mouse wheel to zoom in/out';}
}" border="0" />最後選擇啟動菜單的默認啟動的係統,在啟動時要默認進入的係統前麵的白色方框內點擊一下使其內變成“v”即可,我選擇“Red Hat Linux
4.0”,然後點擊“下一步”。
screen.width*0.7) {this.resized=true; this.width=screen.width*0.7; this.alt='Click here to open new window\nCTRL+Mouse wheel to zoom in/out';}
}" border="0" />設置係統管理員口令即root用戶密碼,在確認框謝xx俅問淙肟諏钜勻啡?以確定密碼的正確xxx。root帳號在係統中具有最高權根,平時登陸係統一般不用該帳號。設置完根口令後,應同時創建一個平時登陸係統用的普通帳號,點擊“添加”按鈕,彈出如下圖所示的對話框。
screen.width*0.7) {this.resized=true; this.width=screen.width*0.7; this.alt='Click here to open new window\nCTRL+Mouse wheel to zoom in/out';}
}" border="0" />在添加新用戶對話框中,輸入普通帳號的用戶名(如abc),後輸入該帳號所用的口令,在確認框謝xx俅問淙肟諏钜勻啡稀?br />
screen.width*0.7) {this.resized=true; this.width=screen.width*0.7; this.alt='Click here to open new window\nCTRL+Mouse wheel to zoom in/out';}
}" border="0" />點擊“確認”按鈕。
screen.width*0.7) {this.resized=true; this.width=screen.width*0.7; this.alt='Click here to open new window\nCTRL+Mouse wheel to zoom in/out';}
}" border="0" />這時在圖中可見到多了一個名為abc的普通帳號,點擊“下一步”。
screen.width*0.7) {this.resized=true; this.width=screen.width*0.7; this.alt='Click here to open new window\nCTRL+Mouse wheel to zoom in/out';}
}" border="0" />安裝向導到此結束,如果你對上麵各個步驟還有異議可直點“上一步”返回後重新設置,
否則點“下一步”後再無“上一步”選擇。要開始安裝請點擊“下一步”。
screen.width*0.7) {this.resized=true; this.width=screen.width*0.7; this.alt='Click here to open new window\nCTRL+Mouse wheel to zoom in/out';}
}" border="0" />複製文件前第一步是格式化選定的兩個分區,接著出現如下圖所示畫麵。
screen.width*0.7) {this.resized=true; this.width=screen.width*0.7; this.alt='Click here to open new window\nCTRL+Mouse wheel to zoom in/out';}
}" border="0" />開始複製文
件到硬盤,所用
時間不長。
screen.width*0.7) {this.resized=true; this.width=screen.width*0.7; this.alt='Click here to open new window\nCTRL+Mouse wheel to zoom in/out';}
}" border="0" />正在進行安裝準備,真廣泛,很快出現如下圖所示畫麵。
screen.width*0.7) {this.resized=true; this.width=screen.width*0.7; this.alt='Click here to open new window\nCTRL+Mouse wheel to zoom in/out';}
}" border="0" />一個慢長的安裝過程已經開始,你可休息約30分鍾了。
screen.width*0.7) {this.resized=true; this.width=screen.width*0.7; this.alt='Click here to open new window\nCTRL+Mouse wheel to zoom in/out';}
}" border="0" />這一步是創建引導盤,建議創建!將去除寫保護的空白軟盤放入軟驅中,點擊“下一步”。
screen.width*0.7) {this.resized=true; this.width=screen.width*0.7; this.alt='Click here to open new window\nCTRL+Mouse wheel to zoom in/out';}
}" border="0" />正在創建引導盤,完成後,顯示如下圖所示。
screen.width*0.7) {this.resized=true; this.width=screen.width*0.7; this.alt='Click here to open new window\nCTRL+Mouse wheel to zoom in/out';}
}" border="0" />提示全部安裝已經完成,取出軟盤後,點擊“下一步”按鈕。
係統重新啟動後,首次出現啟動選擇菜單。
screen.width*0.7) {this.resized=true; this.width=screen.width*0.7; this.alt='Click here to open new window\nCTRL+Mouse wheel to zoom in/out';}
}" border="0" />啟動選項第一是正常啟動圖形界麵,第二項是進安全模式,第三項是進命令提示模式,第四項是進Windows 98。如果選第二項進入安全模式,首先
出現的是X設置(顯卡和顯示
器設置),然後是係統設置,適合那些不能正常啟動係統的用戶。如果選第三項進入命令提示模式,適合那些不想浪費係統資源的高手。這裏先選擇正常啟動,10秒後自動進入。
screen.width*0.7) {this.resized=true; this.width=screen.width*0.7; this.alt='Click here to open new window\nCTRL+Mouse wheel to zoom in/out';}
}" border="0" />screen.width*0.7) {this.resized=true; this.width=screen.width*0.7; this.alt='Click here to open new window\nCTRL+Mouse wheel to zoom in/out';}
}" border="0" />出現登陸窗口,可更改用戶名以用戶abc登陸。首次登陸我用管理員root的身份登陸係統,輸入密碼後回車。
screen.width*0.7) {this.resized=true; this.width=screen.width*0.7; this.alt='Click here to open new window\nCTRL+Mouse wheel to zoom in/out';}
}" border="0" />首次登陸所用時間會長一點,請耐心等候。
screen.width*0.7) {this.resized=true; this.width=screen.width*0.7; this.alt='Click here to open new window\nCTRL+Mouse wheel to zoom in/out';}
}" border="0" />screen.width*0.7) {this.resized=true; this.width=screen.width*0.7; this.alt='Click here to open new window\nCTRL+Mouse wheel to zoom in/out';}
}" border="0" />screen.width*0.7) {this.resized=true; this.width=screen.width*0.7; this.alt='Click here to open new window\nCTRL+Mouse wheel to zoom in/out';}
}" border="0" />screen.width*0.7) {this.resized=true; this.width=screen.width*0.7; this.alt='Click here to open new window\nCTRL+Mouse wheel to zoom in/out';}
}" border="0" />安裝全部完成,現在以root用戶的身份進入了係統。以後進入係統都是圖形界麵了。首次進入有小提示,可幫助你更好地了解紅旗桌麵版4.0的一些基本功能,對初裝者很有用。
想要開機後不再顯示該提示窗口,隻要取消“在啟動時顯示提示”前麵的勾後關閉提示窗口即可。
screen.width*0.7) {this.resized=true; this.width=screen.width*0.7; this.alt='Click here to open new window\nCTRL+Mouse wheel to zoom in/out';}
}" border="0" />這是紅旗桌麵版4.0的登陸桌麵,桌麵很似Windows的風格,很好!科技以人為本,最方便用的東西會是最多人用的,
因為普通用戶絕對會多於研究人員,這是絕對的。下麵打開“我的電腦”和輸入法看一看。
screen.width*0.7) {this.resized=true; this.width=screen.width*0.7; this.alt='Click here to open new window\nCTRL+Mouse wheel to zoom in/out';}
}" border="0" />在眾多Linux版本中,我認為當前的紅旗桌麵版4.0最接近Windows使用者的習慣了,開機能自動掛載(顯示)基它分區的內容,還自帶五種中文輸入法。全部工作完成。慢慢分享一下啦!
三、卸載紅旗Linux桌麵版 4.0係統的方法:
進入DOS下在提示符“A:>_”下輸入“
fdisk/mbr”回車,重寫硬盤主引
導扇區即可,重啟後就沒有了紅旗Linux桌麵版
4.0的啟動菜單了,再格式化紅旗Linux桌麵版 4.0所在的分區就完事!
共創Linux co-create 1.0.3
共創Linux co-create 1.0.3
共創Linux co-create 1.0.3篇:
前提∶你的光盤能直接啟動,推薦使用光盤啟動安裝。
一、準備工作:
1.安裝前記下每個分區的大小,便於選擇分區時核對,以免操作錯誤,丟失有用數據。
2.準備共創Linux桌麵係統co-create 1.0.3安裝光盤一張。BABY-i386-disc.iso官方免費下載地址為∶
/>
MD5:632e3543e5eb73206138c7545527c342
3.留一個分區給co-create 1.0.3係統安裝用。我留D盤ext3文件係統,安裝時安裝程序將格式化該分區,,如果有重要數椐請備份。
二、共創Linux桌麵係統co-create 1.0.3光盤安裝
將光盤設為第一啟動盤,放入安裝光盤,重新啟動電腦,如果你的光盤能自動啟動,將出現如下圖所示:
 screen.width*0.7) {this.resized=true; this.width=screen.width*0.7; this.alt='Click here to open new window\nCTRL+Mouse wheel to zoom in/out';}
}" border="0" />
screen.width*0.7) {this.resized=true; this.width=screen.width*0.7; this.alt='Click here to open new window\nCTRL+Mouse wheel to zoom in/out';}
}" border="0" />
安裝程序正在啟動,要用文本方式安裝,請輸入linux text後回車;這裏我選用圖形方式安裝,直接回車(如不操作10秒後自動進入圖形方式安裝)。
 screen.width*0.7) {this.resized=true; this.width=screen.width*0.7; this.alt='Click here to open new window\nCTRL+Mouse wheel to zoom in/out';}
}" border="0" />
screen.width*0.7) {this.resized=true; this.width=screen.width*0.7; this.alt='Click here to open new window\nCTRL+Mouse wheel to zoom in/out';}
}" border="0" />
版權聲明
,用鼠標在“同意”
前麵點擊,使其選中後,“下一步”按鈕會由灰色的不可操作狀態變為白色可操作狀態,然後點擊“下一步”按鈕。
 screen.width*0.7) {this.resized=true; this.width=screen.width*0.7; this.alt='Click here to open new window\nCTRL+Mouse wheel to zoom in/out';}
}" border="0" />
screen.width*0.7) {this.resized=true; this.width=screen.width*0.7; this.alt='Click here to open new window\nCTRL+Mouse wheel to zoom in/out';}
}" border="0" />
這裏要特別注意了,圖中將
列出你硬盤的所有分區
列表(我這裏有4個分區,其中第三個分區為swap文件係統大小為252M的分區沒有顯示),隻細考慮清楚你將用那個分區安裝co-create 1.0.3,因為該分區將被安裝程序格式化(會有提示),也可勾選“高級分區模式”進行下一步的高級分區設置。用向上或向下箭頭鍵選擇安裝所用的分區後點擊“下一步”按鈕。
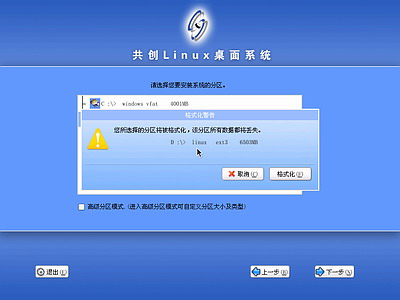 screen.width*0.7) {this.resized=true; this.width=screen.width*0.7; this.alt='Click here to open new window\nCTRL+Mouse wheel to zoom in/out';}
}" border="0" />
screen.width*0.7) {this.resized=true; this.width=screen.width*0.7; this.alt='Click here to open new window\nCTRL+Mouse wheel to zoom in/out';}
}" border="0" />
提示即將格式化選定的分區。如果選定的分區原來是FAT32文件係統格式的,安裝程序將刪除該分區再創建Linux格式的分區;如果選定的分區原來是Linux格式的,安裝程序將會提示格式該分區;點擊“格式化”按鈕。
 screen.width*0.7) {this.resized=true; this.width=screen.width*0.7; this.alt='Click here to open new window\nCTRL+Mouse wheel to zoom in/out';}
}" border="0" />
screen.width*0.7) {this.resized=true; this.width=screen.width*0.7; this.alt='Click here to open new window\nCTRL+Mouse wheel to zoom in/out';}
}" border="0" />
安裝程序開始格式化選定的分區。
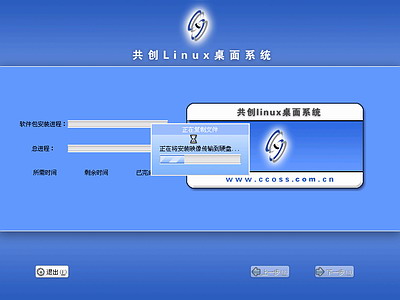 screen.width*0.7) {this.resized=true; this.width=screen.width*0.7; this.alt='Click here to open new window\nCTRL+Mouse wheel to zoom in/out';}
}" border="0" />
screen.width*0.7) {this.resized=true; this.width=screen.width*0.7; this.alt='Click here to open new window\nCTRL+Mouse wheel to zoom in/out';}
}" border="0" />
(光驅差一點的經常在這裏死機)正在將安裝映像
傳輸到硬盤。
 screen.width*0.7) {this.resized=true; this.width=screen.width*0.7; this.alt='Click here to open new window\nCTRL+Mouse wheel to zoom in/out';}
}" border="0" />
screen.width*0.7) {this.resized=true; this.width=screen.width*0.7; this.alt='Click here to open new window\nCTRL+Mouse wheel to zoom in/out';}
}" border="0" />
正在籌備RPM傳輸,很快出現如下圖。
 screen.width*0.7) {this.resized=true; this.width=screen.width*0.7; this.alt='Click here to open new window\nCTRL+Mouse wheel to zoom in/out';}
}" border="0" />
screen.width*0.7) {this.resized=true; this.width=screen.width*0.7; this.alt='Click here to open new window\nCTRL+Mouse wheel to zoom in/out';}
}" border="0" />
正在開啟安裝進程。
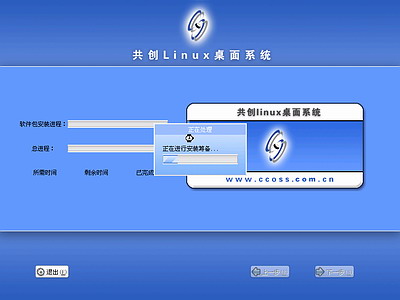 screen.width*0.7) {this.resized=true; this.width=screen.width*0.7; this.alt='Click here to open new window\nCTRL+Mouse wheel to zoom in/out';}
}" border="0" />
screen.width*0.7) {this.resized=true; this.width=screen.width*0.7; this.alt='Click here to open new window\nCTRL+Mouse wheel to zoom in/out';}
}" border="0" />
正在進行安裝籌備。
 screen.width*0.7) {this.resized=true; this.width=screen.width*0.7; this.alt='Click here to open new window\nCTRL+Mouse wheel to zoom in/out';}
}" border="0" />
screen.width*0.7) {this.resized=true; this.width=screen.width*0.7; this.alt='Click here to open new window\nCTRL+Mouse wheel to zoom in/out';}
}" border="0" />
正在安裝,這個過程所用時間最長,等待文件複製完成。
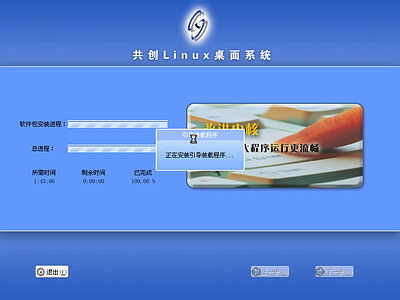 screen.width*0.7) {this.resized=true; this.width=screen.width*0.7; this.alt='Click here to open new window\nCTRL+Mouse wheel to zoom in/out';}
}" border="0" />
screen.width*0.7) {this.resized=true; this.width=screen.width*0.7; this.alt='Click here to open new window\nCTRL+Mouse wheel to zoom in/out';}
}" border="0" />
正在安裝引導裝載程序,安裝完成後將出現如下圖所示界麵。
 screen.width*0.7) {this.resized=true; this.width=screen.width*0.7; this.alt='Click here to open new window\nCTRL+Mouse wheel to zoom in/out';}
}" border="0" />
screen.width*0.7) {this.resized=true; this.width=screen.width*0.7; this.alt='Click here to open new window\nCTRL+Mouse wheel to zoom in/out';}
}" border="0" />
提示取出軟盤或光盤,然後按“下一步”來重新引導係統,點“下一步”後計算機將重新啟動。
 screen.width*0.7) {this.resized=true; this.width=screen.width*0.7; this.alt='Click here to open new window\nCTRL+Mouse wheel to zoom in/out';}
}" border="0" />
screen.width*0.7) {this.resized=true; this.width=screen.width*0.7; this.alt='Click here to open new window\nCTRL+Mouse wheel to zoom in/out';}
}" border="0" />
啟動選擇默認是正常啟動到共創Linux桌麵係統co-create 1.0.3,第二選擇是啟動到共創Linux桌麵係統co-create 1.0.3安全模式,如果你還有其它Windows操作係統,可選DOS項啟動進Windows。
 screen.width*0.7) {this.resized=true; this.width=screen.width*0.7; this.alt='Click here to open new window\nCTRL+Mouse wheel to zoom in/out';}
}" border="0" />
screen.width*0.7) {this.resized=true; this.width=screen.width*0.7; this.alt='Click here to open new window\nCTRL+Mouse wheel to zoom in/out';}
}" border="0" />
類似XP的啟動畫麵,在這裏可能進行初始配置,會停留一段時間。
 screen.width*0.7) {this.resized=true; this.width=screen.width*0.7; this.alt='Click here to open new window\nCTRL+Mouse wheel to zoom in/out';}
}" border="0" />
screen.width*0.7) {this.resized=true; this.width=screen.width*0.7; this.alt='Click here to open new window\nCTRL+Mouse wheel to zoom in/out';}
}" border="0" />
輸入用戶名,默認的用戶名為root,輸入root後回車。
 screen.width*0.7) {this.resized=true; this.width=screen.width*0.7; this.alt='Click here to open new window\nCTRL+Mouse wheel to zoom in/out';}
}" border="0" />
screen.width*0.7) {this.resized=true; this.width=screen.width*0.7; this.alt='Click here to open new window\nCTRL+Mouse wheel to zoom in/out';}
}" border="0" />
默認的高級管理員帳號是沒有密碼的,直接回車即可。
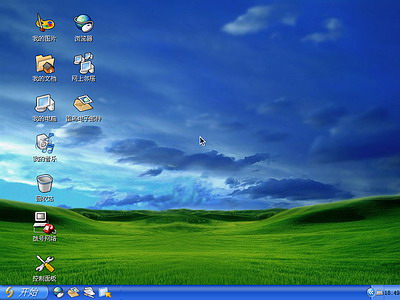 screen.width*0.7) {this.resized=true; this.width=screen.width*0.7; this.alt='Click here to open new window\nCTRL+Mouse wheel to zoom in/out';}
}" border="0" />
screen.width*0.7) {this.resized=true; this.width=screen.width*0.7; this.alt='Click here to open new window\nCTRL+Mouse wheel to zoom in/out';}
}" border="0" />
啊!共創Linux桌麵係統co-create 1.0.3已成功啟動。從桌麵上看與Windows相似,真正是提高了易用xxx,雙擊我的電腦,看一下結果。
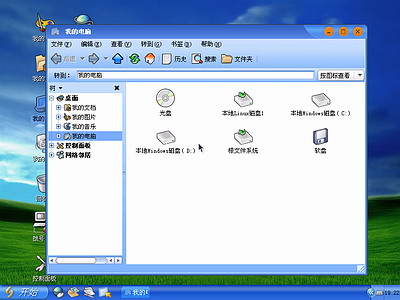 screen.width*0.7) {this.resized=true; this.width=screen.width*0.7; this.alt='Click here to open new window\nCTRL+Mouse wheel to zoom in/out';}
}" border="0" />
screen.width*0.7) {this.resized=true; this.width=screen.width*0.7; this.alt='Click here to open new window\nCTRL+Mouse wheel to zoom in/out';}
}" border="0" />
能自動掛載分區,再點開始菜單看一下。
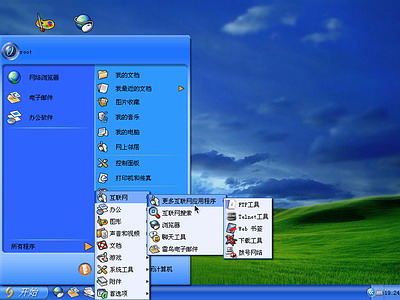 screen.width*0.7) {this.resized=true; this.width=screen.width*0.7; this.alt='Click here to open new window\nCTRL+Mouse wheel to zoom in/out';}
}" border="0" />
screen.width*0.7) {this.resized=true; this.width=screen.width*0.7; this.alt='Click here to open new window\nCTRL+Mouse wheel to zoom in/out';}
}" border="0" />
看來大有用處,會有更多人喜歡的。
三、卸載共創Linux桌麵係統co-create 1.0.3係統的方法∶
進入DOS,在“A:>_”提示符下,輸入“FDISK/MBR”後回車,重寫硬盤的主引導扇區,即可刪除co-create 1.0.3係統的啟動引導菜單,如果你原來是Windows XP與co-create 1.0.3雙係統,重寫硬盤的主引導扇區後再次重啟動電腦時隻有Windows XP的啟動菜單了。
刪除co-create 1.0.3係統的啟動菜單後,再刪除co-create 1.0.3係統文件即可。
共創Linux co-create 1.0.3篇:
前提∶你的光盤能直接啟動,推薦使用光盤啟動安裝。
一、準備工作:
1.安裝前記下每個分區的大小,便於選擇分區時核對,以免操作錯誤,丟失有用數據。
2.準備共創Linux桌麵係統co-create 1.0.3安裝光盤一張。BABY-i386-disc.iso官方免費下載地址為∶
/>
MD5:632e3543e5eb73206138c7545527c342
3.留一個分區給co-create 1.0.3係統安裝用。我留D盤ext3文件係統,安裝時安裝程序將格式化該分區,,如果有重要數椐請備份。
二、共創Linux桌麵係統co-create 1.0.3光盤安裝
將光盤設為第一啟動盤,放入安裝光盤,重新啟動電腦,如果你的光盤能自動啟動,將出現如下圖所示:
screen.width*0.7) {this.resized=true; this.width=screen.width*0.7; this.alt='Click here to open new window\nCTRL+Mouse wheel to zoom in/out';}
}" border="0" />安裝程序正在啟動,要用文本方式安裝,請輸入linux text後回車;這裏我選用圖形方式安裝,直接回車(如不操作10秒後自動進入圖形方式安裝)。
screen.width*0.7) {this.resized=true; this.width=screen.width*0.7; this.alt='Click here to open new window\nCTRL+Mouse wheel to zoom in/out';}
}" border="0" />screen.width*0.7) {this.resized=true; this.width=screen.width*0.7; this.alt='Click here to open new window\nCTRL+Mouse wheel to zoom in/out';}
}" border="0" />版權聲明
,用鼠標在“同意”
前麵點擊,使其選中後,“下一步”按鈕會由灰色的不可操作狀態變為白色可操作狀態,然後點擊“下一步”按鈕。
screen.width*0.7) {this.resized=true; this.width=screen.width*0.7; this.alt='Click here to open new window\nCTRL+Mouse wheel to zoom in/out';}
}" border="0" />這裏要特別注意了,圖中將
列出你硬盤的所有分區
列表(我這裏有4個分區,其中第三個分區為swap文件係統大小為252M的分區沒有顯示),隻細考慮清楚你將用那個分區安裝co-create 1.0.3,因為該分區將被安裝程序格式化(會有提示),也可勾選“高級分區模式”進行下一步的高級分區設置。用向上或向下箭頭鍵選擇安裝所用的分區後點擊“下一步”按鈕。
screen.width*0.7) {this.resized=true; this.width=screen.width*0.7; this.alt='Click here to open new window\nCTRL+Mouse wheel to zoom in/out';}
}" border="0" />提示即將格式化選定的分區。如果選定的分區原來是FAT32文件係統格式的,安裝程序將刪除該分區再創建Linux格式的分區;如果選定的分區原來是Linux格式的,安裝程序將會提示格式該分區;點擊“格式化”按鈕。
screen.width*0.7) {this.resized=true; this.width=screen.width*0.7; this.alt='Click here to open new window\nCTRL+Mouse wheel to zoom in/out';}
}" border="0" />安裝程序開始格式化選定的分區。
screen.width*0.7) {this.resized=true; this.width=screen.width*0.7; this.alt='Click here to open new window\nCTRL+Mouse wheel to zoom in/out';}
}" border="0" />(光驅差一點的經常在這裏死機)正在將安裝映像
傳輸到硬盤。
screen.width*0.7) {this.resized=true; this.width=screen.width*0.7; this.alt='Click here to open new window\nCTRL+Mouse wheel to zoom in/out';}
}" border="0" />正在籌備RPM傳輸,很快出現如下圖。
screen.width*0.7) {this.resized=true; this.width=screen.width*0.7; this.alt='Click here to open new window\nCTRL+Mouse wheel to zoom in/out';}
}" border="0" />正在開啟安裝進程。
screen.width*0.7) {this.resized=true; this.width=screen.width*0.7; this.alt='Click here to open new window\nCTRL+Mouse wheel to zoom in/out';}
}" border="0" />正在進行安裝籌備。
screen.width*0.7) {this.resized=true; this.width=screen.width*0.7; this.alt='Click here to open new window\nCTRL+Mouse wheel to zoom in/out';}
}" border="0" />正在安裝,這個過程所用時間最長,等待文件複製完成。
screen.width*0.7) {this.resized=true; this.width=screen.width*0.7; this.alt='Click here to open new window\nCTRL+Mouse wheel to zoom in/out';}
}" border="0" />正在安裝引導裝載程序,安裝完成後將出現如下圖所示界麵。
screen.width*0.7) {this.resized=true; this.width=screen.width*0.7; this.alt='Click here to open new window\nCTRL+Mouse wheel to zoom in/out';}
}" border="0" />提示取出軟盤或光盤,然後按“下一步”來重新引導係統,點“下一步”後計算機將重新啟動。
screen.width*0.7) {this.resized=true; this.width=screen.width*0.7; this.alt='Click here to open new window\nCTRL+Mouse wheel to zoom in/out';}
}" border="0" />啟動選擇默認是正常啟動到共創Linux桌麵係統co-create 1.0.3,第二選擇是啟動到共創Linux桌麵係統co-create 1.0.3安全模式,如果你還有其它Windows操作係統,可選DOS項啟動進Windows。
screen.width*0.7) {this.resized=true; this.width=screen.width*0.7; this.alt='Click here to open new window\nCTRL+Mouse wheel to zoom in/out';}
}" border="0" />類似XP的啟動畫麵,在這裏可能進行初始配置,會停留一段時間。
screen.width*0.7) {this.resized=true; this.width=screen.width*0.7; this.alt='Click here to open new window\nCTRL+Mouse wheel to zoom in/out';}
}" border="0" />輸入用戶名,默認的用戶名為root,輸入root後回車。
screen.width*0.7) {this.resized=true; this.width=screen.width*0.7; this.alt='Click here to open new window\nCTRL+Mouse wheel to zoom in/out';}
}" border="0" />默認的高級管理員帳號是沒有密碼的,直接回車即可。
screen.width*0.7) {this.resized=true; this.width=screen.width*0.7; this.alt='Click here to open new window\nCTRL+Mouse wheel to zoom in/out';}
}" border="0" />啊!共創Linux桌麵係統co-create 1.0.3已成功啟動。從桌麵上看與Windows相似,真正是提高了易用xxx,雙擊我的電腦,看一下結果。
screen.width*0.7) {this.resized=true; this.width=screen.width*0.7; this.alt='Click here to open new window\nCTRL+Mouse wheel to zoom in/out';}
}" border="0" />能自動掛載分區,再點開始菜單看一下。
screen.width*0.7) {this.resized=true; this.width=screen.width*0.7; this.alt='Click here to open new window\nCTRL+Mouse wheel to zoom in/out';}
}" border="0" />看來大有用處,會有更多人喜歡的。
三、卸載共創Linux桌麵係統co-create 1.0.3係統的方法∶
進入DOS,在“A:>_”提示符下,輸入“FDISK/MBR”後回車,重寫硬盤的主引導扇區,即可刪除co-create 1.0.3係統的啟動引導菜單,如果你原來是Windows XP與co-create 1.0.3雙係統,重寫硬盤的主引導扇區後再次重啟動電腦時隻有Windows XP的啟動菜單了。
刪除co-create 1.0.3係統的啟動菜單後,再刪除co-create 1.0.3係統文件即可。
共創Linux co-create 2005
共創Linux co-create 2005
共創Linux co-create 2005篇:
北京共創開源軟件有限公司在2004年10月25日發布Co-CreateLinux2005版操作係統,這一版本是Co-CreateLinux
1.0.3的後繼版本,它是一個全新的版本。
共創桌麵Linux 2005(ISO鏡像文件)下載地址:
一、共創桌麵Linux 2005安裝
將光驅設為第一啟動盤,放入“共創桌麵Linux 2005版”安裝光盤後重新啟動電腦,如無意外,即可成功從光驅引導。
 screen.width*0.7) {this.resized=true; this.width=screen.width*0.7; this.alt='Click here to open new window\nCTRL+Mouse wheel to zoom in/out';}
}" border="0" />
screen.width*0.7) {this.resized=true; this.width=screen.width*0.7; this.alt='Click here to open new window\nCTRL+Mouse wheel to zoom in/out';}
}" border="0" />
按回車鍵後開始啟動安裝程序,(如不按回車鍵,10秒後自動啟動安裝程序)。
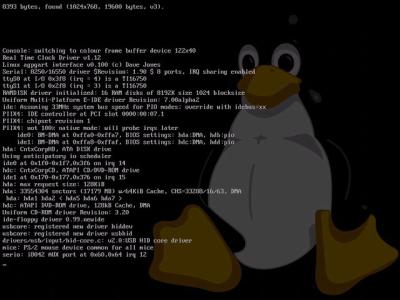 screen.width*0.7) {this.resized=true; this.width=screen.width*0.7; this.alt='Click here to open new window\nCTRL+Mouse wheel to zoom in/out';}
}" border="0" />
screen.width*0.7) {this.resized=true; this.width=screen.width*0.7; this.alt='Click here to open new window\nCTRL+Mouse wheel to zoom in/out';}
}" border="0" />
如
果顯卡驅動找到了,很快出現如下
圖所示畫麵。否則不知能否進入圖形界麵。
 screen.width*0.7) {this.resized=true; this.width=screen.width*0.7; this.alt='Click here to open new window\nCTRL+Mouse wheel to zoom in/out';}
}" border="0" />
screen.width*0.7) {this.resized=true; this.width=screen.width*0.7; this.alt='Click here to open new window\nCTRL+Mouse wheel to zoom in/out';}
}" border="0" />
點擊“下一步”。
 screen.width*0.7) {this.resized=true; this.width=screen.width*0.7; this.alt='Click here to open new window\nCTRL+Mouse wheel to zoom in/out';}
}" border="0" />
screen.width*0.7) {this.resized=true; this.width=screen.width*0.7; this.alt='Click here to open new window\nCTRL+Mouse wheel to zoom in/out';}
}" border="0" />
認真閱讀協議後,在下方“同意”前打勾,這時“下一步”按鈕變為可操作。
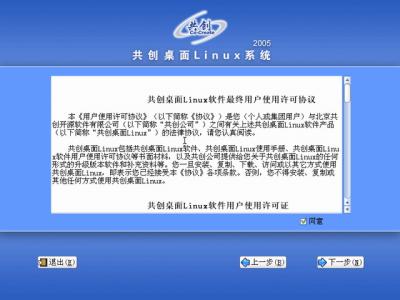 screen.width*0.7) {this.resized=true; this.width=screen.width*0.7; this.alt='Click here to open new window\nCTRL+Mouse wheel to zoom in/out';}
}" border="0" />
screen.width*0.7) {this.resized=true; this.width=screen.width*0.7; this.alt='Click here to open new window\nCTRL+Mouse wheel to zoom in/out';}
}" border="0" />
點擊“下一步”按鈕繼續安裝,將出現選擇安裝分區畫麵。
 screen.width*0.7) {this.resized=true; this.width=screen.width*0.7; this.alt='Click here to open new window\nCTRL+Mouse wheel to zoom in/out';}
}" border="0" />
screen.width*0.7) {this.resized=true; this.width=screen.width*0.7; this.alt='Click here to open new window\nCTRL+Mouse wheel to zoom in/out';}
}" border="0" />
上圖中選擇安裝分區,有高級分區模式和一般模式。安裝Linux係統一般要用一個係統分區和一個交換區(或幾個分區),這裏我準備用第二個分區(D盤即hda5)做係統分區,用第三個分區(E盤即hda6)做交換區。
這裏,暫時不用高級分
區模式,用鼠標點擊選
擇第二個分區(D盤即hda5)來安裝。
 screen.width*0.7) {this.resized=true; this.width=screen.width*0.7; this.alt='Click here to open new window\nCTRL+Mouse wheel to zoom in/out';}
}" border="0" />
screen.width*0.7) {this.resized=true; this.width=screen.width*0.7; this.alt='Click here to open new window\nCTRL+Mouse wheel to zoom in/out';}
}" border="0" />
選擇第二個分區大小6502MB後點“下一步”按鈕。
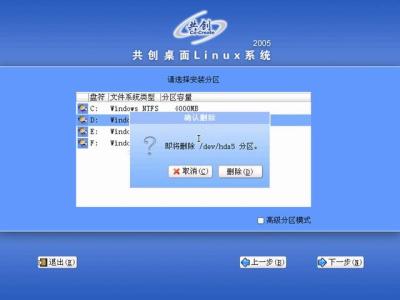 screen.width*0.7) {this.resized=true; this.width=screen.width*0.7; this.alt='Click here to open new window\nCTRL+Mouse wheel to zoom in/out';}
}" border="0" />
screen.width*0.7) {this.resized=true; this.width=screen.width*0.7; this.alt='Click here to open new window\nCTRL+Mouse wheel to zoom in/out';}
}" border="0" />
上圖是刪除“/dev/hda5”(D盤)的警告,點擊“刪除”按鈕後出現如下圖所示(這時實際還未對分區進行刪除和格式化操作,在安裝向導結束,準備開始複製文件前才真正執行)。
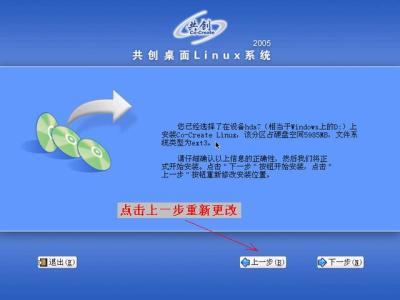 screen.width*0.7) {this.resized=true; this.width=screen.width*0.7; this.alt='Click here to open new window\nCTRL+Mouse wheel to zoom in/out';}
}" border="0" />
screen.width*0.7) {this.resized=true; this.width=screen.width*0.7; this.alt='Click here to open new window\nCTRL+Mouse wheel to zoom in/out';}
}" border="0" />
上圖表明安裝向導到此結束,請仔細確認所列出的更改,否則點擊“下一步”按鈕後再沒有回頭的餘地。
在上圖中我看到了選擇的分區原本大小為6502MB,可這裏顯示為5985MB,估計有517MB劃分出去建另一個交換區;與我原先安排的有不同,可見我在這裏用普通選擇分區模式是不合我現在的要求的。
普通選擇分區模式
隻適合在硬盤謝xxは然?/font>
定交換區並已將該分區格式化成swap文件係統的用戶。點擊“上一步”按鈕退回去。
 screen.width*0.7) {this.resized=true; this.width=screen.width*0.7; this.alt='Click here to open new window\nCTRL+Mouse wheel to zoom in/out';}
}" border="0" />
screen.width*0.7) {this.resized=true; this.width=screen.width*0.7; this.alt='Click here to open new window\nCTRL+Mouse wheel to zoom in/out';}
}" border="0" />
從上圖可見,安裝程序將我原來的D盤6502MB變為兩個盤∶D盤5985MB和F盤517MB。安裝程序默認分配517MB約8%的分區空間作為交換區。
再點擊“上一步”按鈕退回去準備重新分區。
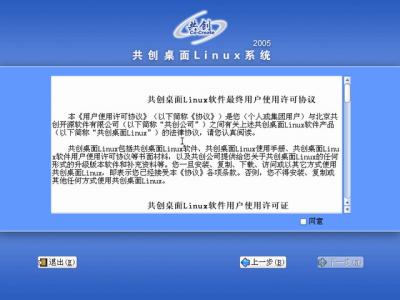 screen.width*0.7) {this.resized=true; this.width=screen.width*0.7; this.alt='Click here to open new window\nCTRL+Mouse wheel to zoom in/out';}
}" border="0" />
screen.width*0.7) {this.resized=true; this.width=screen.width*0.7; this.alt='Click here to open new window\nCTRL+Mouse wheel to zoom in/out';}
}" border="0" />
原來退回到協議窗口,在“同意”前麵打勾後,點擊“下一步”按鈕。
 screen.width*0.7) {this.resized=true; this.width=screen.width*0.7; this.alt='Click here to open new window\nCTRL+Mouse wheel to zoom in/out';}
}" border="0" />
screen.width*0.7) {this.resized=true; this.width=screen.width*0.7; this.alt='Click here to open new window\nCTRL+Mouse wheel to zoom in/out';}
}" border="0" />
重新進入選擇分區窗口,這次在“高級分區模式”前打
勾,並用
鼠標
點擊D盤(/
hda5)使其被選中。
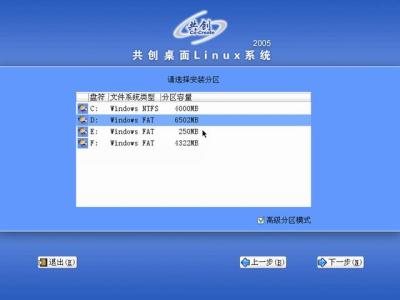 screen.width*0.7) {this.resized=true; this.width=screen.width*0.7; this.alt='Click here to open new window\nCTRL+Mouse wheel to zoom in/out';}
}" border="0" />
screen.width*0.7) {this.resized=true; this.width=screen.width*0.7; this.alt='Click here to open new window\nCTRL+Mouse wheel to zoom in/out';}
}" border="0" />
上圖列出各分區的詳細信息,其中/dev/hda5分區(D盤)已經被注為將格式化成ext3文件係統的分區,用於安裝係統。還需要指定一個200MB--600MB的分區為交換分區就行了。我要用/dev/hda6分區(E盤)做交換區,所以這裏要編輯/dev/hda6分區(E盤)。
點擊/dev/hda6分區(E盤)使其被選中。
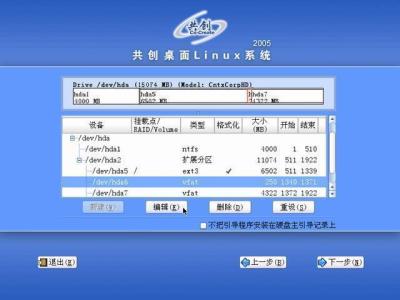 screen.width*0.7) {this.resized=true; this.width=screen.width*0.7; this.alt='Click here to open new window\nCTRL+Mouse wheel to zoom in/out';}
}" border="0" />
screen.width*0.7) {this.resized=true; this.width=screen.width*0.7; this.alt='Click here to open new window\nCTRL+Mouse wheel to zoom in/out';}
}" border="0" />
然後點擊“編輯”按鈕。
 screen.width*0.7) {this.resized=true; this.width=screen.width*0.7; this.alt='Click here to open new window\nCTRL+Mouse wheel to zoom in/out';}
}" border="0" />
screen.width*0.7) {this.resized=true; this.width=screen.width*0.7; this.alt='Click here to open new window\nCTRL+Mouse wheel to zoom in/out';}
}" border="0" />
我用這個分區不是用來掛載,所以“掛載點”一欄不必管它。選定“將分區格式化成”,然後在“將分區格式化成”欄的右側點擊三角形選擇箭頭,在彈出的選擇菜單中有“swap”文件係統選項,交換區一定是swap文件係統。
 screen.width*0.7) {this.resized=true; this.width=screen.width*0.7; this.alt='Click here to open new window\nCTRL+Mouse wheel to zoom in/out';}
}" border="0" />
screen.width*0.7) {this.resized=true; this.width=screen.width*0.7; this.alt='Click here to open new window\nCTRL+Mouse wheel to zoom in/out';}
}" border="0" />
點擊“swap”選中它,顯示如下圖。
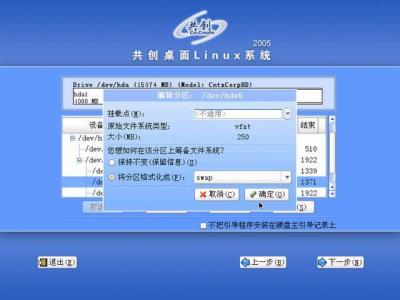 screen.width*0.7) {this.resized=true; this.width=screen.width*0.7; this.alt='Click here to open new window\nCTRL+Mouse wheel to zoom in/out';}
}" border="0" />
screen.width*0.7) {this.resized=true; this.width=screen.width*0.7; this.alt='Click here to open new window\nCTRL+Mouse wheel to zoom in/out';}
}" border="0" />
點擊“確定”按鈕。
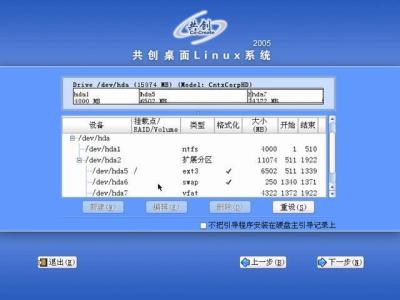 screen.width*0.7) {this.resized=true; this.width=screen.width*0.7; this.alt='Click here to open new window\nCTRL+Mouse wheel to zoom in/out';}
}" border="0" />
screen.width*0.7) {this.resized=true; this.width=screen.width*0.7; this.alt='Click here to open new window\nCTRL+Mouse wheel to zoom in/out';}
}" border="0" />
在上圖可
見,ext3和swap文件係統都有了,並將被格式化,分區選擇操作完成。另外還有一個選項“不把引導程序安裝在硬盤主引導記錄上”。建議不選擇它,而直接將引導程序安裝在硬盤主引導記錄上,如果硬盤裏還裝有Windows
係統時對該係統進行ghost恢複不會影響Linux係統的引導。
點擊“下一步”按鈕。
 screen.width*0.7) {this.resized=true; this.width=screen.width*0.7; this.alt='Click here to open new window\nCTRL+Mouse wheel to zoom in/out';}
}" border="0" />
screen.width*0.7) {this.resized=true; this.width=screen.width*0.7; this.alt='Click here to open new window\nCTRL+Mouse wheel to zoom in/out';}
}" border="0" />
格式化提示(其實還未開始格式化),點“格式化”按鈕繼續安裝向導。
 screen.width*0.7) {this.resized=true; this.width=screen.width*0.7; this.alt='Click here to open new window\nCTRL+Mouse wheel to zoom in/out';}
}" border="0" />
screen.width*0.7) {this.resized=true; this.width=screen.width*0.7; this.alt='Click here to open new window\nCTRL+Mouse wheel to zoom in/out';}
}" border="0" />
上圖為安裝向導結束提示,仔細核對所有更改無誤後,點“下一步”按鈕開始真正安裝係統。點“下一步”按鈕後程序不可逆,沒有回頭,會自動到安裝結束,不再需要你的繼續參與。
這個過程最長,需要30-60分鍾不等,你可休息一下了。
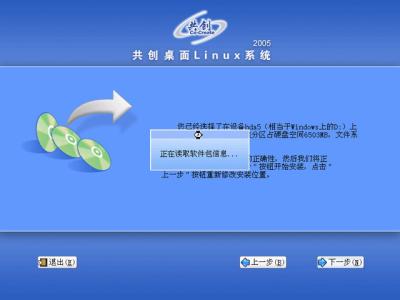 screen.width*0.7) {this.resized=true; this.width=screen.width*0.7; this.alt='Click here to open new window\nCTRL+Mouse wheel to zoom in/out';}
}" border="0" />
screen.width*0.7) {this.resized=true; this.width=screen.width*0.7; this.alt='Click here to open new window\nCTRL+Mouse wheel to zoom in/out';}
}" border="0" />
讀取安裝光盤中信息。
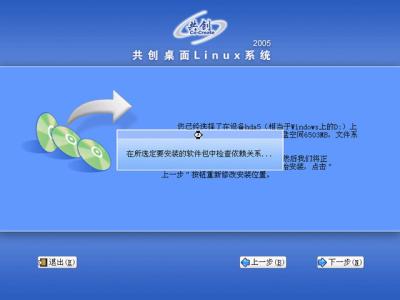 screen.width*0.7) {this.resized=true; this.width=screen.width*0.7; this.alt='Click here to open new window\nCTRL+Mouse wheel to zoom in/out';}
}" border="0" />
screen.width*0.7) {this.resized=true; this.width=screen.width*0.7; this.alt='Click here to open new window\nCTRL+Mouse wheel to zoom in/out';}
}" border="0" />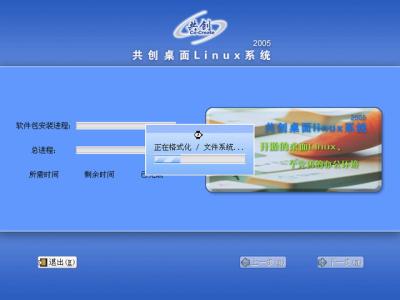
這時才真正格式化分區。完成後開始複製文件。
 screen.width*0.7) {this.resized=true; this.width=screen.width*0.7; this.alt='Click here to open new window\nCTRL+Mouse wheel to zoom in/out';}
}" border="0" />
screen.width*0.7) {this.resized=true; this.width=screen.width*0.7; this.alt='Click here to open new window\nCTRL+Mouse wheel to zoom in/out';}
}" border="0" />
複製文件完成後,繼續進行安裝。
 screen.width*0.7) {this.resized=true; this.width=screen.width*0.7; this.alt='Click here to open new window\nCTRL+Mouse wheel to zoom in/out';}
}" border="0" />
screen.width*0.7) {this.resized=true; this.width=screen.width*0.7; this.alt='Click here to open new window\nCTRL+Mouse wheel to zoom in/out';}
}" border="0" />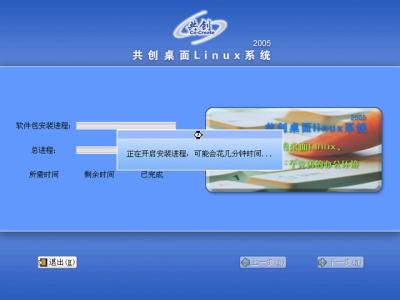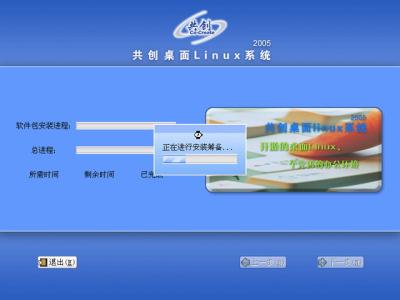
上圖所示的安裝過程最為漫長,完成後出現如下圖。
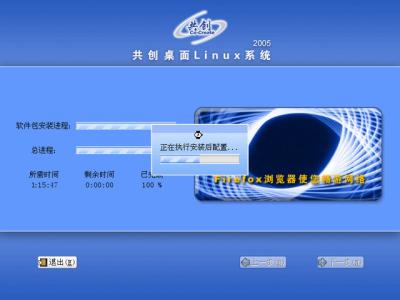 screen.width*0.7) {this.resized=true; this.width=screen.width*0.7; this.alt='Click here to open new window\nCTRL+Mouse wheel to zoom in/out';}
}" border="0" />
screen.width*0.7) {this.resized=true; this.width=screen.width*0.7; this.alt='Click here to open new window\nCTRL+Mouse wheel to zoom in/out';}
}" border="0" />
安裝引導程序
到硬盤引導
區。
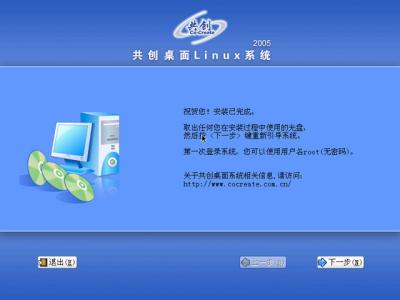 screen.width*0.7) {this.resized=true; this.width=screen.width*0.7; this.alt='Click here to open new window\nCTRL+Mouse wheel to zoom in/out';}
}" border="0" />
screen.width*0.7) {this.resized=true; this.width=screen.width*0.7; this.alt='Click here to open new window\nCTRL+Mouse wheel to zoom in/out';}
}" border="0" />
安裝完成了,係統管理員帳戶為root默認沒有密碼。取出光盤後點“下一步”按鈕重新啟動。
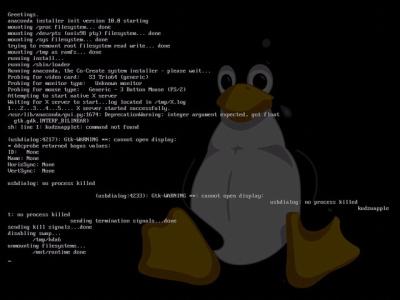 screen.width*0.7) {this.resized=true; this.width=screen.width*0.7; this.alt='Click here to open new window\nCTRL+Mouse wheel to zoom in/out';}
}" border="0" />
screen.width*0.7) {this.resized=true; this.width=screen.width*0.7; this.alt='Click here to open new window\nCTRL+Mouse wheel to zoom in/out';}
}" border="0" />
啟動時首先出現啟動選單,如下圖所示。
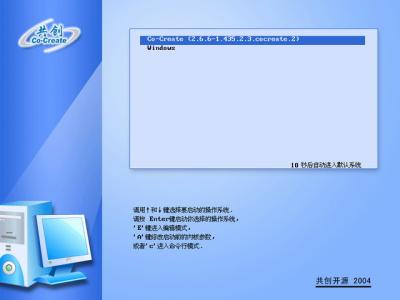 screen.width*0.7) {this.resized=true; this.width=screen.width*0.7; this.alt='Click here to open new window\nCTRL+Mouse wheel to zoom in/out';}
}" border="0" />
screen.width*0.7) {this.resized=true; this.width=screen.width*0.7; this.alt='Click here to open new window\nCTRL+Mouse wheel to zoom in/out';}
}" border="0" />
如不進行選擇,10秒後自動啟動默認係統。
 screen.width*0.7) {this.resized=true; this.width=screen.width*0.7; this.alt='Click here to open new window\nCTRL+Mouse wheel to zoom in/out';}
}" border="0" />
screen.width*0.7) {this.resized=true; this.width=screen.width*0.7; this.alt='Click here to open new window\nCTRL+Mouse wheel to zoom in/out';}
}" border="0" />
第一次啟動需要時間很長,接著出現如下圖所示。
 screen.width*0.7) {this.resized=true; this.width=screen.width*0.7; this.alt='Click here to open new window\nCTRL+Mouse wheel to zoom in/out';}
}" border="0" />
screen.width*0.7) {this.resized=true; this.width=screen.width*0.7; this.alt='Click here to open new window\nCTRL+Mouse wheel to zoom in/out';}
}" border="0" />
不知轉了幾圈後。
 screen.width*0.7) {this.resized=true; this.width=screen.width*0.7; this.alt='Click here to open new window\nCTRL+Mouse wheel to zoom in/out';}
}" border="0" />
screen.width*0.7) {this.resized=true; this.width=screen.width*0.7; this.alt='Click here to open new window\nCTRL+Mouse wheel to zoom in/out';}
}" border="0" />
第一次啟動還要進行設置。點“下一步”按鈕開始。
 screen.width*0.7) {this.resized=true; this.width=screen.width*0.7; this.alt='Click here to open new window\nCTRL+Mouse wheel to zoom in/out';}
}" border="0" />
screen.width*0.7) {this.resized=true; this.width=screen.width*0.7; this.alt='Click here to open new window\nCTRL+Mouse wheel to zoom in/out';}
}" border="0" />
時間設置一般沒問題的。點下一步繼續,出現如下圖。
 screen.width*0.7) {this.resized=true; this.width=screen.width*0.7; this.alt='Click here to open new window\nCTRL+Mouse wheel to zoom in/out';}
}" border="0" />
screen.width*0.7) {this.resized=true; this.width=screen.width*0.7; this.alt='Click here to open new window\nCTRL+Mouse wheel to zoom in/out';}
}" border="0" />
創建一個用於平時進入係統的帳戶,輸入用戶名和密碼後,點“下一步”按鈕。
 screen.width*0.7) {this.resized=true; this.width=screen.width*0.7; this.alt='Click here to open new window\nCTRL+Mouse wheel to zoom in/out';}
}" border="0" />
screen.width*0.7) {this.resized=true; this.width=screen.width*0.7; this.alt='Click here to open new window\nCTRL+Mouse wheel to zoom in/out';}
}" border="0" />
點“下一步”按鈕後再重新登陸。
 screen.width*0.7) {this.resized=true; this.width=screen.width*0.7; this.alt='Click here to open new window\nCTRL+Mouse wheel to zoom in/out';}
}" border="0" />
screen.width*0.7) {this.resized=true; this.width=screen.width*0.7; this.alt='Click here to open new window\nCTRL+Mouse wheel to zoom in/out';}
}" border="0" />
輸入密碼後,點擊“登錄”或回車,很快即進入桌麵。
 screen.width*0.7) {this.resized=true; this.width=screen.width*0.7; this.alt='Click here to open new window\nCTRL+Mouse wheel to zoom in/out';}
}" border="0" />
screen.width*0.7) {this.resized=true; this.width=screen.width*0.7; this.alt='Click here to open new window\nCTRL+Mouse wheel to zoom in/out';}
}" border="0" />
啟動完成後顯示如下圖所示。
 screen.width*0.7) {this.resized=true; this.width=screen.width*0.7; this.alt='Click here to open new window\nCTRL+Mouse wheel to zoom in/out';}
}" border="0" />
screen.width*0.7) {this.resized=true; this.width=screen.width*0.7; this.alt='Click here to open new window\nCTRL+Mouse wheel to zoom in/out';}
}" border="0" />
桌麵布局比較接近Windows XP風格。
三、共創桌麵Linux 2005係統瀏覽
打開“我的電腦”看一下。
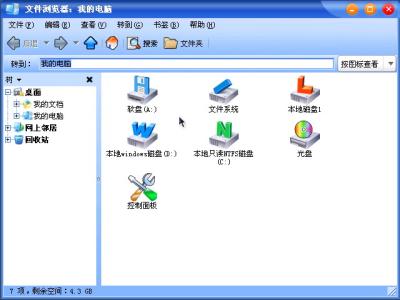 screen.width*0.7) {this.resized=true; this.width=screen.width*0.7; this.alt='Click here to open new window\nCTRL+Mouse wheel to zoom in/out';}
}" border="0" />
screen.width*0.7) {this.resized=true; this.width=screen.width*0.7; this.alt='Click here to open new window\nCTRL+Mouse wheel to zoom in/out';}
}" border="0" />
開機能自動加載各分區,但NTFS格式分區還是隻讀,不能寫入。打開控製麵板,如下圖所示。
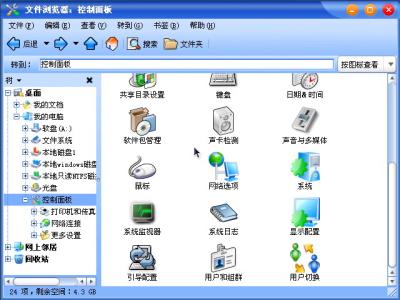 screen.width*0.7) {this.resized=true; this.width=screen.width*0.7; this.alt='Click here to open new window\nCTRL+Mouse wheel to zoom in/out';}
}" border="0" />
screen.width*0.7) {this.resized=true; this.width=screen.width*0.7; this.alt='Click here to open new window\nCTRL+Mouse wheel to zoom in/out';}
}" border="0" />
控製麵板中的項目較為齊全,對設置較為方便。控製麵板中雙擊“係統”看一下係統屬xxx。
 screen.width*0.7) {this.resized=true; this.width=screen.width*0.7; this.alt='Click here to open new window\nCTRL+Mouse wheel to zoom in/out';}
}" border="0" />
screen.width*0.7) {this.resized=true; this.width=screen.width*0.7; this.alt='Click here to open new window\nCTRL+Mouse wheel to zoom in/out';}
}" border="0" />
再看一下硬件選項卡。
 screen.width*0.7) {this.resized=true; this.width=screen.width*0.7; this.alt='Click here to open new window\nCTRL+Mouse wheel to zoom in/out';}
}" border="0" />
screen.width*0.7) {this.resized=true; this.width=screen.width*0.7; this.alt='Click here to open new window\nCTRL+Mouse wheel to zoom in/out';}
}" border="0" />
這些與XP較為相似。打開設備管理器看一下設備驅動是否安裝完成。
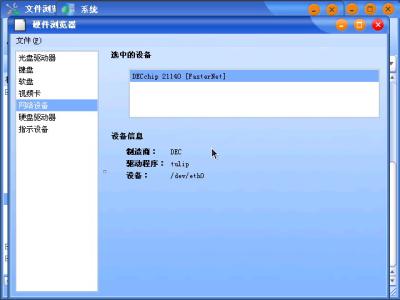 screen.width*0.7) {this.resized=true; this.width=screen.width*0.7; this.alt='Click here to open new window\nCTRL+Mouse wheel to zoom in/out';}
}" border="0" />
screen.width*0.7) {this.resized=true; this.width=screen.width*0.7; this.alt='Click here to open new window\nCTRL+Mouse wheel to zoom in/out';}
}" border="0" />
各種設備都安裝了驅動
程序了,網卡有驅動就可建寬
帶連接了。
四、建立寬帶連接
在控製麵板中有“網絡連接”選項。
Turbolinux 7 Server篇
OpenDesktop 1.0
>>共創Linux co-create 2005篇:
北京共創開源軟件有限公司在2004年10月25日發布Co-CreateLinux2005版操作係統,這一版本是Co-CreateLinux
1.0.3的後繼版本,它是一個全新的版本。
共創桌麵Linux 2005(ISO鏡像文件)下載地址:
一、共創桌麵Linux 2005安裝
將光驅設為第一啟動盤,放入“共創桌麵Linux 2005版”安裝光盤後重新啟動電腦,如無意外,即可成功從光驅引導。
screen.width*0.7) {this.resized=true; this.width=screen.width*0.7; this.alt='Click here to open new window\nCTRL+Mouse wheel to zoom in/out';}
}" border="0" />按回車鍵後開始啟動安裝程序,(如不按回車鍵,10秒後自動啟動安裝程序)。
screen.width*0.7) {this.resized=true; this.width=screen.width*0.7; this.alt='Click here to open new window\nCTRL+Mouse wheel to zoom in/out';}
}" border="0" />如
果顯卡驅動找到了,很快出現如下
圖所示畫麵。否則不知能否進入圖形界麵。
screen.width*0.7) {this.resized=true; this.width=screen.width*0.7; this.alt='Click here to open new window\nCTRL+Mouse wheel to zoom in/out';}
}" border="0" />點擊“下一步”。
screen.width*0.7) {this.resized=true; this.width=screen.width*0.7; this.alt='Click here to open new window\nCTRL+Mouse wheel to zoom in/out';}
}" border="0" />認真閱讀協議後,在下方“同意”前打勾,這時“下一步”按鈕變為可操作。
screen.width*0.7) {this.resized=true; this.width=screen.width*0.7; this.alt='Click here to open new window\nCTRL+Mouse wheel to zoom in/out';}
}" border="0" />點擊“下一步”按鈕繼續安裝,將出現選擇安裝分區畫麵。
screen.width*0.7) {this.resized=true; this.width=screen.width*0.7; this.alt='Click here to open new window\nCTRL+Mouse wheel to zoom in/out';}
}" border="0" />上圖中選擇安裝分區,有高級分區模式和一般模式。安裝Linux係統一般要用一個係統分區和一個交換區(或幾個分區),這裏我準備用第二個分區(D盤即hda5)做係統分區,用第三個分區(E盤即hda6)做交換區。
這裏,暫時不用高級分
區模式,用鼠標點擊選
擇第二個分區(D盤即hda5)來安裝。
screen.width*0.7) {this.resized=true; this.width=screen.width*0.7; this.alt='Click here to open new window\nCTRL+Mouse wheel to zoom in/out';}
}" border="0" />選擇第二個分區大小6502MB後點“下一步”按鈕。
screen.width*0.7) {this.resized=true; this.width=screen.width*0.7; this.alt='Click here to open new window\nCTRL+Mouse wheel to zoom in/out';}
}" border="0" />上圖是刪除“/dev/hda5”(D盤)的警告,點擊“刪除”按鈕後出現如下圖所示(這時實際還未對分區進行刪除和格式化操作,在安裝向導結束,準備開始複製文件前才真正執行)。
screen.width*0.7) {this.resized=true; this.width=screen.width*0.7; this.alt='Click here to open new window\nCTRL+Mouse wheel to zoom in/out';}
}" border="0" />上圖表明安裝向導到此結束,請仔細確認所列出的更改,否則點擊“下一步”按鈕後再沒有回頭的餘地。
在上圖中我看到了選擇的分區原本大小為6502MB,可這裏顯示為5985MB,估計有517MB劃分出去建另一個交換區;與我原先安排的有不同,可見我在這裏用普通選擇分區模式是不合我現在的要求的。
普通選擇分區模式
隻適合在硬盤謝xxは然?/font>
定交換區並已將該分區格式化成swap文件係統的用戶。點擊“上一步”按鈕退回去。
screen.width*0.7) {this.resized=true; this.width=screen.width*0.7; this.alt='Click here to open new window\nCTRL+Mouse wheel to zoom in/out';}
}" border="0" />從上圖可見,安裝程序將我原來的D盤6502MB變為兩個盤∶D盤5985MB和F盤517MB。安裝程序默認分配517MB約8%的分區空間作為交換區。
再點擊“上一步”按鈕退回去準備重新分區。
screen.width*0.7) {this.resized=true; this.width=screen.width*0.7; this.alt='Click here to open new window\nCTRL+Mouse wheel to zoom in/out';}
}" border="0" />原來退回到協議窗口,在“同意”前麵打勾後,點擊“下一步”按鈕。
screen.width*0.7) {this.resized=true; this.width=screen.width*0.7; this.alt='Click here to open new window\nCTRL+Mouse wheel to zoom in/out';}
}" border="0" />重新進入選擇分區窗口,這次在“高級分區模式”前打
勾,並用
鼠標
點擊D盤(/
hda5)使其被選中。
screen.width*0.7) {this.resized=true; this.width=screen.width*0.7; this.alt='Click here to open new window\nCTRL+Mouse wheel to zoom in/out';}
}" border="0" />screen.width*0.7) {this.resized=true; this.width=screen.width*0.7; this.alt='Click here to open new window\nCTRL+Mouse wheel to zoom in/out';}
}" border="0" />上圖列出各分區的詳細信息,其中/dev/hda5分區(D盤)已經被注為將格式化成ext3文件係統的分區,用於安裝係統。還需要指定一個200MB--600MB的分區為交換分區就行了。我要用/dev/hda6分區(E盤)做交換區,所以這裏要編輯/dev/hda6分區(E盤)。
點擊/dev/hda6分區(E盤)使其被選中。
screen.width*0.7) {this.resized=true; this.width=screen.width*0.7; this.alt='Click here to open new window\nCTRL+Mouse wheel to zoom in/out';}
}" border="0" />然後點擊“編輯”按鈕。
screen.width*0.7) {this.resized=true; this.width=screen.width*0.7; this.alt='Click here to open new window\nCTRL+Mouse wheel to zoom in/out';}
}" border="0" />我用這個分區不是用來掛載,所以“掛載點”一欄不必管它。選定“將分區格式化成”,然後在“將分區格式化成”欄的右側點擊三角形選擇箭頭,在彈出的選擇菜單中有“swap”文件係統選項,交換區一定是swap文件係統。
screen.width*0.7) {this.resized=true; this.width=screen.width*0.7; this.alt='Click here to open new window\nCTRL+Mouse wheel to zoom in/out';}
}" border="0" />點擊“swap”選中它,顯示如下圖。
screen.width*0.7) {this.resized=true; this.width=screen.width*0.7; this.alt='Click here to open new window\nCTRL+Mouse wheel to zoom in/out';}
}" border="0" />點擊“確定”按鈕。
screen.width*0.7) {this.resized=true; this.width=screen.width*0.7; this.alt='Click here to open new window\nCTRL+Mouse wheel to zoom in/out';}
}" border="0" />在上圖可
見,ext3和swap文件係統都有了,並將被格式化,分區選擇操作完成。另外還有一個選項“不把引導程序安裝在硬盤主引導記錄上”。建議不選擇它,而直接將引導程序安裝在硬盤主引導記錄上,如果硬盤裏還裝有Windows
係統時對該係統進行ghost恢複不會影響Linux係統的引導。
點擊“下一步”按鈕。
screen.width*0.7) {this.resized=true; this.width=screen.width*0.7; this.alt='Click here to open new window\nCTRL+Mouse wheel to zoom in/out';}
}" border="0" />格式化提示(其實還未開始格式化),點“格式化”按鈕繼續安裝向導。
screen.width*0.7) {this.resized=true; this.width=screen.width*0.7; this.alt='Click here to open new window\nCTRL+Mouse wheel to zoom in/out';}
}" border="0" />上圖為安裝向導結束提示,仔細核對所有更改無誤後,點“下一步”按鈕開始真正安裝係統。點“下一步”按鈕後程序不可逆,沒有回頭,會自動到安裝結束,不再需要你的繼續參與。
這個過程最長,需要30-60分鍾不等,你可休息一下了。
screen.width*0.7) {this.resized=true; this.width=screen.width*0.7; this.alt='Click here to open new window\nCTRL+Mouse wheel to zoom in/out';}
}" border="0" />讀取安裝光盤中信息。
screen.width*0.7) {this.resized=true; this.width=screen.width*0.7; this.alt='Click here to open new window\nCTRL+Mouse wheel to zoom in/out';}
}" border="0" />screen.width*0.7) {this.resized=true; this.width=screen.width*0.7; this.alt='Click here to open new window\nCTRL+Mouse wheel to zoom in/out';}
}" border="0" />這時才真正格式化分區。完成後開始複製文件。
screen.width*0.7) {this.resized=true; this.width=screen.width*0.7; this.alt='Click here to open new window\nCTRL+Mouse wheel to zoom in/out';}
}" border="0" />複製文件完成後,繼續進行安裝。
screen.width*0.7) {this.resized=true; this.width=screen.width*0.7; this.alt='Click here to open new window\nCTRL+Mouse wheel to zoom in/out';}
}" border="0" />screen.width*0.7) {this.resized=true; this.width=screen.width*0.7; this.alt='Click here to open new window\nCTRL+Mouse wheel to zoom in/out';}
}" border="0" />screen.width*0.7) {this.resized=true; this.width=screen.width*0.7; this.alt='Click here to open new window\nCTRL+Mouse wheel to zoom in/out';}
}" border="0" />screen.width*0.7) {this.resized=true; this.width=screen.width*0.7; this.alt='Click here to open new window\nCTRL+Mouse wheel to zoom in/out';}
}" border="0" />上圖所示的安裝過程最為漫長,完成後出現如下圖。
screen.width*0.7) {this.resized=true; this.width=screen.width*0.7; this.alt='Click here to open new window\nCTRL+Mouse wheel to zoom in/out';}
}" border="0" />安裝引導程序
到硬盤引導
區。
screen.width*0.7) {this.resized=true; this.width=screen.width*0.7; this.alt='Click here to open new window\nCTRL+Mouse wheel to zoom in/out';}
}" border="0" />安裝完成了,係統管理員帳戶為root默認沒有密碼。取出光盤後點“下一步”按鈕重新啟動。
screen.width*0.7) {this.resized=true; this.width=screen.width*0.7; this.alt='Click here to open new window\nCTRL+Mouse wheel to zoom in/out';}
}" border="0" />啟動時首先出現啟動選單,如下圖所示。
screen.width*0.7) {this.resized=true; this.width=screen.width*0.7; this.alt='Click here to open new window\nCTRL+Mouse wheel to zoom in/out';}
}" border="0" />如不進行選擇,10秒後自動啟動默認係統。
screen.width*0.7) {this.resized=true; this.width=screen.width*0.7; this.alt='Click here to open new window\nCTRL+Mouse wheel to zoom in/out';}
}" border="0" />第一次啟動需要時間很長,接著出現如下圖所示。
screen.width*0.7) {this.resized=true; this.width=screen.width*0.7; this.alt='Click here to open new window\nCTRL+Mouse wheel to zoom in/out';}
}" border="0" />不知轉了幾圈後。
screen.width*0.7) {this.resized=true; this.width=screen.width*0.7; this.alt='Click here to open new window\nCTRL+Mouse wheel to zoom in/out';}
}" border="0" />第一次啟動還要進行設置。點“下一步”按鈕開始。
screen.width*0.7) {this.resized=true; this.width=screen.width*0.7; this.alt='Click here to open new window\nCTRL+Mouse wheel to zoom in/out';}
}" border="0" />時間設置一般沒問題的。點下一步繼續,出現如下圖。
screen.width*0.7) {this.resized=true; this.width=screen.width*0.7; this.alt='Click here to open new window\nCTRL+Mouse wheel to zoom in/out';}
}" border="0" />創建一個用於平時進入係統的帳戶,輸入用戶名和密碼後,點“下一步”按鈕。
screen.width*0.7) {this.resized=true; this.width=screen.width*0.7; this.alt='Click here to open new window\nCTRL+Mouse wheel to zoom in/out';}
}" border="0" />點“下一步”按鈕後再重新登陸。
screen.width*0.7) {this.resized=true; this.width=screen.width*0.7; this.alt='Click here to open new window\nCTRL+Mouse wheel to zoom in/out';}
}" border="0" />screen.width*0.7) {this.resized=true; this.width=screen.width*0.7; this.alt='Click here to open new window\nCTRL+Mouse wheel to zoom in/out';}
}" border="0" />輸入密碼後,點擊“登錄”或回車,很快即進入桌麵。
screen.width*0.7) {this.resized=true; this.width=screen.width*0.7; this.alt='Click here to open new window\nCTRL+Mouse wheel to zoom in/out';}
}" border="0" />啟動完成後顯示如下圖所示。
screen.width*0.7) {this.resized=true; this.width=screen.width*0.7; this.alt='Click here to open new window\nCTRL+Mouse wheel to zoom in/out';}
}" border="0" />桌麵布局比較接近Windows XP風格。
三、共創桌麵Linux 2005係統瀏覽
打開“我的電腦”看一下。
screen.width*0.7) {this.resized=true; this.width=screen.width*0.7; this.alt='Click here to open new window\nCTRL+Mouse wheel to zoom in/out';}
}" border="0" />開機能自動加載各分區,但NTFS格式分區還是隻讀,不能寫入。打開控製麵板,如下圖所示。
screen.width*0.7) {this.resized=true; this.width=screen.width*0.7; this.alt='Click here to open new window\nCTRL+Mouse wheel to zoom in/out';}
}" border="0" />控製麵板中的項目較為齊全,對設置較為方便。控製麵板中雙擊“係統”看一下係統屬xxx。
screen.width*0.7) {this.resized=true; this.width=screen.width*0.7; this.alt='Click here to open new window\nCTRL+Mouse wheel to zoom in/out';}
}" border="0" />再看一下硬件選項卡。
screen.width*0.7) {this.resized=true; this.width=screen.width*0.7; this.alt='Click here to open new window\nCTRL+Mouse wheel to zoom in/out';}
}" border="0" />這些與XP較為相似。打開設備管理器看一下設備驅動是否安裝完成。
screen.width*0.7) {this.resized=true; this.width=screen.width*0.7; this.alt='Click here to open new window\nCTRL+Mouse wheel to zoom in/out';}
}" border="0" />各種設備都安裝了驅動
程序了,網卡有驅動就可建寬
帶連接了。
四、建立寬帶連接
在控製麵板中有“網絡連接”選項。
Turbolinux 7 Server篇
Turbolinux 7 Server篇:
安裝前先記下你係統中監視器的廠商和型號。
將光盤設為第一啟動盤,放入安裝光盤,重新啟動電腦,如果你的光盤能自動啟動,將出現如下圖所示:
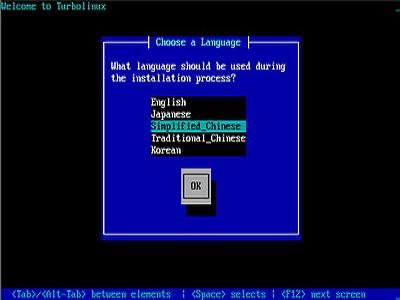 screen.width*0.7) {this.resized=true; this.width=screen.width*0.7; this.alt='Click here to open new window\nCTRL+Mouse wheel to zoom in/out';}
}" border="0" />
screen.width*0.7) {this.resized=true; this.width=screen.width*0.7; this.alt='Click here to open new window\nCTRL+Mouse wheel to zoom in/out';}
}" border="0" />
選擇安裝語言,選Sinplified_chinese簡體中文,按回車出現如下圖:
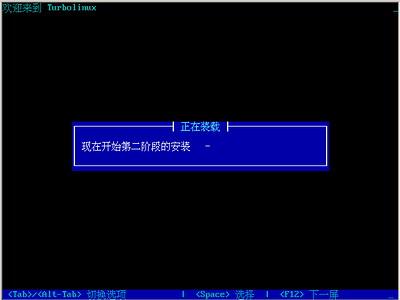 screen.width*0.7) {this.resized=true; this.width=screen.width*0.7; this.alt='Click here to open new window\nCTRL+Mouse wheel to zoom in/out';}
}" border="0" />
screen.width*0.7) {this.resized=true; this.width=screen.width*0.7; this.alt='Click here to open new window\nCTRL+Mouse wheel to zoom in/out';}
}" border="0" />
選擇安裝方式,就選“標準安裝”,點“下一步”。
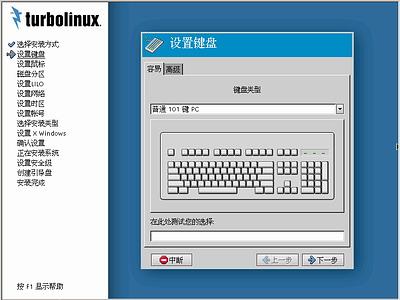 screen.width*0.7) {this.resized=true; this.width=screen.width*0.7; this.alt='Click here to open new window\nCTRL+Mouse wheel to zoom in/out';}
}" border="0" />
screen.width*0.7) {this.resized=true; this.width=screen.width*0.7; this.alt='Click here to open new window\nCTRL+Mouse wheel to zoom in/out';}
}" border="0" />
選擇選
的鍵盤種類
,點“下一步”。
 screen.width*0.7) {this.resized=true; this.width=screen.width*0.7; this.alt='Click here to open new window\nCTRL+Mouse wheel to zoom in/out';}
}" border="0" />
screen.width*0.7) {this.resized=true; this.width=screen.width*0.7; this.alt='Click here to open new window\nCTRL+Mouse wheel to zoom in/out';}
}" border="0" />
選擇分區形式,如果你準備用現有的Linux分區安裝,選自動分區,點“下一步”。
 screen.width*0.7) {this.resized=true; this.width=screen.width*0.7; this.alt='Click here to open new window\nCTRL+Mouse wheel to zoom in/out';}
}" border="0" />
screen.width*0.7) {this.resized=true; this.width=screen.width*0.7; this.alt='Click here to open new window\nCTRL+Mouse wheel to zoom in/out';}
}" border="0" />
LILO引導程序存放位置設置,如果你裝多係統就放在主引導區較好,其它windows係統格式化重裝或ghost備份恢複時都不會破壞引導記錄,隻觴xx贒OS下運行FDISK /MBR重寫硬盤主引導區時才改寫,但是LILO引導程序存放在主引導區時,啟動就有兩次選單(雙係統時),點“高級”選項卡。
 screen.width*0.7) {this.resized=true; this.width=screen.width*0.7; this.alt='Click here to open new window\nCTRL+Mouse wheel to zoom in/out';}
}" border="0" />
screen.width*0.7) {this.resized=true; this.width=screen.width*0.7; this.alt='Click here to open new window\nCTRL+Mouse wheel to zoom in/out';}
}" border="0" />
進一步對LILO引導程序進行設置,適合多係統設置啟動順序,點“下一步”出現如下圖。
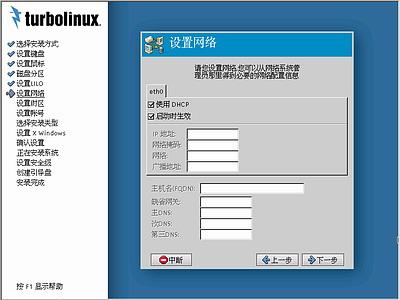 screen.width*0.7) {this.resized=true; this.width=screen.width*0.7; this.alt='Click here to open new window\nCTRL+Mouse wheel to zoom in/out';}
}" border="0" />
screen.width*0.7) {this.resized=true; this.width=screen.width*0.7; this.alt='Click here to open new window\nCTRL+Mouse wheel to zoom in/out';}
}" border="0" />
設置網絡參數,點“下一步”出現如下圖。
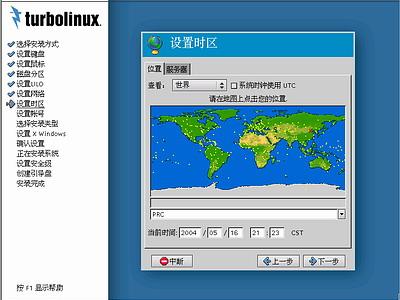 screen.width*0.7) {this.resized=true; this.width=screen.width*0.7; this.alt='Click here to open new window\nCTRL+Mouse wheel to zoom in/out';}
}" border="0" />
screen.width*0.7) {this.resized=true; this.width=screen.width*0.7; this.alt='Click here to open new window\nCTRL+Mouse wheel to zoom in/out';}
}" border="0" />
選擇時區
,用鼠標在世界
地圖上點擊你的位置,然後點“下一步”出現如下圖。
 screen.width*0.7) {this.resized=true; this.width=screen.width*0.7; this.alt='Click here to open new window\nCTRL+Mouse wheel to zoom in/out';}
}" border="0" />
screen.width*0.7) {this.resized=true; this.width=screen.width*0.7; this.alt='Click here to open new window\nCTRL+Mouse wheel to zoom in/out';}
}" border="0" />
設置超級用戶root的密碼,然後點“創建帳號”選項卡出現如下圖。
 screen.width*0.7) {this.resized=true; this.width=screen.width*0.7; this.alt='Click here to open new window\nCTRL+Mouse wheel to zoom in/out';}
}" border="0" />
screen.width*0.7) {this.resized=true; this.width=screen.width*0.7; this.alt='Click here to open new window\nCTRL+Mouse wheel to zoom in/out';}
}" border="0" />
設置平時登陸所用的帳號,然後點“下一步”。
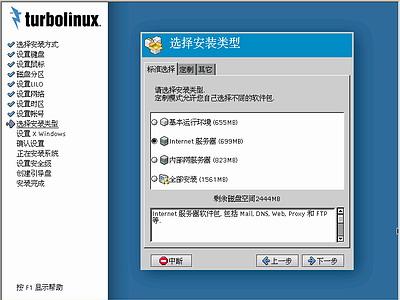 screen.width*0.7) {this.resized=true; this.width=screen.width*0.7; this.alt='Click here to open new window\nCTRL+Mouse wheel to zoom in/out';}
}" border="0" />
screen.width*0.7) {this.resized=true; this.width=screen.width*0.7; this.alt='Click here to open new window\nCTRL+Mouse wheel to zoom in/out';}
}" border="0" />
選擇安裝類型,有詳細說明,然後點“定製”選擇卡,出現如下圖所示。
 screen.width*0.7) {this.resized=true; this.width=screen.width*0.7; this.alt='Click here to open new window\nCTRL+Mouse wheel to zoom in/out';}
}" border="0" />
screen.width*0.7) {this.resized=true; this.width=screen.width*0.7; this.alt='Click here to open new window\nCTRL+Mouse wheel to zoom in/out';}
}" border="0" />
這裏選擇要安裝的軟件包,然後點“其它”選項卡。
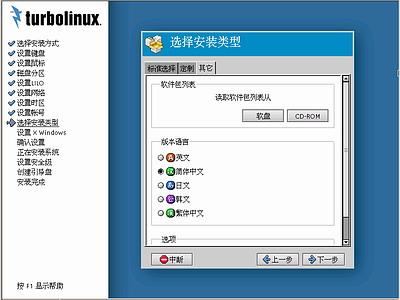 screen.width*0.7) {this.resized=true; this.width=screen.width*0.7; this.alt='Click here to open new window\nCTRL+Mouse wheel to zoom in/out';}
}" border="0" />
screen.width*0.7) {this.resized=true; this.width=screen.width*0.7; this.alt='Click here to open new window\nCTRL+Mouse wheel to zoom in/out';}
}" border="0" />
對添加軟件包進行下一步設置,然後點“下一步”。
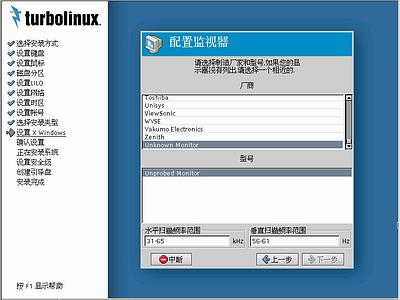 screen.width*0.7) {this.resized=true; this.width=screen.width*0.7; this.alt='Click here to open new window\nCTRL+Mouse wheel to zoom in/out';}
}" border="0" />
screen.width*0.7) {this.resized=true; this.width=screen.width*0.7; this.alt='Click here to open new window\nCTRL+Mouse wheel to zoom in/out';}
}" border="0" />
配置監視器,在上框中選擇顯示器的廠商,在下框中選擇顯示器的型號,然後點“下一步”。
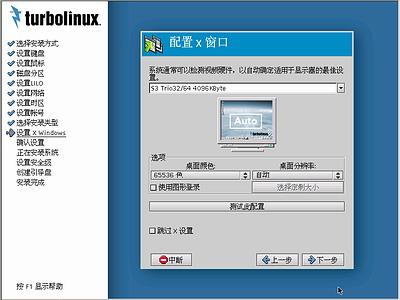 screen.width*0.7) {this.resized=true; this.width=screen.width*0.7; this.alt='Click here to open new window\nCTRL+Mouse wheel to zoom in/out';}
}" border="0" />
screen.width*0.7) {this.resized=true; this.width=screen.width*0.7; this.alt='Click here to open new window\nCTRL+Mouse wheel to zoom in/out';}
}" border="0" />
測
試顯卡和顯示
器配置,選擇好自己喜歡的設置後,點擊“測試此配置”按鈕即可即時測試顯示後果,對於初學者,應選擇“使用圖形登陸”,這裏不選擇;點“下一步”出現如下圖所示。
 screen.width*0.7) {this.resized=true; this.width=screen.width*0.7; this.alt='Click here to open new window\nCTRL+Mouse wheel to zoom in/out';}
}" border="0" />
screen.width*0.7) {this.resized=true; this.width=screen.width*0.7; this.alt='Click here to open new window\nCTRL+Mouse wheel to zoom in/out';}
}" border="0" />
至此安裝向導結束,點擊“下一步”按鈕後開始安裝係統,再沒有上一步的選擇餘地,仔細核對內容,然後點“下一步”出現如下圖所示。
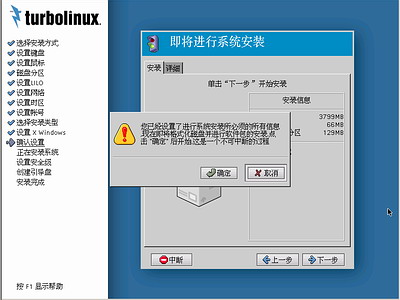 screen.width*0.7) {this.resized=true; this.width=screen.width*0.7; this.alt='Click here to open new window\nCTRL+Mouse wheel to zoom in/out';}
}" border="0" />
screen.width*0.7) {this.resized=true; this.width=screen.width*0.7; this.alt='Click here to open new window\nCTRL+Mouse wheel to zoom in/out';}
}" border="0" />
警告窗口,看完後,點“確定”後,安裝程序會自動完成全過程而不必你繼續設置,你可休息20至30分鍾了。
 screen.width*0.7) {this.resized=true; this.width=screen.width*0.7; this.alt='Click here to open new window\nCTRL+Mouse wheel to zoom in/out';}
}" border="0" />
screen.width*0.7) {this.resized=true; this.width=screen.width*0.7; this.alt='Click here to open new window\nCTRL+Mouse wheel to zoom in/out';}
}" border="0" />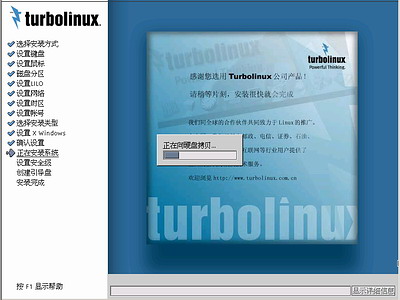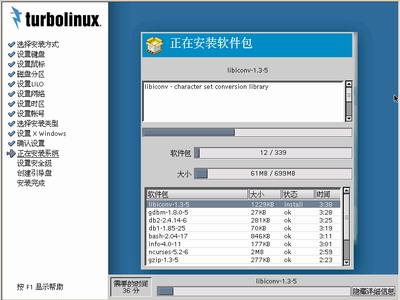
完裝完成後,出現如下圖。
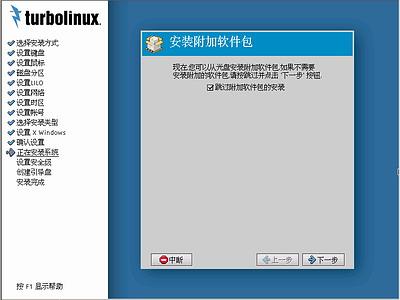 screen.width*0.7) {this.resized=true; this.width=screen.width*0.7; this.alt='Click here to open new window\nCTRL+Mouse wheel to zoom in/out';}
}" border="0" />
screen.width*0.7) {this.resized=true; this.width=screen.width*0.7; this.alt='Click here to open new window\nCTRL+Mouse wheel to zoom in/out';}
}" border="0" />
係統主程序已經安裝完成,附加軟件包可在以後需要時安裝,這裏選擇“跳過附加軟件包的安裝”,然後點“下一步”出現如下圖所示。
 screen.width*0.7) {this.resized=true; this.width=screen.width*0.7; this.alt='Click here to open new window\nCTRL+Mouse wheel to zoom in/out';}
}" border="0" />
screen.width*0.7) {this.resized=true; this.width=screen.width*0.7; this.alt='Click here to open new window\nCTRL+Mouse wheel to zoom in/out';}
}" border="0" />
創建引導盤可為日後維護係統做好準備,應創建,插入一張空白軟盤後點“下一步”開始創建引導盤,完成後取出軟盤點擊“確定”。
 screen.width*0.7) {this.resized=true; this.width=screen.width*0.7; this.alt='Click here to open new window\nCTRL+Mouse wheel to zoom in/out';}
}" border="0" />
screen.width*0.7) {this.resized=true; this.width=screen.width*0.7; this.alt='Click here to open new window\nCTRL+Mouse wheel to zoom in/out';}
}" border="0" />
看到這個畫麵,心中有數,取出光盤和軟盤.點擊“完成”按鈕,係統將創建引導並重新啟動.
 screen.width*0.7) {this.resized=true; this.width=screen.width*0.7; this.alt='Click here to open new window\nCTRL+Mouse wheel to zoom in/out';}
}" border="0" />
screen.width*0.7) {this.resized=true; this.width=screen.width*0.7; this.alt='Click here to open new window\nCTRL+Mouse wheel to zoom in/out';}
}" border="0" />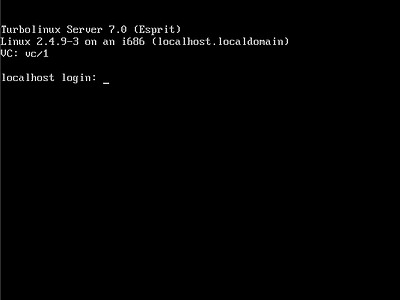
這裏要求輸入用戶名,輸入root後回車,以超級用戶身份登陸。
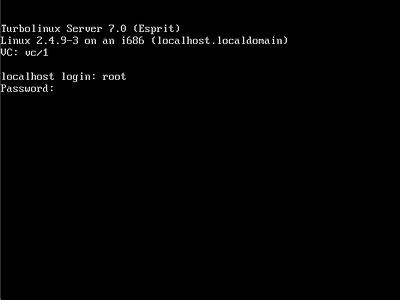 screen.width*0.7) {this.resized=true; this.width=screen.width*0.7; this.alt='Click here to open new window\nCTRL+Mouse wheel to zoom in/out';}
}" border="0" />
screen.width*0.7) {this.resized=true; this.width=screen.width*0.7; this.alt='Click here to open new window\nCTRL+Mouse wheel to zoom in/out';}
}" border="0" />
輸入root超級用戶的密碼(安裝時所設定),輸入密碼時沒有任何顯示,但隻要輸入的密碼正確,按回車鍵後將出現如下圖界麵。
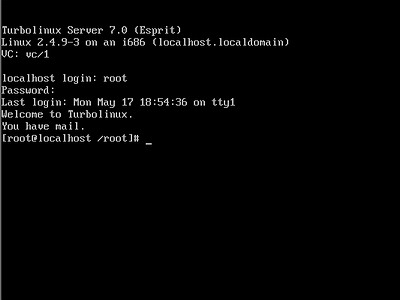 screen.width*0.7) {this.resized=true; this.width=screen.width*0.7; this.alt='Click here to open new window\nCTRL+Mouse wheel to zoom in/out';}
}" border="0" />
screen.width*0.7) {this.resized=true; this.width=screen.width*0.7; this.alt='Click here to open new window\nCTRL+Mouse wheel to zoom in/out';}
}" border="0" />
已經進入了命令行介麵,進入圖形界麵的命令是startx,輸入startx後回車。
 screen.width*0.7) {this.resized=true; this.width=screen.width*0.7; this.alt='Click here to open new window\nCTRL+Mouse wheel to zoom in/out';}
}" border="0" />
screen.width*0.7) {this.resized=true; this.width=screen.width*0.7; this.alt='Click here to open new window\nCTRL+Mouse wheel to zoom in/out';}
}" border="0" />
第一次進入圖形界麵,係統正在初始化,完成後正式進入桌麵。
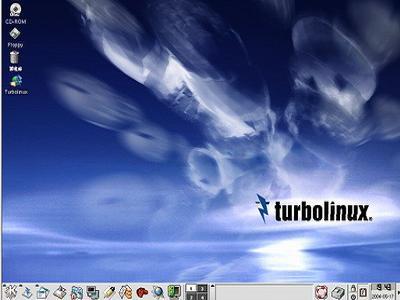 screen.width*0.7) {this.resized=true; this.width=screen.width*0.7; this.alt='Click here to open new window\nCTRL+Mouse wheel to zoom in/out';}
}" border="0" />
screen.width*0.7) {this.resized=true; this.width=screen.width*0.7; this.alt='Click here to open new window\nCTRL+Mouse wheel to zoom in/out';}
}" border="0" />
全部過程真正結束,以後自己慢慢體會,祝你愉快!
安裝前先記下你係統中監視器的廠商和型號。
將光盤設為第一啟動盤,放入安裝光盤,重新啟動電腦,如果你的光盤能自動啟動,將出現如下圖所示:
screen.width*0.7) {this.resized=true; this.width=screen.width*0.7; this.alt='Click here to open new window\nCTRL+Mouse wheel to zoom in/out';}
}" border="0" />選擇安裝語言,選Sinplified_chinese簡體中文,按回車出現如下圖:
screen.width*0.7) {this.resized=true; this.width=screen.width*0.7; this.alt='Click here to open new window\nCTRL+Mouse wheel to zoom in/out';}
}" border="0" />screen.width*0.7) {this.resized=true; this.width=screen.width*0.7; this.alt='Click here to open new window\nCTRL+Mouse wheel to zoom in/out';}
}" border="0" />選擇安裝方式,就選“標準安裝”,點“下一步”。
screen.width*0.7) {this.resized=true; this.width=screen.width*0.7; this.alt='Click here to open new window\nCTRL+Mouse wheel to zoom in/out';}
}" border="0" />選擇選
的鍵盤種類
,點“下一步”。
screen.width*0.7) {this.resized=true; this.width=screen.width*0.7; this.alt='Click here to open new window\nCTRL+Mouse wheel to zoom in/out';}
}" border="0" />選擇分區形式,如果你準備用現有的Linux分區安裝,選自動分區,點“下一步”。
screen.width*0.7) {this.resized=true; this.width=screen.width*0.7; this.alt='Click here to open new window\nCTRL+Mouse wheel to zoom in/out';}
}" border="0" />LILO引導程序存放位置設置,如果你裝多係統就放在主引導區較好,其它windows係統格式化重裝或ghost備份恢複時都不會破壞引導記錄,隻觴xx贒OS下運行FDISK /MBR重寫硬盤主引導區時才改寫,但是LILO引導程序存放在主引導區時,啟動就有兩次選單(雙係統時),點“高級”選項卡。
screen.width*0.7) {this.resized=true; this.width=screen.width*0.7; this.alt='Click here to open new window\nCTRL+Mouse wheel to zoom in/out';}
}" border="0" />進一步對LILO引導程序進行設置,適合多係統設置啟動順序,點“下一步”出現如下圖。
screen.width*0.7) {this.resized=true; this.width=screen.width*0.7; this.alt='Click here to open new window\nCTRL+Mouse wheel to zoom in/out';}
}" border="0" />設置網絡參數,點“下一步”出現如下圖。
screen.width*0.7) {this.resized=true; this.width=screen.width*0.7; this.alt='Click here to open new window\nCTRL+Mouse wheel to zoom in/out';}
}" border="0" />選擇時區
,用鼠標在世界
地圖上點擊你的位置,然後點“下一步”出現如下圖。
screen.width*0.7) {this.resized=true; this.width=screen.width*0.7; this.alt='Click here to open new window\nCTRL+Mouse wheel to zoom in/out';}
}" border="0" />設置超級用戶root的密碼,然後點“創建帳號”選項卡出現如下圖。
screen.width*0.7) {this.resized=true; this.width=screen.width*0.7; this.alt='Click here to open new window\nCTRL+Mouse wheel to zoom in/out';}
}" border="0" />設置平時登陸所用的帳號,然後點“下一步”。
screen.width*0.7) {this.resized=true; this.width=screen.width*0.7; this.alt='Click here to open new window\nCTRL+Mouse wheel to zoom in/out';}
}" border="0" />選擇安裝類型,有詳細說明,然後點“定製”選擇卡,出現如下圖所示。
screen.width*0.7) {this.resized=true; this.width=screen.width*0.7; this.alt='Click here to open new window\nCTRL+Mouse wheel to zoom in/out';}
}" border="0" />這裏選擇要安裝的軟件包,然後點“其它”選項卡。
screen.width*0.7) {this.resized=true; this.width=screen.width*0.7; this.alt='Click here to open new window\nCTRL+Mouse wheel to zoom in/out';}
}" border="0" />對添加軟件包進行下一步設置,然後點“下一步”。
screen.width*0.7) {this.resized=true; this.width=screen.width*0.7; this.alt='Click here to open new window\nCTRL+Mouse wheel to zoom in/out';}
}" border="0" />配置監視器,在上框中選擇顯示器的廠商,在下框中選擇顯示器的型號,然後點“下一步”。
screen.width*0.7) {this.resized=true; this.width=screen.width*0.7; this.alt='Click here to open new window\nCTRL+Mouse wheel to zoom in/out';}
}" border="0" />測
試顯卡和顯示
器配置,選擇好自己喜歡的設置後,點擊“測試此配置”按鈕即可即時測試顯示後果,對於初學者,應選擇“使用圖形登陸”,這裏不選擇;點“下一步”出現如下圖所示。
screen.width*0.7) {this.resized=true; this.width=screen.width*0.7; this.alt='Click here to open new window\nCTRL+Mouse wheel to zoom in/out';}
}" border="0" />至此安裝向導結束,點擊“下一步”按鈕後開始安裝係統,再沒有上一步的選擇餘地,仔細核對內容,然後點“下一步”出現如下圖所示。
screen.width*0.7) {this.resized=true; this.width=screen.width*0.7; this.alt='Click here to open new window\nCTRL+Mouse wheel to zoom in/out';}
}" border="0" />警告窗口,看完後,點“確定”後,安裝程序會自動完成全過程而不必你繼續設置,你可休息20至30分鍾了。
screen.width*0.7) {this.resized=true; this.width=screen.width*0.7; this.alt='Click here to open new window\nCTRL+Mouse wheel to zoom in/out';}
}" border="0" />screen.width*0.7) {this.resized=true; this.width=screen.width*0.7; this.alt='Click here to open new window\nCTRL+Mouse wheel to zoom in/out';}
}" border="0" />screen.width*0.7) {this.resized=true; this.width=screen.width*0.7; this.alt='Click here to open new window\nCTRL+Mouse wheel to zoom in/out';}
}" border="0" />完裝完成後,出現如下圖。
screen.width*0.7) {this.resized=true; this.width=screen.width*0.7; this.alt='Click here to open new window\nCTRL+Mouse wheel to zoom in/out';}
}" border="0" />係統主程序已經安裝完成,附加軟件包可在以後需要時安裝,這裏選擇“跳過附加軟件包的安裝”,然後點“下一步”出現如下圖所示。
screen.width*0.7) {this.resized=true; this.width=screen.width*0.7; this.alt='Click here to open new window\nCTRL+Mouse wheel to zoom in/out';}
}" border="0" />創建引導盤可為日後維護係統做好準備,應創建,插入一張空白軟盤後點“下一步”開始創建引導盤,完成後取出軟盤點擊“確定”。
screen.width*0.7) {this.resized=true; this.width=screen.width*0.7; this.alt='Click here to open new window\nCTRL+Mouse wheel to zoom in/out';}
}" border="0" />看到這個畫麵,心中有數,取出光盤和軟盤.點擊“完成”按鈕,係統將創建引導並重新啟動.
screen.width*0.7) {this.resized=true; this.width=screen.width*0.7; this.alt='Click here to open new window\nCTRL+Mouse wheel to zoom in/out';}
}" border="0" />screen.width*0.7) {this.resized=true; this.width=screen.width*0.7; this.alt='Click here to open new window\nCTRL+Mouse wheel to zoom in/out';}
}" border="0" />這裏要求輸入用戶名,輸入root後回車,以超級用戶身份登陸。
screen.width*0.7) {this.resized=true; this.width=screen.width*0.7; this.alt='Click here to open new window\nCTRL+Mouse wheel to zoom in/out';}
}" border="0" />輸入root超級用戶的密碼(安裝時所設定),輸入密碼時沒有任何顯示,但隻要輸入的密碼正確,按回車鍵後將出現如下圖界麵。
screen.width*0.7) {this.resized=true; this.width=screen.width*0.7; this.alt='Click here to open new window\nCTRL+Mouse wheel to zoom in/out';}
}" border="0" />已經進入了命令行介麵,進入圖形界麵的命令是startx,輸入startx後回車。
screen.width*0.7) {this.resized=true; this.width=screen.width*0.7; this.alt='Click here to open new window\nCTRL+Mouse wheel to zoom in/out';}
}" border="0" />第一次進入圖形界麵,係統正在初始化,完成後正式進入桌麵。
screen.width*0.7) {this.resized=true; this.width=screen.width*0.7; this.alt='Click here to open new window\nCTRL+Mouse wheel to zoom in/out';}
}" border="0" />全部過程真正結束,以後自己慢慢體會,祝你愉快!
OpenDesktop 1.0
OpenDesktop 1.0
OpenDesktop 1.0篇:
前提∶你的光盤能直接啟動,推薦使用光盤啟動安裝,刻錄光盤要特別注意,使用支持64個字母長文件名的刻錄軟件。
一、準備工作:
1.安裝前記下每個分區的大小,便於選擇分區時核對,以免操作錯誤,丟失有用數據。
2.準備OpenDesktop1.0光盤一張。
OpenDesktop-i386-disc.iso官方免費下載地址為∶
/>
/>
前期下載的OpenDesktop-i386-disc.iso有三個問題:
(1).OpenDesktop-fonts-zh_CN-en-minimal-0.1-1_opendesktop_1_0_rc3.noarch.rpm名字被截成OpenDesktop-fonts-zh_CN-en-minimal-0.1-1_opendesktop_1_0_rc3.noa
(2).control-center-2.4.0-3.i386.rpm文件損壞
(3).Omni-0.9.0-4.i386.rpm文件損壞
修改方法:用ultraiso進行編輯,對(1).改名;對(2)和(3)重新從網上下載,並替換這樣就修複了OpenDesktop-i386-disc.iso;
下載地址:
http://rpm.pbone.net/index.php3/stat/4/idpl/843862/com/Omni-0.9.0-4.i386.rpm.html
http://rpm.pbone.net/index.php3/stat/4/idpl/862650/com/control-center-2.4.0-3.i386.rpm.html
3.留一個空分區給OpenDesktop係統安裝用。我留C盤FAT32文件係統,安裝時安裝程序將格式化該分區,,如果有重要數椐請備份。
二、OpenDesktop光盤安裝
將光盤設為第一啟動盤,放入安裝光盤盤,重新啟動電腦,如果你的光盤能自動啟動,將出現如下圖所示的界麵。
 screen.width*0.7) {this.resized=true; this.width=screen.width*0.7; this.alt='Click here to open new window\nCTRL+Mouse wheel to zoom in/out';}
}" border="0" />
screen.width*0.7) {this.resized=true; this.width=screen.width*0.7; this.alt='Click here to open new window\nCTRL+Mouse wheel to zoom in/out';}
}" border="0" />
安裝程序正在啟動,接著出現如下圖。
 screen.width*0.7) {this.resized=true; this.width=screen.width*0.7; this.alt='Click here to open new window\nCTRL+Mouse wheel to zoom in/out';}
}" border="0" />
screen.width*0.7) {this.resized=true; this.width=screen.width*0.7; this.alt='Click here to open new window\nCTRL+Mouse wheel to zoom in/out';}
}" border="0" />
不用多說,點下一走,出現如下圖。
 screen.width*0.7) {this.resized=true; this.width=screen.width*0.7; this.alt='Click here to open new window\nCTRL+Mouse wheel to zoom in/out';}
}" border="0" />
screen.width*0.7) {this.resized=true; this.width=screen.width*0.7; this.alt='Click here to open new window\nCTRL+Mouse wheel to zoom in/out';}
}" border="0" />
這裏要特別注意了,圖中將
列出你硬盤的所有分區列表(
我這裏隻有一個分區),隻細考慮清楚你將用那個分區安裝OpenDesktop,因為該分區將被安裝程序格式化(會有提示),也可勾選“高級分區模式”進行下一步的高級分區設置.用向上或向下箭頭鍵選擇安裝所用的分區後點擊“下一步”按鈕,出現如下圖。
 screen.width*0.7) {this.resized=true; this.width=screen.width*0.7; this.alt='Click here to open new window\nCTRL+Mouse wheel to zoom in/out';}
}" border="0" />
screen.width*0.7) {this.resized=true; this.width=screen.width*0.7; this.alt='Click here to open new window\nCTRL+Mouse wheel to zoom in/out';}
}" border="0" />
提示即將刪除選定的分區,因為選定的分區原來是FAT32文件係統格式的所以安裝程序將刪除該分區再創建Linux格式的分區;如果選定的分區原來是Linux格式的,安裝程序將會提示格式該分區;點擊“刪除”按鈕後,出現如下圖。
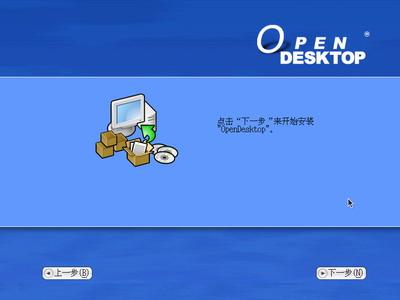 screen.width*0.7) {this.resized=true; this.width=screen.width*0.7; this.alt='Click here to open new window\nCTRL+Mouse wheel to zoom in/out';}
}" border="0" />
screen.width*0.7) {this.resized=true; this.width=screen.width*0.7; this.alt='Click here to open new window\nCTRL+Mouse wheel to zoom in/out';}
}" border="0" />
安裝向導到止結束,點“下一步”後開始正式安裝,安裝程序不再有上一步,不用考慮了,點“下一步”。
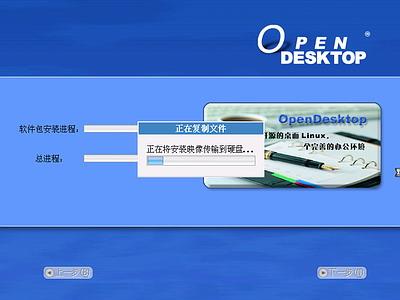 screen.width*0.7) {this.resized=true; this.width=screen.width*0.7; this.alt='Click here to open new window\nCTRL+Mouse wheel to zoom in/out';}
}" border="0" />
screen.width*0.7) {this.resized=true; this.width=screen.width*0.7; this.alt='Click here to open new window\nCTRL+Mouse wheel to zoom in/out';}
}" border="0" />
光驅差一點的經常在這裏死機。
 screen.width*0.7) {this.resized=true; this.width=screen.width*0.7; this.alt='Click here to open new window\nCTRL+Mouse wheel to zoom in/out';}
}" border="0" />
screen.width*0.7) {this.resized=true; this.width=screen.width*0.7; this.alt='Click here to open new window\nCTRL+Mouse wheel to zoom in/out';}
}" border="0" />
安裝完成後將出現如下圖所示。
 screen.width*0.7) {this.resized=true; this.width=screen.width*0.7; this.alt='Click here to open new window\nCTRL+Mouse wheel to zoom in/out';}
}" border="0" />
screen.width*0.7) {this.resized=true; this.width=screen.width*0.7; this.alt='Click here to open new window\nCTRL+Mouse wheel to zoom in/out';}
}" border="0" />
提示取出軟盤或光盤,然後按“下一步”來重新引導係統,點“下一步”後計算機將重新啟動。
 screen.width*0.7) {this.resized=true; this.width=screen.width*0.7; this.alt='Click here to open new window\nCTRL+Mouse wheel to zoom in/out';}
}" border="0" />
screen.width*0.7) {this.resized=true; this.width=screen.width*0.7; this.alt='Click here to open new window\nCTRL+Mouse wheel to zoom in/out';}
}" border="0" />
啟動選擇默認是啟動到OpenDesktop,如果你還有其它Windows操作係統,可選DOS項啟動進Windows,接著出現如下圖。
 screen.width*0.7) {this.resized=true; this.width=screen.width*0.7; this.alt='Click here to open new window\nCTRL+Mouse wheel to zoom in/out';}
}" border="0" />
screen.width*0.7) {this.resized=true; this.width=screen.width*0.7; this.alt='Click here to open new window\nCTRL+Mouse wheel to zoom in/out';}
}" border="0" />
桂林山水,好畫!
如果從硬盤安裝是看不到這個
畫麵的,在這裏可能進行初始配置,會停留一段時間,接著出現如下圖。
 screen.width*0.7) {this.resized=true; this.width=screen.width*0.7; this.alt='Click here to open new window\nCTRL+Mouse wheel to zoom in/out';}
}" border="0" />
screen.width*0.7) {this.resized=true; this.width=screen.width*0.7; this.alt='Click here to open new window\nCTRL+Mouse wheel to zoom in/out';}
}" border="0" />
輸入用戶名,默認的用戶名為root,輸入root回車後出現如下圖。
 screen.width*0.7) {this.resized=true; this.width=screen.width*0.7; this.alt='Click here to open new window\nCTRL+Mouse wheel to zoom in/out';}
}" border="0" />
screen.width*0.7) {this.resized=true; this.width=screen.width*0.7; this.alt='Click here to open new window\nCTRL+Mouse wheel to zoom in/out';}
}" border="0" />
默認的高級管理員帳號是沒有密碼的,直接回車即可,回車後出現如下圖。
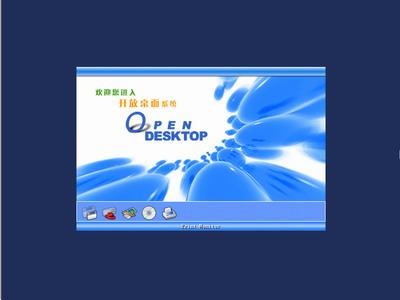 screen.width*0.7) {this.resized=true; this.width=screen.width*0.7; this.alt='Click here to open new window\nCTRL+Mouse wheel to zoom in/out';}
}" border="0" />
screen.width*0.7) {this.resized=true; this.width=screen.width*0.7; this.alt='Click here to open new window\nCTRL+Mouse wheel to zoom in/out';}
}" border="0" />
如果你的計算機速度較快,上圖幾乎看不清,接著出現桌麵。
 screen.width*0.7) {this.resized=true; this.width=screen.width*0.7; this.alt='Click here to open new window\nCTRL+Mouse wheel to zoom in/out';}
}" border="0" />
screen.width*0.7) {this.resized=true; this.width=screen.width*0.7; this.alt='Click here to open new window\nCTRL+Mouse wheel to zoom in/out';}
}" border="0" />
啊!OpenDesktop已成功啟動.
三、功能設置
用慣Windows操作係統的我,剛安裝完OpenDesktop1.0係統時,好象進了一個迷宮,進去後不知係統驅動程序安裝完成未?@床壞狡淥黈indows分區,象陷進了一個深淵;不能上網,迷失方向;不會安裝程序等等;不知這個係統有什麽用。如果你也有這樣的感覺,還請往下看:
1、在OpenDesktop係統顯示其它Windows分區內容∶(Linux開機掛載文件係統)
2、在OpenDesktop1.0建立寬帶ADSL連接的方法
3、修改OpenDesktop的GRUB啟動管理,設成默認啟動Windows
四、卸載OpenDesktop1.0係統的方法∶
進入DOS,在“A:>_”提示符下,輸入“FDISK/MBR”後
回車,重寫硬盤的主引導扇區,即可刪除OpenDesktop1.0係統的啟動菜單,如果你原來是WindowsXP與OpenDesktop1.0雙係統,重寫硬盤的主引導扇區後再次重啟動電腦時隻有WindowsXP的啟動菜單了。
刪除OpenDesktop1.0係統的啟動菜單後,再刪除OpenDesktop1.0係統文件即可
雙擊“網絡連接”選項可打開“網絡連接”窗口(點擊“開始”--“連接到”--顯示所有網絡連接,也可打開這個窗口)。
 screen.width*0.7) {this.resized=true; this.width=screen.width*0.7; this.alt='Click here to open new window\nCTRL+Mouse wheel to zoom in/out';}
}" border="0" />
screen.width*0.7) {this.resized=true; this.width=screen.width*0.7; this.alt='Click here to open new window\nCTRL+Mouse wheel to zoom in/out';}
}" border="0" />
上圖
中網卡圖標中有一個紅色的“X”號,表明網卡還沒有激活。旁
邊有一個“新建連接”的快捷方式,雙擊它建立連接。
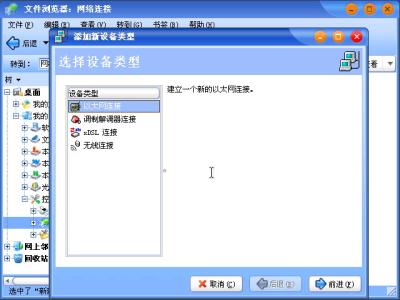 screen.width*0.7) {this.resized=true; this.width=screen.width*0.7; this.alt='Click here to open new window\nCTRL+Mouse wheel to zoom in/out';}
}" border="0" />
screen.width*0.7) {this.resized=true; this.width=screen.width*0.7; this.alt='Click here to open new window\nCTRL+Mouse wheel to zoom in/out';}
}" border="0" />
選擇“xDSL連接”。
 screen.width*0.7) {this.resized=true; this.width=screen.width*0.7; this.alt='Click here to open new window\nCTRL+Mouse wheel to zoom in/out';}
}" border="0" />
screen.width*0.7) {this.resized=true; this.width=screen.width*0.7; this.alt='Click here to open new window\nCTRL+Mouse wheel to zoom in/out';}
}" border="0" />
點擊“前進”按鈕,出現如下圖所示。
 screen.width*0.7) {this.resized=true; this.width=screen.width*0.7; this.alt='Click here to open new window\nCTRL+Mouse wheel to zoom in/out';}
}" border="0" />
screen.width*0.7) {this.resized=true; this.width=screen.width*0.7; this.alt='Click here to open new window\nCTRL+Mouse wheel to zoom in/out';}
}" border="0" />
輸入各項信息後點“前進”按鈕,出現如下圖所示。
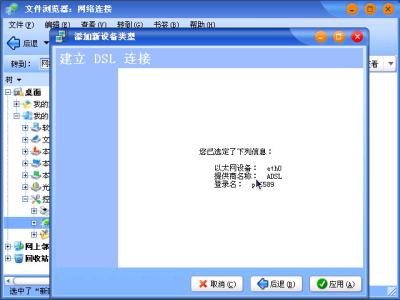 screen.width*0.7) {this.resized=true; this.width=screen.width*0.7; this.alt='Click here to open new window\nCTRL+Mouse wheel to zoom in/out';}
}" border="0" />
screen.width*0.7) {this.resized=true; this.width=screen.width*0.7; this.alt='Click here to open new window\nCTRL+Mouse wheel to zoom in/out';}
}" border="0" />
確認無誤後,點擊“應用”按鈕就OK!
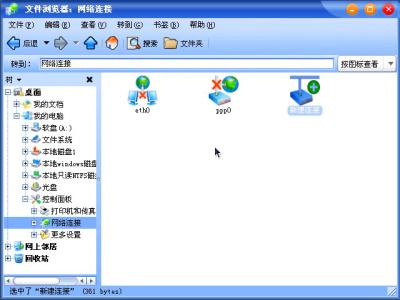 screen.width*0.7) {this.resized=true; this.width=screen.width*0.7; this.alt='Click here to open new window\nCTRL+Mouse wheel to zoom in/out';}
}" border="0" />
screen.width*0.7) {this.resized=true; this.width=screen.width*0.7; this.alt='Click here to open new window\nCTRL+Mouse wheel to zoom in/out';}
}" border="0" />
上圖可見寬帶連接(ppp0)已在“網絡連接”窗口中出現。
五、激活網絡設備
寬帶連接(ppp0)已在“網絡連接”窗口中出現,可是它還沒有激活。剛建立寬帶連接時,(寬帶連接)ppp0屬xxx窗口自動打開了,如下圖(如不能自動打開ppp0屬xxx窗口,可右鍵點擊它然後點擊屬xxx即可打開)。
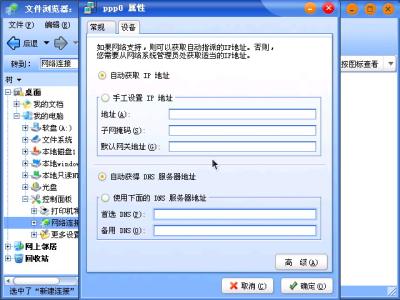 screen.width*0.7) {this.resized=true; this.width=screen.width*0.7; this.alt='Click here to open new window\nCTRL+Mouse wheel to zoom in/out';}
}" border="0" />
screen.width*0.7) {this.resized=true; this.width=screen.width*0.7; this.alt='Click here to open new window\nCTRL+Mouse wheel to zoom in/out';}
}" border="0" />
我所用的ADSL連接不是固定IP地址的,所以選“自動獲取IP地址”;DNS名稱
解析服務器地址如果知道就一定要填寫了(DNS地址,大家可以從windows中的撥號軟件中獲得,如在98/Me/2000中安裝EnterNet300,連接上網後,點擊其登陸網絡後右下角的圖標,從“詳細”按鈕中看登陸信息即可,實在不行打個客服電話),我用佛山聯通的DNS服務器;輸入
完成後如下圖所示。
 screen.width*0.7) {this.resized=true; this.width=screen.width*0.7; this.alt='Click here to open new window\nCTRL+Mouse wheel to zoom in/out';}
}" border="0" />
screen.width*0.7) {this.resized=true; this.width=screen.width*0.7; this.alt='Click here to open new window\nCTRL+Mouse wheel to zoom in/out';}
}" border="0" />
如果要在每次啟動後自動激活這個設備,可點擊“高級”按鈕,在彈出的窗口中勾選“啟動時自動激活該設備”,這樣每次啟動後就自動連接了。
點“確定”後出現如下圖所示。
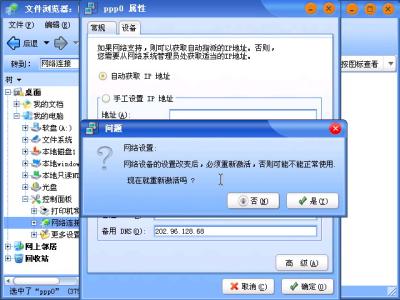 screen.width*0.7) {this.resized=true; this.width=screen.width*0.7; this.alt='Click here to open new window\nCTRL+Mouse wheel to zoom in/out';}
}" border="0" />
screen.width*0.7) {this.resized=true; this.width=screen.width*0.7; this.alt='Click here to open new window\nCTRL+Mouse wheel to zoom in/out';}
}" border="0" />
正想激活連接,點“是”按鈕後,開始解除設備,接著激活。
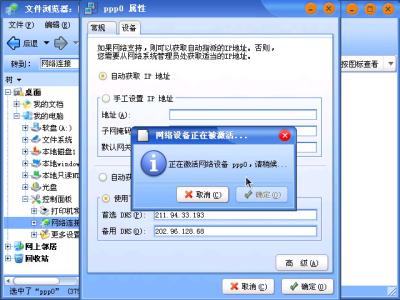 screen.width*0.7) {this.resized=true; this.width=screen.width*0.7; this.alt='Click here to open new window\nCTRL+Mouse wheel to zoom in/out';}
}" border="0" />
screen.width*0.7) {this.resized=true; this.width=screen.width*0.7; this.alt='Click here to open new window\nCTRL+Mouse wheel to zoom in/out';}
}" border="0" />
ppp0寬帶連接激活後顯示如下圖。
 screen.width*0.7) {this.resized=true; this.width=screen.width*0.7; this.alt='Click here to open new window\nCTRL+Mouse wheel to zoom in/out';}
}" border="0" />
screen.width*0.7) {this.resized=true; this.width=screen.width*0.7; this.alt='Click here to open new window\nCTRL+Mouse wheel to zoom in/out';}
}" border="0" />
ppp0寬帶連接激活後,ppp0圖標的紅色“X”號已經沒有了。接下來還要
激活eth0網卡這個設備後才能連接上網。
右鍵點擊“eth0”在彈出的下拉菜單中指向“屬xxx”。
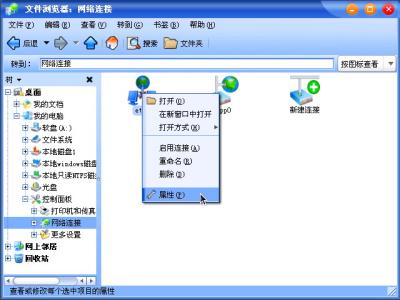 screen.width*0.7) {this.resized=true; this.width=screen.width*0.7; this.alt='Click here to open new window\nCTRL+Mouse wheel to zoom in/out';}
}" border="0" />
screen.width*0.7) {this.resized=true; this.width=screen.width*0.7; this.alt='Click here to open new window\nCTRL+Mouse wheel to zoom in/out';}
}" border="0" />
點擊“屬xxx”後,打開
eth0網卡屬
xxx。
 screen.width*0.7) {this.resized=true; this.width=screen.width*0.7; this.alt='Click here to open new window\nCTRL+Mouse wheel to zoom in/out';}
}" border="0" />
screen.width*0.7) {this.resized=true; this.width=screen.width*0.7; this.alt='Click here to open new window\nCTRL+Mouse wheel to zoom in/out';}
}" border="0" />
上圖可見,DNS服務器地址自動輸入了預設的值。網卡的IP地址、子網掩碼和默認網關地址應該正確輸入。(默認網關地址可在Windows2003/xp下,雙擊係統托盤中的寬帶連接圖標,在彈出的“寬帶連接 狀態”中選擇詳細信息選項卡,裏麵填寫的服務器IP地址即是默認網關地址),IP地址欄輸入169.254.0.1即可,IP地址輸入後點擊子網掩碼欄後它會自動輸入子網掩碼,填完各項信息。
 screen.width*0.7) {this.resized=true; this.width=screen.width*0.7; this.alt='Click here to open new window\nCTRL+Mouse wheel to zoom in/out';}
}" border="0" />
screen.width*0.7) {this.resized=true; this.width=screen.width*0.7; this.alt='Click here to open new window\nCTRL+Mouse wheel to zoom in/out';}
}" border="0" />
點“確定”按鈕後開始
激活網卡.
 screen.width*0.7) {this.resized=true; this.width=screen.width*0.7; this.alt='Click here to open new window\nCTRL+Mouse wheel to zoom in/out';}
}" border="0" />
screen.width*0.7) {this.resized=true; this.width=screen.width*0.7; this.alt='Click here to open new window\nCTRL+Mouse wheel to zoom in/out';}
}" border="0" />
網卡激活
後,正在載入所有設置。
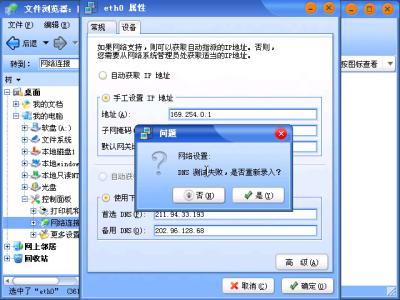 screen.width*0.7) {this.resized=true; this.width=screen.width*0.7; this.alt='Click here to open new window\nCTRL+Mouse wheel to zoom in/out';}
}" border="0" />
screen.width*0.7) {this.resized=true; this.width=screen.width*0.7; this.alt='Click here to open new window\nCTRL+Mouse wheel to zoom in/out';}
}" border="0" />
顯示
DNS服務器連接失敗,原因未知,但輸入的DNS服務器地址是正確的,所以不需要重新錄入,點擊“否”關閉
窗口。
 screen.width*0.7) {this.resized=true; this.width=screen.width*0.7; this.alt='Click here to open new window\nCTRL+Mouse wheel to zoom in/out';}
}" border="0" />
screen.width*0.7) {this.resized=true; this.width=screen.width*0.7; this.alt='Click here to open new window\nCTRL+Mouse wheel to zoom in/out';}
}" border="0" />
eth0設
備(網卡)激活後,eth0設
備圖標的紅色“X”號已經沒有了。
六、連接上網
如果要進行寬帶連接,隻要連接如網線後雙擊寬帶連接圖標ppp0,即可進行連接。
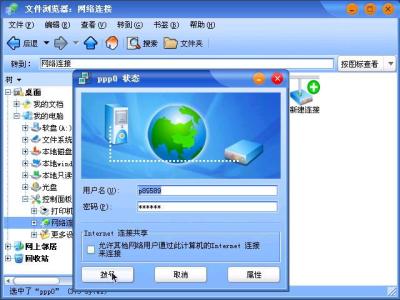 screen.width*0.7) {this.resized=true; this.width=screen.width*0.7; this.alt='Click here to open new window\nCTRL+Mouse wheel to zoom in/out';}
}" border="0" />
screen.width*0.7) {this.resized=true; this.width=screen.width*0.7; this.alt='Click here to open new window\nCTRL+Mouse wheel to zoom in/out';}
}" border="0" />
點擊“拔號”後很快即可連接成功。寬帶連接的另外一種操作方法是,在桌麵上點擊“開始”然後點擊“連接到”,在彈出的菜單中有ppp0寬帶連接快捷方式。
在彈出的菜單中雙擊ppp0也可打開寬帶連接窗口(ppp0狀態窗口)。
 screen.width*0.7) {this.resized=true; this.width=screen.width*0.7; this.alt='Click here to open new window\nCTRL+Mouse wheel to zoom in/out';}
}" border="0" />
screen.width*0.7) {this.resized=true; this.width=screen.width*0.7; this.alt='Click here to open new window\nCTRL+Mouse wheel to zoom in/out';}
}" border="0" />
點擊“拔號”後很快就可連接成功。打開瀏覽器,自動連接到“北京共創開源軟件有限公司”主頁。
 screen.width*0.7) {this.resized=true; this.width=screen.width*0.7; this.alt='Click here to open new window\nCTRL+Mouse wheel to zoom in/out';}
}" border="0" />
screen.width*0.7) {this.resized=true; this.width=screen.width*0.7; this.alt='Click here to open new window\nCTRL+Mouse wheel to zoom in/out';}
}" border="0" />
七、卸載共創桌麵Linux 2005版的方法
進入DOS,在“A:>_”提示符下,輸入“FDISK/MBR”後回車,重寫硬盤的主引導扇區,即可刪除共創桌麵Linux 2005係統的啟動引導菜單,如果你原來是Windows XP與共創桌麵Linux 2005雙係統,重寫硬盤的主引導扇區後再次重啟動電腦時隻有Windows XP的啟動菜單了。
刪除共創桌麵Linux 2005係統的啟動菜單後,再刪除共創桌麵Linux 2005係統文件即可。
OpenDesktop 1.0篇:
前提∶你的光盤能直接啟動,推薦使用光盤啟動安裝,刻錄光盤要特別注意,使用支持64個字母長文件名的刻錄軟件。
一、準備工作:
1.安裝前記下每個分區的大小,便於選擇分區時核對,以免操作錯誤,丟失有用數據。
2.準備OpenDesktop1.0光盤一張。
OpenDesktop-i386-disc.iso官方免費下載地址為∶
/>
/>
前期下載的OpenDesktop-i386-disc.iso有三個問題:
(1).OpenDesktop-fonts-zh_CN-en-minimal-0.1-1_opendesktop_1_0_rc3.noarch.rpm名字被截成OpenDesktop-fonts-zh_CN-en-minimal-0.1-1_opendesktop_1_0_rc3.noa
(2).control-center-2.4.0-3.i386.rpm文件損壞
(3).Omni-0.9.0-4.i386.rpm文件損壞
修改方法:用ultraiso進行編輯,對(1).改名;對(2)和(3)重新從網上下載,並替換這樣就修複了OpenDesktop-i386-disc.iso;
下載地址:
http://rpm.pbone.net/index.php3/stat/4/idpl/843862/com/Omni-0.9.0-4.i386.rpm.html
http://rpm.pbone.net/index.php3/stat/4/idpl/862650/com/control-center-2.4.0-3.i386.rpm.html
3.留一個空分區給OpenDesktop係統安裝用。我留C盤FAT32文件係統,安裝時安裝程序將格式化該分區,,如果有重要數椐請備份。
二、OpenDesktop光盤安裝
將光盤設為第一啟動盤,放入安裝光盤盤,重新啟動電腦,如果你的光盤能自動啟動,將出現如下圖所示的界麵。
screen.width*0.7) {this.resized=true; this.width=screen.width*0.7; this.alt='Click here to open new window\nCTRL+Mouse wheel to zoom in/out';}
}" border="0" />安裝程序正在啟動,接著出現如下圖。
screen.width*0.7) {this.resized=true; this.width=screen.width*0.7; this.alt='Click here to open new window\nCTRL+Mouse wheel to zoom in/out';}
}" border="0" />不用多說,點下一走,出現如下圖。
screen.width*0.7) {this.resized=true; this.width=screen.width*0.7; this.alt='Click here to open new window\nCTRL+Mouse wheel to zoom in/out';}
}" border="0" />這裏要特別注意了,圖中將
列出你硬盤的所有分區列表(
我這裏隻有一個分區),隻細考慮清楚你將用那個分區安裝OpenDesktop,因為該分區將被安裝程序格式化(會有提示),也可勾選“高級分區模式”進行下一步的高級分區設置.用向上或向下箭頭鍵選擇安裝所用的分區後點擊“下一步”按鈕,出現如下圖。
screen.width*0.7) {this.resized=true; this.width=screen.width*0.7; this.alt='Click here to open new window\nCTRL+Mouse wheel to zoom in/out';}
}" border="0" />提示即將刪除選定的分區,因為選定的分區原來是FAT32文件係統格式的所以安裝程序將刪除該分區再創建Linux格式的分區;如果選定的分區原來是Linux格式的,安裝程序將會提示格式該分區;點擊“刪除”按鈕後,出現如下圖。
screen.width*0.7) {this.resized=true; this.width=screen.width*0.7; this.alt='Click here to open new window\nCTRL+Mouse wheel to zoom in/out';}
}" border="0" />安裝向導到止結束,點“下一步”後開始正式安裝,安裝程序不再有上一步,不用考慮了,點“下一步”。
screen.width*0.7) {this.resized=true; this.width=screen.width*0.7; this.alt='Click here to open new window\nCTRL+Mouse wheel to zoom in/out';}
}" border="0" />光驅差一點的經常在這裏死機。
screen.width*0.7) {this.resized=true; this.width=screen.width*0.7; this.alt='Click here to open new window\nCTRL+Mouse wheel to zoom in/out';}
}" border="0" />screen.width*0.7) {this.resized=true; this.width=screen.width*0.7; this.alt='Click here to open new window\nCTRL+Mouse wheel to zoom in/out';}
}" border="0" />screen.width*0.7) {this.resized=true; this.width=screen.width*0.7; this.alt='Click here to open new window\nCTRL+Mouse wheel to zoom in/out';}
}" border="0" />安裝完成後將出現如下圖所示。
screen.width*0.7) {this.resized=true; this.width=screen.width*0.7; this.alt='Click here to open new window\nCTRL+Mouse wheel to zoom in/out';}
}" border="0" />提示取出軟盤或光盤,然後按“下一步”來重新引導係統,點“下一步”後計算機將重新啟動。
screen.width*0.7) {this.resized=true; this.width=screen.width*0.7; this.alt='Click here to open new window\nCTRL+Mouse wheel to zoom in/out';}
}" border="0" />啟動選擇默認是啟動到OpenDesktop,如果你還有其它Windows操作係統,可選DOS項啟動進Windows,接著出現如下圖。
screen.width*0.7) {this.resized=true; this.width=screen.width*0.7; this.alt='Click here to open new window\nCTRL+Mouse wheel to zoom in/out';}
}" border="0" />桂林山水,好畫!
如果從硬盤安裝是看不到這個
畫麵的,在這裏可能進行初始配置,會停留一段時間,接著出現如下圖。
screen.width*0.7) {this.resized=true; this.width=screen.width*0.7; this.alt='Click here to open new window\nCTRL+Mouse wheel to zoom in/out';}
}" border="0" />輸入用戶名,默認的用戶名為root,輸入root回車後出現如下圖。
screen.width*0.7) {this.resized=true; this.width=screen.width*0.7; this.alt='Click here to open new window\nCTRL+Mouse wheel to zoom in/out';}
}" border="0" />默認的高級管理員帳號是沒有密碼的,直接回車即可,回車後出現如下圖。
screen.width*0.7) {this.resized=true; this.width=screen.width*0.7; this.alt='Click here to open new window\nCTRL+Mouse wheel to zoom in/out';}
}" border="0" />如果你的計算機速度較快,上圖幾乎看不清,接著出現桌麵。
screen.width*0.7) {this.resized=true; this.width=screen.width*0.7; this.alt='Click here to open new window\nCTRL+Mouse wheel to zoom in/out';}
}" border="0" />啊!OpenDesktop已成功啟動.
三、功能設置
用慣Windows操作係統的我,剛安裝完OpenDesktop1.0係統時,好象進了一個迷宮,進去後不知係統驅動程序安裝完成未?@床壞狡淥黈indows分區,象陷進了一個深淵;不能上網,迷失方向;不會安裝程序等等;不知這個係統有什麽用。如果你也有這樣的感覺,還請往下看:
1、在OpenDesktop係統顯示其它Windows分區內容∶(Linux開機掛載文件係統)
2、在OpenDesktop1.0建立寬帶ADSL連接的方法
3、修改OpenDesktop的GRUB啟動管理,設成默認啟動Windows
四、卸載OpenDesktop1.0係統的方法∶
進入DOS,在“A:>_”提示符下,輸入“FDISK/MBR”後
回車,重寫硬盤的主引導扇區,即可刪除OpenDesktop1.0係統的啟動菜單,如果你原來是WindowsXP與OpenDesktop1.0雙係統,重寫硬盤的主引導扇區後再次重啟動電腦時隻有WindowsXP的啟動菜單了。
刪除OpenDesktop1.0係統的啟動菜單後,再刪除OpenDesktop1.0係統文件即可
雙擊“網絡連接”選項可打開“網絡連接”窗口(點擊“開始”--“連接到”--顯示所有網絡連接,也可打開這個窗口)。
screen.width*0.7) {this.resized=true; this.width=screen.width*0.7; this.alt='Click here to open new window\nCTRL+Mouse wheel to zoom in/out';}
}" border="0" />上圖
中網卡圖標中有一個紅色的“X”號,表明網卡還沒有激活。旁
邊有一個“新建連接”的快捷方式,雙擊它建立連接。
screen.width*0.7) {this.resized=true; this.width=screen.width*0.7; this.alt='Click here to open new window\nCTRL+Mouse wheel to zoom in/out';}
}" border="0" />選擇“xDSL連接”。
screen.width*0.7) {this.resized=true; this.width=screen.width*0.7; this.alt='Click here to open new window\nCTRL+Mouse wheel to zoom in/out';}
}" border="0" />點擊“前進”按鈕,出現如下圖所示。
screen.width*0.7) {this.resized=true; this.width=screen.width*0.7; this.alt='Click here to open new window\nCTRL+Mouse wheel to zoom in/out';}
}" border="0" />輸入各項信息後點“前進”按鈕,出現如下圖所示。
screen.width*0.7) {this.resized=true; this.width=screen.width*0.7; this.alt='Click here to open new window\nCTRL+Mouse wheel to zoom in/out';}
}" border="0" />確認無誤後,點擊“應用”按鈕就OK!
screen.width*0.7) {this.resized=true; this.width=screen.width*0.7; this.alt='Click here to open new window\nCTRL+Mouse wheel to zoom in/out';}
}" border="0" />上圖可見寬帶連接(ppp0)已在“網絡連接”窗口中出現。
五、激活網絡設備
寬帶連接(ppp0)已在“網絡連接”窗口中出現,可是它還沒有激活。剛建立寬帶連接時,(寬帶連接)ppp0屬xxx窗口自動打開了,如下圖(如不能自動打開ppp0屬xxx窗口,可右鍵點擊它然後點擊屬xxx即可打開)。
screen.width*0.7) {this.resized=true; this.width=screen.width*0.7; this.alt='Click here to open new window\nCTRL+Mouse wheel to zoom in/out';}
}" border="0" />我所用的ADSL連接不是固定IP地址的,所以選“自動獲取IP地址”;DNS名稱
解析服務器地址如果知道就一定要填寫了(DNS地址,大家可以從windows中的撥號軟件中獲得,如在98/Me/2000中安裝EnterNet300,連接上網後,點擊其登陸網絡後右下角的圖標,從“詳細”按鈕中看登陸信息即可,實在不行打個客服電話),我用佛山聯通的DNS服務器;輸入
完成後如下圖所示。
screen.width*0.7) {this.resized=true; this.width=screen.width*0.7; this.alt='Click here to open new window\nCTRL+Mouse wheel to zoom in/out';}
}" border="0" />如果要在每次啟動後自動激活這個設備,可點擊“高級”按鈕,在彈出的窗口中勾選“啟動時自動激活該設備”,這樣每次啟動後就自動連接了。
點“確定”後出現如下圖所示。
screen.width*0.7) {this.resized=true; this.width=screen.width*0.7; this.alt='Click here to open new window\nCTRL+Mouse wheel to zoom in/out';}
}" border="0" />正想激活連接,點“是”按鈕後,開始解除設備,接著激活。
screen.width*0.7) {this.resized=true; this.width=screen.width*0.7; this.alt='Click here to open new window\nCTRL+Mouse wheel to zoom in/out';}
}" border="0" />ppp0寬帶連接激活後顯示如下圖。
screen.width*0.7) {this.resized=true; this.width=screen.width*0.7; this.alt='Click here to open new window\nCTRL+Mouse wheel to zoom in/out';}
}" border="0" />ppp0寬帶連接激活後,ppp0圖標的紅色“X”號已經沒有了。接下來還要
激活eth0網卡這個設備後才能連接上網。
右鍵點擊“eth0”在彈出的下拉菜單中指向“屬xxx”。
screen.width*0.7) {this.resized=true; this.width=screen.width*0.7; this.alt='Click here to open new window\nCTRL+Mouse wheel to zoom in/out';}
}" border="0" />點擊“屬xxx”後,打開
eth0網卡屬
xxx。
screen.width*0.7) {this.resized=true; this.width=screen.width*0.7; this.alt='Click here to open new window\nCTRL+Mouse wheel to zoom in/out';}
}" border="0" />上圖可見,DNS服務器地址自動輸入了預設的值。網卡的IP地址、子網掩碼和默認網關地址應該正確輸入。(默認網關地址可在Windows2003/xp下,雙擊係統托盤中的寬帶連接圖標,在彈出的“寬帶連接 狀態”中選擇詳細信息選項卡,裏麵填寫的服務器IP地址即是默認網關地址),IP地址欄輸入169.254.0.1即可,IP地址輸入後點擊子網掩碼欄後它會自動輸入子網掩碼,填完各項信息。
screen.width*0.7) {this.resized=true; this.width=screen.width*0.7; this.alt='Click here to open new window\nCTRL+Mouse wheel to zoom in/out';}
}" border="0" />screen.width*0.7) {this.resized=true; this.width=screen.width*0.7; this.alt='Click here to open new window\nCTRL+Mouse wheel to zoom in/out';}
}" border="0" />點“確定”按鈕後開始
激活網卡.
screen.width*0.7) {this.resized=true; this.width=screen.width*0.7; this.alt='Click here to open new window\nCTRL+Mouse wheel to zoom in/out';}
}" border="0" />screen.width*0.7) {this.resized=true; this.width=screen.width*0.7; this.alt='Click here to open new window\nCTRL+Mouse wheel to zoom in/out';}
}" border="0" />網卡激活
後,正在載入所有設置。
screen.width*0.7) {this.resized=true; this.width=screen.width*0.7; this.alt='Click here to open new window\nCTRL+Mouse wheel to zoom in/out';}
}" border="0" />顯示
DNS服務器連接失敗,原因未知,但輸入的DNS服務器地址是正確的,所以不需要重新錄入,點擊“否”關閉
窗口。
screen.width*0.7) {this.resized=true; this.width=screen.width*0.7; this.alt='Click here to open new window\nCTRL+Mouse wheel to zoom in/out';}
}" border="0" />eth0設
備(網卡)激活後,eth0設
備圖標的紅色“X”號已經沒有了。
六、連接上網
如果要進行寬帶連接,隻要連接如網線後雙擊寬帶連接圖標ppp0,即可進行連接。
screen.width*0.7) {this.resized=true; this.width=screen.width*0.7; this.alt='Click here to open new window\nCTRL+Mouse wheel to zoom in/out';}
}" border="0" />點擊“拔號”後很快即可連接成功。寬帶連接的另外一種操作方法是,在桌麵上點擊“開始”然後點擊“連接到”,在彈出的菜單中有ppp0寬帶連接快捷方式。
在彈出的菜單中雙擊ppp0也可打開寬帶連接窗口(ppp0狀態窗口)。
screen.width*0.7) {this.resized=true; this.width=screen.width*0.7; this.alt='Click here to open new window\nCTRL+Mouse wheel to zoom in/out';}
}" border="0" />點擊“拔號”後很快就可連接成功。打開瀏覽器,自動連接到“北京共創開源軟件有限公司”主頁。
screen.width*0.7) {this.resized=true; this.width=screen.width*0.7; this.alt='Click here to open new window\nCTRL+Mouse wheel to zoom in/out';}
}" border="0" />七、卸載共創桌麵Linux 2005版的方法
進入DOS,在“A:>_”提示符下,輸入“FDISK/MBR”後回車,重寫硬盤的主引導扇區,即可刪除共創桌麵Linux 2005係統的啟動引導菜單,如果你原來是Windows XP與共創桌麵Linux 2005雙係統,重寫硬盤的主引導扇區後再次重啟動電腦時隻有Windows XP的啟動菜單了。
刪除共創桌麵Linux 2005係統的啟動菜單後,再刪除共創桌麵Linux 2005係統文件即可。